- Get started Get started for free
Figma design
Design and prototype in one place
Collaborate with a digital whiteboard
Translate designs into code
Get the desktop, mobile, and font installer apps
See the latest features and releases
- Prototyping
- Design systems
- Wireframing
- Online whiteboard
- Team meetings
- Strategic planning
- Brainstorming
- Diagramming
- Product development
- Web development
- Design handoff
- Product managers
Organizations
Config 2024
Register to attend in person or online — June 26–27
Creator fund
Build and sell what you love
User groups
Join a local Friends of Figma group
Learn best practices at virtual events
Customer stories
Read about leading product teams
Stories about bringing new ideas to life
Get started
- Developer docs
- Best practices
- Reports & insights
- Resource library
- Help center

How to create an effective user journey map

No matter what you’re working on, the key to customer satisfaction and business growth is understanding your users. A user journey map helps you uncover pain points, explore the touchpoints from their perspective, and learn how to improve your product.
Imagine you just launched a new ecommerce platform. Shoppers fill their carts with products, but they abandon their carts before checkout. With a user journey map, you can pinpoint where the customer experience is going wrong, and how to enable more successful checkouts.
Read on to find out:
- What is a user journey map, and how it captures user flows and customer touchpoints
- Benefits of user journey mapping to refine UX design and reach business goals
- How to make user journey maps in five steps, using FigJam’s user journey map template
What is a user journey map?
Think about the path a user takes to explore your product or website. How would you design the best way to get there? User journey maps (or user experience maps) help team members and stakeholders align on user needs throughout the design process, starting with user research. As you trace users' steps through your user flows, notice: Where do users get lost, backtrack, or drop off?
User journey maps help you flag pain points and churn, so your team can see where the user experience may be confusing or frustrating for your audience. Then you can use your map to identify key customer touchpoints and find opportunities for optimization.
How to read a user journey map
Most user journey maps are flowcharts or grids showing the user experience from end to end. Consider this real-life journey map example of a freelancing app from Figma's design community. The journey starts with a buyer persona needing freelance services, and a freelancer looking for a gig. Ideally, the journey ends with service delivery and payment—but customer pain points could interrupt the flow.
Start your user journey map with FigJam
5 key user journey map phases.
Take a look at another Figma community user journey template , which uses a simple grid. Columns capture the five key stages of the user journey: awareness, consideration, decision, purchase, and retention (see below). Rows show customer experiences across these stages—their thoughts, feelings, and pain points. These experiences are rated as good, neutral, and bad.
To see how this works, consider a practical example. Suppose a new pet parent wants to learn how to train their puppy and discovers your dog-training app. Here's how you might map out the five key user journey stages:
- Awareness. The user sees a puppy-training video on social media with a link to your product website. They're intrigued—a positive experience.
- Consideration. The user visits your product website to preview your app. If they can't find a video preview easily, this could be a neutral or negative experience.
- Decision. The user clicks on a link to the app store and reads reviews of your app and compares it to others. They might think your app reviews are good, but your price is high—a negative or neutral experience.
- Purchase. The user buys your app and completes the onboarding process. If this process is smooth, it's a positive experience. If not, the customer experience could turn negative at this point.
- Retention. The user receives follow-up emails featuring premium puppy-training services or special offers. Depending on their perception of these emails, the experience can range from good (helpful support) to bad (too much spam).
2 types of user journey maps—and when to use them
User journey maps are helpful across the product design and development process, especially at two crucial moments: during product development and for UX troubleshooting. These scenarios call for different user journey maps: current-state and future-state.
Current-state user journey maps
A current-state user journey map shows existing customer interactions with your product. It gives you a snapshot of what's happening, and pinpoints how to enhance the user experience.
Take the puppy training app, for example. A current-state customer journey map might reveal that users are abandoning their shopping carts before making in-app purchases. Look at it from your customers' point of view: Maybe they aren't convinced their credit cards will be secure or the shipping address workflow takes too long. These pain points show where you might tweak functionality to boost user experience and build customer loyalty.
Future-state user journey maps
A future-state user journey map is like a vision board : it shows the ideal customer journey, supported by exceptional customer experiences. Sketch out your best guesses about user behavior on an ideal journey, then put them to the test with usability testing. Once you've identified your north star, you can explore new product or site features that will optimize user experience.
How to make a user journey map in 5 steps
To start user journey mapping, follow this step-by-step guide.
Step 1: Define user personas and goals.
Gather user research and data like demographics, psychographics, and shopping behavior to create detailed customer personas representing your target audience. In your dog-training app example, one key demographic may be parents. What’s their goal? It isn't necessarily "hire a puppy trainer"—it could be "teach kids how to interact with a puppy."
Step 2: Identify customer touch points.
Locate the points along the user journey where the user encounters or interacts with your product. In the dog training app example, touchpoints might include social media videos, app website, app store category search (e.g., pets), app reviews, app store checkout, in-app onboarding, and app customer support.
Step 3: Visualize journey phases.
Create a visual representation of user journey phases across key touchpoints with user flow diagrams , flowcharts , or storyboards .
Step 4: Capture user actions and responses.
For each journey stage, capture the user story: at this juncture, what are they doing, thinking, and feeling ? This could be simple, such as: "Potential customer feels frustrated when the product image takes too long to load."
Step 5: Validate and iterate.
Finally, show your map to real users. Get honest feedback about what works and what doesn’t with user testing , website metrics , or surveys . To use the dog-training app example, you might ask users: Are they interested in subscribing to premium how-to video content by a professional dog trainer? Apply user feedback to refine your map and ensure it reflects customer needs.
Jumpstart your user journey map with FigJam
Lead your team's user journey mapping effort with FigJam, the online collaborative whiteboard for brainstorming, designing, and idea-sharing. Choose a user journey map template from Figma's design community as your guide. With Figma's drag-and-drop design features, you can quickly produce your own professional, presentation-ready user journey map.
Pro tip: Use a service blueprint template to capture behind-the-scenes processes that support the user journey, bridging the gap between user experience and service delivery.
Ready to improve UX with user journey mapping?
Skip navigation
- Log in to UX Certification
World Leaders in Research-Based User Experience
Getting started with journey mapping: 27 tips from practitioners.

March 7, 2021 2021-03-07
- Email article
- Share on LinkedIn
- Share on Twitter
Journey maps visualize the process that a user goes through to accomplish a goal. They provide a holistic view of the customer experience , highlighting both positive and negative moments from the user’s point-of-view.
Leading a journey-mapping initiative is no small challenge. It takes product knowledge and research savvy, along with project- and stakeholder-management skills. To learn about journey mapping in practice, we surveyed more than 300 UX professionals on their journey-mapping experiences. Within that group, 206 respondents shared advice for people creating a journey map for the first time. In this article, we’ve consolidated the advice into 27 tips relevant not only to those getting started with journey mapping, but to all practitioners who want to learn from their peers’ knowledge. We grouped these into 6 categories: learning about journey mapping, defining goals, gathering and conducting research, collaborating on the map, visualizing and communicating the journey, and bonus words of encouragement.
In This Article:
getting started with journey mapping, defining goals, team, and scope, gathering and conducting research, collaborating on the map, visualizing and communicating the journey, final thoughts and words of encouragement.
- Educate yourself on journey-mapping fundamentals . Learning the basics can save you time in the long run because you’ll learn about common faults and pain points to avoid. One participant advises, “Educate yourself on various approaches, methods, and templates in order to make the right choices for your project.” If you’re looking to get started, we’ve published extensive content on customer journeys and even facilitate a course on creating and using customer-journey maps .
- Practice in a low-stakes environment . Once you understand the fundamentals, find ways to practice your approach and learn from your experience. One respondent recommended creating a journey map for something personally familiar, such as a recent, memorable experience. They wrote, “try it out on yourself and something you do and are familiar with.” For example, you might create a journey map documenting your journey to set up a new smart-home device.
- Research existing industry journey maps for inspiration . Search for case studies and artifacts relevant to your context. A quick search can return valuable examples that may inform project planning, communication, and scope or help you learn about communication formats that will work for your context.
- Set expectations for how the map will be used before starting. As you create a team and build buy-in, set clear expectations for the outcome. Journey maps are not created solely for visualizing the experience; they’re intended to help evaluate and improve it. One respondent commented, “Don’t expect it to solve everything. It’s one tool in a sea of many […] It’s up to you to use it to inform decision making.” As you sell journey mapping to your stakeholders, highlight the evaluative benefits, not just the visualization benefits.
- Spend time defining the objectives . Why are you creating a journey map and what do you hope to get out of it? Your goals should be clear and well documented. Share these goals with your stakeholders so you’re all on the same page. A participant notes, “make sure to outline the purpose of the journey map” while another respondent wrote, “define what is the question you need to answer.”
- Start with a small, focused scope . We recommend starting with a focused journey with known pain points and feasible quick wins that the team has authority to change. One participant commented, “Pick a very small project with easy to achieve, low-hanging–fruit outcomes.” With a small, focused scope, it’s likely that pain points uncovered during the initiative will be addressed.
- Accept that you can’t (and shouldn’t) map everything . Journey mapping is a great tool, but you can’t map everything at once. It wouldn’t be a good use of your time. You’d end up spending more time visualizing the pain points than solving them. Relatedly, one participant advises “Start small and scale. Accept that you don't map or `save’ everything.” Prioritize journeys with a significant impact on your experience so you can work on improving high-impact pain points.
- Involve a crossfunctional team . When deciding whom to involve in the initiative, consider the stakeholders or departments that play a role in the experience of the journey to be mapped. Crossfunctional journey-mapping teams often include people from engineering, marketing, sales, and customer support. As one respondent put it, “Do not make it alone. Speak to people who make the journey. Involve people who have to do something with the results.”
- Build a team of influencers and knowledge holders . One respondent said, “Figure out who has sway and influence and include them at early stages of this process!” Your core team should include well-respected influencers who can increase the visibility and positive perception of the initiative and knowledge holders with direct knowledge of the experience being mapped.
- Keep your stakeholders engaged. As one participant recommends, “share progress early and often.” Stay connected with stakeholders by involving them in relevant conversations and activities like research studies and workshops.
- Iterate and don't let perfectionism drag you down . This is an iterative process, so adapt and iterate your map as needed. One survey respondent said, “start small and understand you will make many revisions. Don't try to get it perfect the first time.”
- Focus on action and outcomes . As one participant said, “Have a plan for what you are going to do with the information to make it actionable. It doesn’t do any good to hang the map above the copy machine and expect everyone to know how that impacts their job/function.” In other words, the goal isn’t just creating the artifact, but acting on findings to improve the experience.
- Document assumptions and use them to argue for new research . Don’t let lack of buy-in for initial research derail your mapping goals. One respondent recommended, “start[ing] with assumptions if you can't get user interviews so that you can communicate the need for research.” Starting your mapping process by asking stakeholders to share already known insights or hypotheses can reveal gaps that require additional research. Another participant recommended that practitioners “start by mapping quickly the existing experience based on internal team feedback” before following up with additional user research.
- Know your users and your product. Journey maps require real user data to be effective. As one participant wrote, “Understand the user as well as the problem before you start solutioning.” A basic map with the right insights is better than an extensive map based on assumptions.
- Use mixed methods to understand the full picture. The best research methods for journey mapping are qualitative methods. Even small-sample qualitative studies can give profound insights into what users do, think, and feel throughout a journey. Quantitative methods (e.g., analytics ) can be used as a second step to show the scale of key insights or add additional evidence for your recommendations. On this subject, a respondent commented, “start rough and use qualitative methods to go deeper. Put steps into perspective by adding quantitative metrics.”
- Make the process collaborative . There are immense benefits to creating journey maps collaboratively in a workshop environment. This approach takes considerable coordination and planning, so communicate expectations to management early on and explain why you need help. One participant recommends, “start with a simple 1-hour workshop with the most important internal resources and keep the map low fidelity on paper or a whiteboard.” Workshops involve everyone in the process and create buy-in.
- Asynchronous collaboration is better than no collaboration . This type of collaboration allows people to contribute to your map when it’s convenient for them to do so. For one method of doing this, a participant recommends, “Start a spreadsheet and find an ally who can help fill it in.” If getting everyone together for a workshop isn’t possible, this option might work for you: consider using the template we published for remote journey mapping .
- Involve end users in the process . Creating a journey map with an end user saves time without sacrificing insights. For example, you could have participants document their experience using sticky notes (or a digital equivalent) to create a quick, low-fidelity journey map. After the session, these artifacts can be refined and added to data from other sources. Such participatory-design sessions are especially useful for complex domain-specific workflows .
- Start low fidelity. Journey mapping is an iterative process, so don’t expect to create a high-fidelity map early on in the process. One respondent suggested: “Lay it out on a wall or huge piece of paper using sticky notes. That makes it easy to re-think, re-do, and move things around.” Whether you’re working in person or remote ly, use materials and tools that support iterating and moving things around.
- Use a template . Multiple participants recommended using a template to save time when creating the artifact, saying things like “use a baseline template to get started.” Journey maps don’t have to be works of art; often a simple spreadsheet template can be incredibly useful for tight timelines or iterative work. When selecting a template, be mindful of format and the potential bias certain tools may introduce — people unfamiliar with a tool will be unlikely to contribute.
- Keep it simple . The idea of focusing the artifact was mentioned by several respondents. Aim to provide a clear overview of key moments within the journey, rather than documenting every discrete interaction. As one participant put it, “It’s really easy to go down a rabbit hole and get stuck in the weeds.” Instead of attempting to record all the potential interactions and overlapping journeys, try to focus on one path at a time. Keep the conversation — and your recommendations — focused on the main journey being evaluated.
- Prioritize content over graphics . Polished graphic design is not the main focus of your journey map. One participant wrote, “ignore the fancy versions you see online, the content is core, not the graphics.” Yes, good visual design is important in that it assists the reader in consuming the content, but the content in the map should be the priority. Before jumping to complex visual tools, get your content ready and validated in an easy-to-edit, accessible format.
- Provide recommendations . Don’t just point out what’s wrong with the experience; provide some insight! As one participant put it, “Find the pain and the gain.” Another described: “[The map] is a communication tool…for you to create and finetune your experience,” not just an exhaustive log of problems to be addressed.
- Pilot your journey map . Before presenting your map, ask a colleague or team member to view and explain key takeaways from the artifact. One participant wrote, “Ask a colleague or team member to have a pre-client/stakeholder demo so you can work out as many kinks as possible.” This type of exercise will help reveal points of confusion ahead of time. For example, if there are certain terms or icons used that people don’t understand, you have an opportunity to change them or remove them before sharing the artifact widely.
- Optimize your presentation for the audience . One participant recommends, “make two versions —[a] detailed one for [the] design team and [a] simple one for management.” Don’t be afraid to create custom versions for specific audiences, to highlight insights that are relevant for that group. This approach will result in a compelling presentation tailored for your audience.
- Be patient and persistent. Initiatives like this require a team effort. Be patient with competing motives and persistent about evaluating and improving the experience. Journey mapping requires substantial effort, but as one participant said, “[It’s] worth the effort, and you'll get better with each one you do.” Stay motivated and home in on the outcomes.
- “Do the best you can with the tools and buy-in you have,” a great closing thought from one respondent. Your first-time journey mapping might not be perfect, but it will be a valuable learning experience. Apply your learnings over subsequent mapping initiatives to improve and perfect your craft.
Journey mapping is not new, and many teams have struggled, stumbled, succeeded, and sometimes even failed at it. No single case study can tell you what to do in your specific situation, which is why we research best practices across hundreds of UX projects. This distillation of lessons learned by many teams will position your mapping initiative for success.
Learn more in our full day course, Journey Mapping to Understand Customer Needs .
Related Courses
Discovery: building the right thing.
Conduct successful discovery phases to ensure you build the best solution
Effective Ideation Techniques for UX Design
Systematic methods for creative solutions to any UX design or redesign challenge
Interaction
Personas: Turn User Data Into User-Centered Design
Successfully turn user data into user interfaces. Learn how to create, maintain and utilize personas throughout the UX design process.
Related Topics
- Customer Journeys Customer Journeys
- Design Process
Learn More:

Journey Management vs. Service Design
Kim Salazar · 4 min

Types of User Pain Points
Sarah Gibbons · 4 min

What Is Journey Management?
Kim Salazar · 3 min
Related Articles:
A Guide to Service-Blueprinting Workshops
Alita Joyce · 8 min
Journey-Mapping Approaches: 2 Critical Decisions To Make Before You Begin
Kate Kaplan · 8 min
Journey Mapping: 9 Frequently Asked Questions
Alita Joyce and Kate Kaplan · 7 min
How to Run a Journey-Mapping Workshop: A Step-by-Step Case Study
Kate Kaplan · 10 min
7 Ways to Analyze a Customer-Journey Map
Kim Salazar · 7 min
Refine, Remodel, Rebuild: 3 Strategies for Experience Improvement
16 MIN READ
SHARE THIS POST
Product best practices
- Product Management
- UX research
User Journey Map Guide with Examples & FREE Templates
11 May, 2023

Senior UX Researcher

Customer journey mapping is also a popular workshop task to align user understanding within teams. If backed up by user data and research, they can be a high-level inventory that helps discover strategic oversights, knowledge gaps, and future opportunities.
Yet, if you ask two different people, you will likely get at least three different opinions as to what a user journey looks like and whether it is worth the hassle. Read on if you want to understand whether a UX journey map is what you currently need and how to create one.
You can get the templates here:

Click here to download a high-resolution PDF of this template.
What is user journey mapping?
Imagine your product is a supermarket and your user is the person wanting to refill their fridge. They need to:
Decide what to buy, and in what supermarket will they be able to find and afford it
Remember to bring their coupons
Park there
Find everything
Save the new coupons for the next shopping trip
Recommendation: Improve your skills
If you want to learn more about user journey analytics, we recommend enrolling in our course "Mastering Mobile App Product Management" for free.
Unlock the secrets of user-centric design with our course. Gain practical skills in identifying user needs and crafting engaging, intuitive UX designs. Our modules, including "How to Map Out Your Discovery" and "User Research for Mobile Apps," ensure you create visually stunning and highly functional user experiences.
Mobile App Product Management Certification
- Upskill for free
- Career growth
- Expert Instructors
- Practical Insights

Three ways to understand customer journey maps
Now, there are at least three ways to look at the customer journey.
1. Workflow maps for usability optimization
Some imagine a user journey map as a wireframe or detailed analysis of specific flows in their app . This could be, for example, a sign-up flow or the flow for inviting others to a document. In our supermarket example, it’s a closer look at what they do inside your supermarket, maybe even only in the frozen section. Or you could define what you want them to do in the frozen aisle.
.css-61w915{margin-right:8px;margin-top:8px;max-height:30px;}@media screen and (min-width: 768px){.css-61w915{margin-right:38px;max-height:unset;}} The focus here is on getting the details of the execution right, not how it fits into the bigger picture of what the user needs.
It is more or less a wireframe from a user perspective. Such a product-focused understanding is not what we want to discuss in this article, though many examples for the best user journey maps you might come across are exactly this. There are good reasons to do such an analysis as well, since it helps you smooth out usability for the people who have already found their way into your supermarket because of your excellent ice cream selection. Workflow maps won’t help you notice that your lack of parking spots is one of the reasons why you are missing out on potential customers in the first place. By only looking at what they do inside the supermarket, you might also miss out on an opportunity for user retention: You could help them get their ice cream home before it melts.
2. Holistic user journey maps for strategic insights
With a more holistic view of what people experience when trying to achieve a goal, product makers gain strategic insights on how their product fits into the big picture and what could be in the future. Because this journey document covers so much ground, it is usually a linear simplification of what all the steps would look like if they were completed. Going back to our supermarket example, it would start from the moment the person starts planning to fill the fridge and ends when the fridge is full again — even if the supermarket building is only relevant in a few phases of this journey. Creating this version of a user journey map requires quite some time and research effort. But it can be an invaluable tool for product and business strategy. It is an inventory of user needs that can help you discover knowledge gaps and future opportunities. Service blueprints are the most comprehensive version of a user journey map since they also lay out the behind-the-scenes of a service, usually called backstage. In our supermarket example, that could be:
the advertising efforts
logistics required to keep all shelves stocked
protocols the staffers follow when communicating with customers
3. Journey mapping workshops as an alignment method
In a user journey mapping workshop, stakeholders and team members share their knowledge and assumptions about the users. Some of these assumptions might need to be challenged — which is part of the process. The goal is not the perfect output, but rather to get everyone into one room and work out a common understanding of the users they are building products for. It forces everyone to organize their thoughts, spell out what they know and assumed was common knowledge — and ideally meet real users as part of the workshop. If done right, this establishes a more comprehensive understanding of what users go through and helps overcome the very superficial ideas one might have about the lives and needs of people outside their own social bubble.
Hence, such a workshop helps create aha moments and gives the consequences of great and poor product decisions a face. So at the end of the day, it is one of many methods to evangelize user-centricity in an organization.
What are the benefits of user experience (UX) mapping?
We already discussed the benefits and shortcomings of workflow maps, but what are the reasons you should consider a UX journey map and/or a journey mapping workshop ?
1. Switching perspectives
Empathy: Like any other UX method and user research output, user journey maps are supposed to foster empathy and help product makers put themselves into the shoes of a user. Awareness: It creates awareness of why users do all the things they do. And it challenges product makers to resist the temptation of building something because it’s feasible, not because it’s needed that way.
2. Aligned understanding
Given the team is involved in creating the user experience map (either as a workshop, in expert interviews, observing the user research, or at least as a results presentation), it forces a conversation and offers a shared mental model and terminology — the foundation for a shared vision.
3. Seeing the big picture
Imagine the vastly different perceptions Sales reps, Customer Support teams, C-level, and backend engineers might have since they all meet very different segments at very different stages of their journey. Day-to-day, it makes sense to be an expert in the stages of a user journey you are responsible for. A journey map helps to step back from this and see the bigger picture, where your work fits in, and where assumptions about the majority of users were wrong. It might even help define KPIs across teams that don’t cancel each other out.
4. Uncovering blind spots and opportunities
A user journey map gives you a structured and comprehensive overview of which user needs are already tackled by your product and which ones are either underserved or solved with other tools and touchpoints. Which moments of truth do not get enough attention yet? These are the opportunities and blind spots you can work on in the future.
When is customer journey mapping just a waste of time?
In all honesty, there are also moments when creating a user journey map or running a journey mapping workshop is destined to fail and should better be put on hold. It’s a lot of work, so don’t let this energy go to waste. User journey maps only make sense when there is an intention to collaboratively work on and with them. Here are some of the scenarios and indicators that it’s the wrong moment for a journey map:
No buy-in for the workshop: The requirements of a successful journey workshop are not met, e.g., there is not enough time (60 minutes over lunch won’t do the trick), only a few team members are willing to attend, and/or key stakeholders refuse to have their assumptions challenged.
Isolated creation: The whole creation process of the user journey map happens isolated from the team, e.g., it is outsourced to an agency or an intern. Nobody from the team observes or runs the user research, or is consulted for input or feedback on the first drafts. There is no event or presentation planned that walks the team through the output. Finally, a very detailed, 10-foot-long poster appears in a hallway, and none of the team members ever find time to read, process, or discuss it with each other.
UX theater: For one reason or another, there is no time/resources allocated to user research or reviewing existing insights whilst creating the map (usability tests with non-users do not count in this case, though). Such an approach, also known as, can do more harm than good since the resulting user journey may only reinforce wrong assumptions and wishful thinking about your users.
Unclear objectives: The user journey map is only created because it is on your UX design checklist, but the purpose is unclear. If you are unsure what you or your stakeholders want to achieve with this journey map, clarify expectations and desired output before investing more energy into this. E.g., there is a chance you were only meant to do a usability review of a bumpy app workflow.
The good news is: UX maturity in an organization can change rapidly, so even if you run into one of the obstacles above, it is worth revisiting the idea in the future. Once you’re good to go, you can get started with the user journey map examples and templates below.
User journey mapping: examples, templates & tools
There is more than one way to do it right and design a great user journey map. Every organization and industry has its own templates, tools and approaches to what elements are most important to them. The following examples and template will give you an idea of what a user journey map can look like if you decide to create one yourself. Make it your own, and change up the sections and design so they make sense for your product and use cases.
User journey map template and checklist
To give you a first orientation, you can use this user journey template and check the two fictional examples below to see how you could adapt it for two very different industries: instant meal delivery and healthcare.
Click here to download a high-resolution PDF of the user journey map template.
While there is no official standard, most other user journey maps contain the following elements or variations of them:
Key phases (or ‘stages’) start when users become aware of a problem they need to solve or a goal they want to achieve and may end when they evaluate whether they achieved their goal or enter a maintenance phase. E.g., user journeys for e-commerce could be structured along the classic funnel of:
Consideration
Delivery & use
Loyalty & advocacy
2. Jobs to be done
Whilst some other user journey templates might call this section ‘steps’ or ‘tasks’, it can be very beneficial to structure the stages into ‘jobs to be done’ (JTBD) instead. This framework helps you distinguish better between the actual goal of a user vs. the tasks required to get there . For example, safe online payments are never a goal of a user, this is just one of many jobs on the long way to get new sneakers on their feet. Ideally, users ‘hire’ your product/service to assist them with some of the JTBD on their journey. Phrase your JTBD as verb + object + context . Examples:
Install app on phone
Tip delivery driver
Buy new shoes
Naturally, the stages closest to your current (and future) solution require a more detailed understanding, so you might want to investigate and document deeper what JTBDs happen there.
3. Needs and pains
Users have needs and pains every step along the journey. Use this section to collect the most important needs and potential pains, even if not all apply in all cases. Ask:
What are the repeating themes, even the ones you are (currently) not able to solve with your product?
Phrase pains and needs as I- or me-statements from the user perspective, e.g., ‘I forgot my login details, ‘I am afraid to embarrass myself’ or ‘My day is too busy to wait for a delivery.’
Which are the pains and needs that are so severe that, if not solved, they can become real deal-breakers for your product or service?
On the last point, such deal-breaker and dealmaker situations, or ‘ moments of truth ’, require particular attention in your product decisions and could be visually highlighted in your journey. In a meal delivery, the taste and temperature of the food are such a moment of truth that can spoil the whole experience with your otherwise fantastic service.
4. Emotional curve
An emotional curve visualizes how happy or frustrated users are at certain stages of their journey. Emojis are commonly used to make it easy to understand and empathize with the emotional state of the user across the whole journey. It can be a surprising realization that users are not delighted with your witty microcopy, but you already did a great job by not annoying them. It is also a good reminder that what might personally excite you is perceived as stressful or overwhelming by most other users. Strong user quotes can be used for illustration.
5. Brand and product touchpoints
Here, you can list current and planned touchpoints with your brand and product, as well as. Whilst the touchpoints when using your product might be obvious, others early and late in the journey are probably less obvious to you but critical for the user experience and decision to use or return to your product. This is why it is worthwhile to include them in your map. Make sure your journey does not get outdated too soon, and don’t list one-off marketing campaigns or very detailed aspects of current workflows — just what you got in general so there is no major revision needed for a couple of years.
6. Other tools and touchpoints
This may seem the least interesting aspect of your journey or a user interview, but it can tell you a lot about blind spots in your service or potential partnerships or APIs to extend your service. E.g., Google Maps or WhatsApp are common workaround tools for missing or poor in-app solutions.
User journey map example 1: health industry
The following example is for a fictional platform listing therapists for people in need of mental health support, helping them find, contact, schedule, and pay for therapy sessions. As you can see, the very long journey with recurring steps (repeated therapy sessions) is cut short to avoid repetition.
At the same time, it generalizes very individual mental health experiences into a tangible summary. While it is fair to assume that the key phases happen in this chronological order, JTBD, timing, and the number of sessions are kept open so that it works for different types of patients.
You can also see how the journey covers several phases when the platform is not in active use. Yet, these phases are milestones in the patient’s road to recovery. Looking at a journey like this, you could, for example, realize that a ‘graduation’ feature could be beneficial for your users, even if it means they will stop using your platform because they are feeling better.
This user journey map is fictional but oriented on Johanne Miller’s UX case study Designing a mental healthcare platform .
User journey map example 2: delivery services
What the example above does not cover is the role of the therapist on the platform — most likely they are a second user type that has very different needs for the way they use the platform. This is why the second example shows the two parallel journeys of two different user roles and how they interact with each other.
Nowadays, internal staff such as delivery drivers have dedicated apps and ideally have a designated UX team looking out for their needs, too. Creating a frictionless and respectful user experience for ‘internal users’ is just as critical for the success of a business as it is to please customers.

User journey map example: meal delivery. Please note that this fictional journey map is just an example for illustrative purposes and has not been backed up with user research.
For more inspiration, you can find collections with more real-life user journey examples and customer journey maps on UXeria , eleken.co & userinterviews.com , or check out free templates provided by the design tools listed below.
Free UX journey mapping tools with templates
No matter whether you’re a design buff or feel more comfortable in spreadsheets, there are many templates available for free(mium) tools you might be already using.
For example, there are good templates and tutorials available for Canva , Miro and even Google Sheets . If you are more comfortable with regular design software, you can use the templates available for Sketch or one of these two from the Figma (template 1 , template 2 ) community. There are also several dedicated journey map tools with free licenses or free trials, e.g., FlowMapp , Lucidchart and UXPressia , just to name a few.
Be aware that the first draft will require a lot of rearrangement and fiddling until you get to the final version. So it might help to pick where this feels easy for you.
How do I collect data for my app user journey?
User journey maps need to be rooted in reality and based on what users really need and do (not what we wish they did) to add value to the product and business strategy. Hence, user insights are an inevitable step in the creation process.
However, it’s a huge pile of information that needs to be puzzled together and usually, one source of information is not enough to cover the whole experience — every research method has its own blind spots. But if you combine at least two or three of the approaches below, you can create a solid app user journey .
1. In-house expertise
The people working for and with your users are an incredible source of knowledge to start and finalize the journey. Whilst there might be a few overly optimistic or biased assumptions you need to set straight with your additional research, a user journey mapping workshop and/or expert interviews involving colleagues from very different (user-facing) teams such as:
customer service
business intelligence
customer insights
will help you collect a lot of insights and feedback. You can use these methods to build a preliminary skeleton for your journey but also to finalize the journey with their input and feedback.
2. Desk research
Next to this, it is fair to assume there is already a ton of preexisting documented knowledge about the users simply floating around in your company. Your UX research repository and even industry reports you can buy or find with a bit of googling will help. Go through them and pick the cherries that are relevant for your user journey. Almost anything can be interesting:
Old research reports and not-yet-analyzed context interviews from earlier user interviews
NPS scores & user satisfaction surveys
App store feedback
Customer support tickets
Product reviews written by journalists
Competitor user journeys in publicly available UX case studies
Ask your in-house experts if they know of additional resources you could check. And find out if there’s already a long-forgotten old journey map from a few years ago that you can use as a starting point (most organizations have those somewhere).
3. Qualitative user research
Qualitative research methods are your best shot to learn about all the things users experience, think, and desire before and after they touch your product. In-depth interviews and focus groups explore who they are and what drives them. You could show them a skeleton user journey for feedback or co-creation .
This could also be embedded into your user journey mapping workshop with the team. Alternatively, you can follow their actual journey in diary studies , in-home visits or shadowing . However, in all these cases it is important that you talk to real users of your product or competitors to learn more about the real scenarios. This is why usability testing with non-users or fictional scenarios won’t help much for the user journey map.
4. Quantitative research
Once you know the rough cornerstones of your user journey map, surveys could be used to let users rate what needs and pains really matter to them. And what their mood is at certain phases of the journey. You can learn how they became aware of your product and ask them which of the motives you identified are common or exotic edge cases. Implementing micro-surveys such as NPS surveys , CES , and CSAT embedded into your product experience can give additional insights.
5. User analytics
User analytics is a beautiful source of information, even if it has its limits. Depending on what tools you are using (e.g., Google Analytics, Firebase, Hubspot, UXCam), you can follow the digital footprints of your users before and when they were using the product. This may include acquisition channels (input for brand touchpoints and early journey phases), search terms that brought them to your product (input for needs and pains), and how they navigate your product.
Unlike a usability test, you can use screen flows and heatmaps to understand how your users behave naturally when they follow their own agenda at their own pace — and how often they are so frustrated that they just quit. Knowing this gives you pointers to negative user emotions at certain journey steps and even helps identify your product’s moments of truth. Whilst you cannot ask the users if your interpretations are correct, checking analytics already helps you prepare good questions and talking points for user interviews or surveys.
Curious to know how heatmaps will look in your app? Try UXCam for free — with 100,000 monthly sessions and unlimited features.
How can I utilize UXCam to collect App User Journey data?
If you have UXCam set up in your mobile app, you can use it to support your user journey research. You can find many of the previously mentioned user analytics features ( screen flows and heatmaps , including rage taps ) here as well.
UXCam can also be an invaluable asset for your qualitative research . Especially for niche products and B2B apps that normally have a lot of trouble recruiting real users via the usual user testing platforms.
UXCam’s detailed segmentation options allow you to identify exactly the users you want to interview about their journey — and reach out to them via either email or UXCam push notifications , which can include invitation links for your study, a survey or an additional screener.
Where can I learn more?
Don’t feel ready to get started? Here are a few additional resources that can help you dive deeper into user journey mapping and create the version that is best for your project.
Creating user journey maps & service blueprints:
Mapping Experiences by Jim Kalbach
Journey Mapping 101
How to create customer journey maps
Customer Journey Stages for Product Managers
The Perfect Customer Journey Map
Planning and running user journey mapping workshops:
Journey mapping workshop
Jobs to be done:
The Theory of Jobs To Be Done
Moments of truth in customer journeys:
Journey mapping MoTs
What is a user journey map?
A user journey map is a visual representation of the process that a user goes through to accomplish a goal with your product, service, or app.
What is a user journey?
A user journey refers to the series of steps a user takes to accomplish a specific goal within a product, service, or website. It represents the user's experience from their point of view as they interact with the product or service, starting from the initial contact or discovery, moving through various touchpoints, and leading to a final outcome or goal.
How do I use a user journey map in UX?
User journey maps are an essential tool in the UX design process, used to understand and address the user's needs and pain points.
Related Articles
Best behavioral analytics tools to optimize mobile app UX
20+ powerful UX statistics to impress stakeholders
Mobile UX design: The complete expert guide
Alice Ruddigkeit
Get the latest from uxcam.
Stay up-to-date with UXCam's latest features, insights, and industry news for an exceptional user experience.
Related articles
5 important product health metrics and how to track them.
Find out the 5 key product health metrics critical for success and learn how to track them effectively to optimize your mobile app product...

Growth Manager
How to Increase Product Engagement - A Step-by-Step Guide
Building a mobile app product? Learn effective strategies to increase product engagement and boost user retention with our comprehensive...
User Journey Map Guide with Examples & FREE Templates
Learn experience mapping basics and benefits using templates and examples with mixed-methods UX researcher Alice...

Designorate
Design thinking, innovation, user experience and healthcare design
7 Steps to Create a Successful Journey Map
‘Putting yourself in someone else’s shoes’ is a commonly used idiom. For a designer, however, it is an essential step in concept creation, research, and design. In order to guide any design process, the following vital question should be answered by designers; “Who is the target user, and how will he/she use the product?”
Whether beginning a design process or evaluating an existing design, understanding the users’ specific reactions and interactions is necessary for the design to meet users’ needs. For example, online retail applications look for convenience, speed, and security. Therefore, in order for the design to meet the retail application’s purpose, all the actions and interactions the user goes through need to meet these three requirements. This is why customer journey mapping is crucial to achieve this goal.
After understanding the demographics and psychographics of the user segment, designers need to track and understand the user experience and journey whilst interacting with the design. As well as putting a face and personality to their user, a designer must also tell and track a story from beginning to end.
What is a Journey Map?
A journey map is a visual representation that illustrates how a customer engages with the design and the different touch points of the product or business. It helps visualize the consumer’s experience and keeps track of their needs, motivations, and satisfaction levels. Using a journey map not only helps identify gaps and errors within the user experience but also connects the different disciplines involved in one project.
Journey maps were first created for the service design field to help improve service organizations and have quickly become a tool used by designers and marketers for several reasons. Journey maps can be used to track the experience of online products and businesses, physical products, businesses, and spaces, and have now evolved to encompass Omni-channel products and businesses.

Steps to Create a Journey Map
While a journey map may vary in terms of objectives or which discipline it was created for, the steps below give a comprehensive overview of the important aspects of a journey map that the business as a whole can benefit from.
Wait, Join my Newsletters!
As always, I try to come to you with design ideas, tips, and tools for design and creative thinking. Subscribe to my newsletters to receive new updated design tools and tips!
Understand the Objectives
Before creating the visual presentation of the journey, the following points should be considered to better understand the reason for creating the journey map:
- The objectives of the project; what is this project about and what are the goals of the project?
- The objective(s) of the journey map: is the map created to identify an error in the experience; solve a problem in the experience process; or track the experience of a new product?
For example, in retail, designers may want to test out a new store layout and visual merchandising system, or even introduce a new line. So, navigation through the space will need to be understood and analyzed. A journey map for this particular objective will help map out and ease navigation, maximize the use of space, and improve the user experience .
Get to Know the Consumer
Understanding whom the user is is an essential step to creating a successful and comprehensive journey map. This entails using qualitative, quantitative, analytical, and anecdotal methods to gather and analyze information about the consumers’ needs, motivations, levels of satisfaction, and attitudes towards the product, service or business. This step also helps gather insights and suggestions from actual users and can be highly useful for the design process. While quantitative methods include conducting surveys or content analysis, qualitative methods involve interviews, focus groups, and observations. Analytical research, or website analytics, utilize analysis and evaluation of facts and figures. Anecdotal research, similar to qualitative research, helps gather insight and detailed information about the journey. The key here is to gather enough information to be able to represent the entire user segment while simultaneously gaining detailed insight from individual users within the segment.
Create Personas
A persona is a summary of the research gathered on the consumer and segment manifested as a fictional person. It enables the designer to create an imaginary ideal character or consumer based on all the data and information collected. A persona can be a helpful tool to prioritize and shine light on specific characteristics and observations that are important to the design. While creating a journey map, more than one persona can be created to correctly organize the research. In a retail space, one can create a persona for each of the common types of shopper the store encounters. The personas can include their reasons for being in the space, what are they buying, and when they are buying. The navigation through the space, the interaction with the sales personnel, and touch points will depend on the specific type of consumer.
Understand the Journey
In order to identify a complete experience, there should be a clear understanding of the actions that occur during the customer’s journey. In consumer behavior studies, a journey begins with the identification of the customer’s needs rather than his or her usage and consumption. In retail, the map tracks the consumer’s journey, beginning by identifying the consumer’s needs and ending with the consumer’s return home. Levels of a customer decision include information search, which is the method by which they will know about the store. Once the beginning and end of the journey have been identified, all the possible actions in a journey should be documented. This requires an empathetic outlook and personas created in order to create “scenarios” or actions that are likely to occur in the space.
Identify the Touch Points
After understanding the movements within the journey, a designer should identify the touch points involved in the process. A touch point is a point of interaction between the customer and the business. A brand’s touch points can be divided into pre-purchase, purchase, and post-purchase. Examples of touch points include packaging, advertising, product displays, and social media. In 21 st century retail, touch points are becoming more versatile and diverse than ever before, with touch points available offline and online, at home and in-store. Keep in mind that touch points can consist of any interaction with the brand or business and do not need to be directly managed by the business. For example, if the product is sold through an online retailer that is not owned by the business, this channel becomes a touch point and hence a part of the journey, and should be considered in decision-making. Touch points for retail spaces now encompass everything from the store window to the store’s social media account.
Give Depth to the Journey
Now that the journey’s actions and touch points have been identified and organized, categorize where each touch point occurs, who is involved, and the duration. The touch points should be a representation of the brand and business, so they should all be cohesive and consistent with the overall experience. To add empathy to the map, include emotions in the characterization of each touch point. Allow time for group discussions and meetings concerning the different actions and touch points. This will allow input to be given from all relevant departments within the business.
Put it Together
Now that all the information has been gathered, putting the journey map together is where the information becomes visual. The layout of the journey can go beyond a traditional timeline; this is where the designer within can shine! Make sure the visual hierarchy of information is correctly mapped out and that all important information is included. Digitalizing the map can be efficient because it allows easy circulation and effortless future adjustments. In a retail journey map, the journey is designed within a layout map of the space.

Tips to Consider
While journey maps differ among departments within a business, here are some tips to consider when going through the journey mapping process:
- By creating a journey map, the designer should be able to understand the overall experience and the specific experiences within each action and touch point. If the touch points are not consistent with the brand, consider adjustment.
- Remember to identify the emotional feel that your brand expresses and design your product or space accordingly. For example, if the brand is identified as calm and relaxing, vibrant colors will alter the way the brand is perceived.
- Stay updated with how the brand and business is perceived. Consumers change regularly and understanding your consumers and how they perceive your product will give you the insight necessary to create innovative solutions.
Creating and designing a journey map should be a flexible process that puts a considerable amount of information and insight into a visual analysis. This visual analysis will ease the design and the decision-making processes. No matter the objective, journey maps are always an asset for any business and give a proactive outlook on ever-changing consumer behavior. A journey map becomes a facilitation and justification for future decision making within the business.
Yumna Matar
Graphic design/integrated marketing communications double major currently studying at the American University in Cairo. I was born and raised in London and currently live in Egypt. As a senior, I am Currently working on thesis on Holistic Experiential retail design. My interests include a merge of both Graphic design and marketing. I am not only interested in studying how different cultures contribute to design thinking but also how design thinking works across all disciplines.

You May Also Like

The Role of White Space in User Interface Design

How to Apply Paul-Elder Critical Thinking Framework

How to Use the Decision Matrix to Make Decisions?

Five Reasons Behind a Failed UX Design Process

Free Webinar: Introduction to Google Design Sprinting for UX

How to Use the Fishbone Diagram in Root Cause Analysis?
Leave a reply cancel reply.
Your email address will not be published. Required fields are marked *
Sign me up for the newsletter!
How to Use Journey Mapping for Your Project

The Nielsen-Norman Group defines the user journey map to be “a visualization of the process that a person goes through in order to accomplish a goal”.
Oftentimes, designers grapple with the question, how does a user actually use this product? This is a vital question that needs to be answered by every designer. To do so, designers need to dig deep into the entire journey undertaken by the user in accomplishing the task, while using the product. The user journey map is an overview of the key touchpoints and interactions and describes the user’s motivation, feelings, emotions, and goals stage-by-stage.
At a rudimentary level, a user journey map is a compilation of the user’s actions into a timeline. The next step sees the timeline being infused with the user’s thoughts, feelings, and emotions which develops a cohesive narrative. This narrative is then enhanced into a realistic visual journey.
Key Components for Journey Mapping
User personas are created to ensure that the final design fulfills the needs of actual users, solves their problems, and becomes a delight for them to use. By ensuring that your personas are close to the actual user, the resulting product functions seamlessly, and ultimately meets business goals.
It is recommended to assign one journey map to a single workflow – this results in a clear story. Provide one point of view per map in order to build a strong, clear narrative.
PERSONA EXAMPLE

Scenarios are stories that capture the goals, motivations, and tasks of a persona in a given context. Depending on whether the product is existing or under development, scenarios can be real or presumed.
As is (real) – Demonstrating the way users currently interact with the product or service. To be (presumed) – Demonstrating an enhanced scenario of the users’ interaction with the product or service.
Journey mapping as a technique perfectly suits cases involving a sequence of events or paths of transition traversed to arrive at the intended goal.
Stages of the Journey
Journey phases refer to the sequence of events that the user goes through while using the product. They help in highlighting the user’s actions and pain points along with the thoughts and emotions he undergoes while performing those tasks within the journey.
Actions, Attitudes, and Emotions
The user’s thoughts and feelings are represented through his behavior in the journey. These are behaviors, thoughts, and feelings the user has throughout the journey and that are mapped within each of the journey phases.
Actions are the actual steps taken by the user presented in the form of a narrative.
Attitudes are the user’s thoughts, behavior, and motivations at different stages in the journey.
Emotions are the ups and downs faced by the user in the course of the journey, highlighting parts where he may be happy or frustrated.
Finally, insights reveal how the information gained from the mapping exercise can be capitalized. These insights are nothing but opportunity areas where the design team needs to take action and implement changes.
USER JOURNEY MAPPING

Points to Remember
– In the enterprise context, there’s an added stage at the beginning, wherein the design team has to educate stakeholders about the significance of user-centric technology and its eventual business value.
– As you move on to creating a seamless and intuitive user journey map, it’s always, always important to keep the focus on the user persona. As experienced as you may be as a designer, never think of yourself as the user – what works for you may not necessarily work for the actual user.
– Remember, there isn’t a foolproof method of creating a user journey map, it should be molded according to the needs and goals of the project. Larger, more complex projects require multiple personas with as many journey maps which contribute to design iterations.
– Failing to verify the journey map with the user can mislead your design direction – it’s something akin to parents saying that they know what their teenager is going through because they were teenagers at a point themselves.
To conclude, you’re sure to encounter a few ‘Eureka’ moments while creating personas and user journey maps, which is a good sign. It means that you’ve refrained from making assumptions and empathized your way into learning the user’s actual journey
More Resources:
User Journey Mapping for Complex Enterprise Systems
4 Enterprise Apps that Ace User-centric Features
Remote UX Research: 5 Tips To Do It Right

Founder & CEO
Bansi Mehta
The Founder-CEO of Koru UX Design, Bansi Mehta is a seasoned UX practitioner with over a decade of experience. She specializes in design ops and innovation discovery at the business level. She has led interdisciplinary teams to curate superior, user-centric experiences for B2B SaaS startups, SMBs, and legacy products in the healthcare sector.
Discover more insights
COLLABORATION Collaboration between UX team and developers Read more
HEALTHCARE Design Standards to save lives – UX in Healthcare Read more
HEALTHCARE Understanding the Goals of Patient Portals Read more
UI 4 Superpowers of Every Designer Read more
EMPATHY Empathy Maps Made Easy: A 10-Minute Guide Read more
HOW TO How to Communicate Visual Hierarchy Read more
HOW TO How to Design a CRM System? 5 Actionable Tips on CRM Design Read more
ENTERPRISE UX 4 Crucial Characteristics that Make or Break Fintech UX Read more
What is a Product Journey Map and How to Build One?
11 min read

A product journey map is a key part of the product development and design process as it serves as a peek into how your users see and experience your product or service.
It also enhances the overall product experience and improves chances of customers reaching the activation then retention stages.
In this article, we’ll cover what a product journey map is, why you need it, and how to build one.
Let’s get started!
- Product journey maps are a representation of customer interactions with your product or service.
- It’s not the same as creating customer journey maps which are a representation of the customer journey and interactions with your business across each stage of the buying process.
- Journey mapping is important because it helps to identify customer pain points, gives you a feel of the customer’s state while using your product, and lets you uncover unique perspectives and potential solutions to improving it.
- There are 6 types of journey maps: current state, future state maps, day in the life, service blueprint, empty, and experience maps.
- You can build user journey maps using tools such as Miro, Lucidcharts, Smaply, etc.
What is a product journey map?
A product journey map is a blueprint of a user’s interactions within your product. It is a visual representation of every behavior and possible step or action the user takes while using your product.
It consists of everything a user does in the app. From signing up to activation, to how they experience and navigate your entire product and use specific features.
Product journey map vs customer journey map
A product map (also called a user journey map) covers all interactions a user has with your product and is used in UX and product development, while a customer journey map covers all interaction a user has with your brand and product across multiple channels, and platforms, even before the purchase, and is mostly used in marketing and sales.
With that being said, customer journey maps include your marketing efforts and MQLs and leads, while the former focuses on current users already using your product.

Before you can create a customer journey map, you have to decide on your company goal for the finished map. This will then determine which type of journey map you need to build to get the best results.
Here are the six types of journey maps product managers use to identify opportunities and create a better user experience.
Current state maps
Current state maps are the most common types of journey maps. They take a look at how your current users interact with your product right now. This map shows you what’s working today and what’s not in your product so you know what to improve.

Future state maps
Future state maps are an assumption or expectation of how users will navigate through and interact with your product in the future. This is built after the errors/blocks in your current state map have been fixed.
The future state map can also be used to set and track goals you hope to achieve with your improved product.

Service blueprint
A service blueprint template tracks customers’ experience with employees and other parts of your company. This helps improve the interaction between the business and customers.

Day in the life
Day in the life maps is a bigger picture of your user as a whole person, not just as a user of your tool. This looks into the customer’s emotions, behaviors, activities, and other things that make them who they are.
While this type of journey mapping may not directly involve your product, it helps you get into your user personas’ heads and design products and experiences that fit into their lifestyles.

Empathy maps
Empathy is the ability to understand and share the feelings of another person, in this case, the user. It’s an important skill for building products people love.
An empathy map, therefore, is a visual representation of how the user sees your product from their point of view. It doesn’t just map product interactions, it takes into consideration their feelings and struggles while using it. Empathy maps are built by running user research or interviews, and are usually divided into four parts to record:
- What the user says about your product and their experience with it
- What the user thinks when using the product.
- What they feel when using it
- What they do and actions/behaviors they display while using it
Each section gives you a better understanding of the user, what’s a problem to them, and exactly how to improve their experience.

Experience maps
A good or bad experience isn’t just a function of your product design or features. Every member of your product team is a part of the customer’s experience . So, experience maps are a visual slate of users’ experience with the different parts or touchpoints of your product during a given period.
To draw up an accurate experience map, you must first acknowledge the goal of the user then look at the paths taken to achieve that and their experience all through. Did it take longer than expected? How easy was it for them to get support? How many attempts did it take for them to get a task completed?
This particular map helps you discover and fix the hiccups in your customer journey and product flow.

Benefits of user and customer journey mapping?
Mapping customer experience or interaction with your product across the different stages of their journey can provide insights that could help with product development and improvement.
In other words, creating a customer journey map is a better way to develop products because it relies on how your user/customer base is experiencing your service. Here are a few other benefits.
Provide transparency across all teams involved in the development of your product
User and customer journey mapping look at the user’s interactions with your product (and brand as a whole), so the results you get from doing this can provide insight into how each team works at each stage of the customer’s journey. And also show you at what points improvements need to be made.
It helps cross-functional teams sync their actions of working towards the same business goal of improving customer experience. Instead of guessing/assuming, it shows the marketing team how their marketing efforts are received and which channels work best, the sales team gets insight into what kind of leads convert best, and the product team sees what parts of the product experience encourage users to move along their journey and where the friction points lie.
Drive product engagement and adoption
Customer journey mapping reveals what parts of your product work smoothly and which may be stalling users from progressing in their journey.
It could be a long and boring onboarding flow that keeps users from reaching activation so they leave. It could also be features that users are ignoring even though you know it’s important to their use case. Mapping how users use such a feature can show you how they experience it, and why they overlook it – it may be hard to find, they don’t see immediate value, hard to use, etc. This lets you know what needs to be done to increase product/feature engagement and adoption.
If you have a long-expected future, you can also use in-app announcements to notify users of new features.

Know which KPIs to track and why
There are a lot of KPIs or metrics to track in product marketing, so understanding how users see and experience your product can help you discover the most important ones to focus on right now. The customer journey mapping process helps you focus your efforts on what’s most important and remove friction points with in-app guidance.
A customer journey mapping examples could be of your users dropping off before reaching the activation stage. That could be your sign to focus on monitoring and improving onboarding flow and primary activation. Using a checklist, you can drive users to the activation point in their journey where they experience the value of the product.

How to create a product journey map?
Now you know what a product journey map is, and why you need it, the next thing is figuring out how to build one. The step-by-step process is what this section will cover.
#1 – Where to get data for your product journey map
The first thing to do is work out where the information you want to analyze will come from. You have two options:
Firstly, if you’re starting from scratch, the best way to get data is from user interviews.
This involves getting information directly from your users to understand how they interact with your product.
From user interviews, you can easily trace/map out how users see your product from their point of view. You can get a clear vision into their exact sentiments about several parts of the product and how easy or difficult it is for them to fulfill the desired action or achieve their goals.
The information you get here serves as a starting point. Since customer journeys aren’t static, your product map will need continuous adjustments as you move along.
Secondly, if you already have data from existing users you can:
- use product analytics tools to track in-app user behavior, user flow, friction points, etc
- Track user sentiments using in-app surveys like net promoter score (NPS) , customer satisfaction score (CSAT) , and customer effort score (CES) .
- Ask your sales and customer success/support teams for recurring customer queries, bugs, and common words or quotes. These give you a better understanding of users’ pain points and needs.
Check out this video on The What and Why of Continuous Discovery from Teresa Torres, author, Speaker, and Product Management Coach at ProductTalk.
#2 – Set your target
By identifying what goal you hope to achieve from your user journey maps, it’ll be easier to create one.
For example:
- Do you want to improve the user’s experience of your product? You’ll need a user journey map that highlights your friction points and tracks user behavior of those who churned out of your product.
- Or do you want to improve a specific feature ? An experience map of customer interaction with that feature will work best here to show how they experience it. From struggle points to the success areas.
- Looking to improve your product and make it more useful for your target user persona? A day in the life map of your target user can help you identify gaps and opportunities you can include in your product, because you’ll be able to see them as people, not just users of your product.
#3 – Define your user persona
Once you identify your goals and the type of user journey map you’ll be creating, the next step is to define your target user personas for the map.
By picking the necessary user personas on which your journey maps will focus, you’ll increase your chances of getting better results. So if your goal is to improve a specific feature, your target persona should be the users who use such feature.
Here’s an example of a Product Manager persona for Userpilot’s product adoption tool. It gives insight into their pain points, typical jobs to be done, the type of company they work for, and what they stand to gain from a tool like Userpilot.

#4 – Which journey stages are you mapping?
Your set objective will determine what stages of the user journey to map.
For example, if your goal is to improve onboarding flow and increase activation rates, your journey map will have to focus on only the primary onboarding stage of the user’s journey. This is because that’s the only part with influence on your goal.

#5 – Map out the key milestones in your product journey
Milestones are key points in the user’s journey through your product. They usually signify the end of a goal the user has achieved and are useful for tracking user progression.
Say your product is a meeting scheduling tool. There are several things your users have to do to achieve their goal.
- Sync calendar
- Create a meeting
- Share link.
If they don’t go through these steps they can’t experience your product’s benefit. But by completing the steps and achieving their goal of a scheduled meeting, they’ve reached one milestone in their journey.
Assigning milestones in your product journey map will give you insight into how the customer interacts with your product and if they’re advancing in their journey or not. Some examples of milestones include:
- Reaching the Aha moment
- Reaching the activation point
- Becoming an advanced user
Hint: translate those milestones into goals and track when users complete them using a product adoption tool like Userpilot

#6 – Add relevant touchpoints to your product journey map
Using the meeting scheduling tool example from above, a milestone is a goal achieved by successfully scheduling your meeting. While the touchpoints in this case are all the steps you take to accomplish this.
The milestone is the fully baked cake, while the touchpoints are all the steps that went into baking it.
Touchpoints are a necessary addition to your product journey map because they show you how users navigate them to achieve their goals. Onboarding checklists are a great way to get users to each touchpoint in your product.

There are many tools companies use to create journey maps. Here are the best 6:
- UXPressia : their main focus is helping you improve customer experiences with your product. Asides from being a dedicated product journey mapping tool with several templates, you can also use this tool for your company employee onboarding. They also offer integrations with Slack and the design tool Marvel.
- Miro : this is one of the popular product journey map tools. With access to many preloaded templates, an easy UI, and a dedicated focus on product education which makes it super easy for anyone to use.
- LucidChart : If you use Google sheets, you may want to go with this tool because LucidChart integrates smoothly with it.
- Conceptboard : this is a recommended tool for remote teams. With this tool, you and your team can easily collaborate on creating product journey maps regardless of location.
- Smaply : With Smaply you can run multiple product journey maps across multiple roles and personas. This helps you compare and contrast and easily discover pain points in the journey flow.
- FlowMapp : this is a UX tool that helps you visualize various types of flow maps such as site maps and product journey maps.
The success of your product lies in how much your users love and value it. If they see the value, they stay and you grow. If they don’t, they leave.
Product journey maps reveal how users experience your product. They show you the user’s pain point with your product and how you can fix that to improve their experience.
Want to build product experiences code-free? Book a demo call with our team and get started!
Leave a comment Cancel reply
Save my name, email, and website in this browser for the next time I comment.

Get The Insights!
The fastest way to learn about Product Growth,Management & Trends.
The coolest way to learn about Product Growth, Management & Trends. Delivered fresh to your inbox, weekly.
The fastest way to learn about Product Growth, Management & Trends.
You might also be interested in ...
- Integrations
- Learning Center
How Journey Maps Can Help Product Managers Build Better Products
In this post, I will walk you through some of the ways journey maps can add invaluable new insights to any product manager’s understanding of their customers, product, and organization. When you’re finished reading, I’m hoping you’ll want to head straight over to your marketing team to start collaborating on your own customer journey map — or several of them.
What Are Journey Maps?
Journey maps tell the step-by-step story, usually in a visual way, of some aspect of your customer’s experience.
You could develop a journey map, for example, to document your user onboarding process. Such a journey map might begin with the first contact your prospect has with your company, through the process of filling out the free trial form, to the first interactions with the product itself, to every follow-up contact your sales reps have with the prospect. It might also include detail about the lag time between each of these steps and any educational information the sales team sent to the prospect in between.
A Product Manager’s Guide to Journey Maps
Let’s explore one example of how a customer might experience working with your company — the sales funnel — to see how a journey map can be so valuable. Or, more to the point, let’s examine how not having a journey map might undermine your sales process and negatively affect your future sales and product development.
Imagine you offer a SaaS product, and part of your lead-generation process is a 30-day free trial. Anyone who visits your website or clicks on one of your banner ads is taken to a signup form that requires an email address and phone number, and when they’ve filled out that form they can start using your product immediately. Any time someone signs up for the trial, one of your reps will immediately send them a standard first-contact sales email.
So far, so good.
But let’s also assume that your marketing team offers gated content on your site and through online ads — free white papers, for example. Marketing has its own lead-nurture process, which includes a follow-up email when a prospect downloads a white paper. But marketing also puts anyone who downloads a white paper on a 7-day companywide “Do Not Contact” list in your organization’s Salesforce platform. That means once a prospect has downloaded a white paper, and marketing has begun its lead-nurture campaign, sales can no longer contact them.
And here’s the big problem: What if someone signs up for your free trial, starts using your product, and then downloads one of your white papers? Answer: They’re removed from the sales funnel, and their dedicated sales rep can’t contact them for the next week. This is obviously totally counterproductive to your sales efforts, because a prospect who signs up for your free trial and also downloads your white paper is at least as pre-qualified as a sales lead as someone who only signs up for the trial.
In this example, sales and marketing both have legitimate and logical strategies, but they are working in silos — so no one has connected the dots to realize that their combined efforts work against each other and against the company’s goals.
If you worked with these teams to draft a customer journey map, however, you would clearly spot the problem. When the prospect raises a hand by signing up for your trial, that triggers the first contact from sales. But when that same prospect raises a hand again by accessing your white paper — saying, in effect, “I’m really interested” — they are treated like a dead lead by sales.
This sort of conflict comes to light only when you and your team turn things around, and view the experience not in terms of the steps your company takes but rather in terms of how your customer experiences the whole process.
Here are a few more reasons journey maps can be so valuable.
1. A journey map can uncover problems in your company’s process that might be turning customers away without you even realizing it.
In the mad rush to add features, functionality and other competitive advantages to your products, it’s very easy to overlook parts of the customer experience that seem standard and trivial. But if these “trivial” things are not handled properly, they can have a strong negative effect on how your customers perceive you and feel about working with you.
It can be very tempting, for example, to add a single-phrase story — “customer buys product online” — to your product roadmap , and to assume that your development team will make this a streamlined, user-friendly process.
But what if they don’t? What if development includes extra steps in your sign-up process? What if several of the required fields are unnecessary to the purchase process, and create just enough friction that buyers abandon the purchase midway?
Yes, your analytics tools might uncover this trend, but only after you’ve lost out on enough people to notice — people who almost bought your product but didn’t.
Tweet This: “A journey map can help you spot onboarding problems before you chase away real would-be customers.”
With a customer journey map to illuminate every required step in the purchase of your product, you’d be able to experience this process exactly as your customer does — and you’d have a much better chance of discovering problems before you chase a real would-be customer away from your site.
2. A journey map can identify gaps or overlap in the customer experience that can undermine your efforts.
In the example above, I walked you through a hypothetical organization in which the sales and marketing departments had lead-generation processes that might have worked as standalone campaigns but that, when implemented simultaneously, actually prevented sales from connecting with some of their most promising prospects.
The genius of a journey map is that it turns the entire concept of customer engagement on its head. It halts our natural tendency to focus on our side of the process and instead forces us to view interacting with our company through the lens of our customer.
Using that lens, we can often identify gaps in the process, such as the fact that perhaps our product suite is too complicated for a new prospect to understand, and we have no mechanism in place to educate that prospect on their first visit to our site. Experiencing things from our customer’s viewpoint can also uncover overlaps in the process, such as when a support question submitted by email triggers an automatic sales call — before the company realizes that in fact the support question came from an existing customer who does not want to learn that the company doesn’t even know he’s been using their product for years.
Journey maps, in other words, are a great way to take us as product managers out of our own product-focused bubbles and force us to take a fresh and honest look — through our customers’ eyes — at what it’s like to interact with us.
3. A journey map can help bring together the various departments across your company, and help more closely align everyone to the same goals.
Throughout this post I’ve alluded to the fact that you’ll want to craft your journey map with input from across the company — marketing, product management, sales, development, support. After all, when you flip your viewpoint around from inside your company to your customer’s experience with it, you’ll need to know how that customer experiences each component of your organization.
What this means is that the act of developing journey maps will necessitate more collaboration across teams, more of your organization putting the spotlight on your customer experience and determining how they can all work together to improve that experience. This is all to the good.
One of the great things about creating journey maps is simply that they bring disparate teams together that might otherwise work entirely in silos, even though they are all ultimately working for the same customer. This collaboration will of course give a richer, more detailed picture to the journey map itself. But perhaps just as important, it will also help more closely align everyone across the company in their strategic objectives, and it will help amplify the value of the shared domain expertise scattered throughout the organization.
Tweet This: “Great things can happen when your company comes together to focus on your customers.”
Or, to describe the value of a journey map more succinctly, great things can happen when your company comes together to focus on your customers.
Tying Your Journey Map to the Product Roadmap
Of course, when you’ve created your journey map and gleaned whatever valuable learnings it offers about your customers and your process, you’ll want to make these learnings actionable — and possibly communicate them to support the strategic decisions you’ve made.
This is why a customer journey map can also serve as an important complement to your product roadmap.
Once you have documented in a journey map a step-by-step walk through some aspect of interacting with your company or product, you will have more logical and compelling reasoning behind the strategic decisions in your roadmap. And if you are using flexible, visual roadmap software , you can easily connect your journey map directly to the roadmap itself, to present your reasoning to your various audiences such as stakeholders or the sales team.
In other words, their ability to add value to your product roadmaps is just one more reason that customer journey maps should be a part of your company’s process for continually improving customer engagement.
What’s your experience with customer journey maps? Any thoughts? Tips? Please share them in the comments below.

Product Management in Healthcare
Discover how product management in healthcare enables organizations to provide real-world solutions that meet patients' needs.

Product Management for Financial Services
The product management function in any given industry has both similarities and differences. In all cases, product managers drive the...

Where Do PMs Gather Their Product Ideas?
Explore the many ways product managers leverage both their internal and external sources for product ideas.
Continue exploring
You can search or explore specific categories.
Prioritization and Backlog
Company news and updates, templates and workbooks, remote product management, product metrics and analytics, product strategy example, product managers, tools and resources, customer-centricity, product leadership, product management, roadmap and roadmap management, product strategy, agile & product development, career and interviews, try productplan free for 14 days, share on mastodon.
MEET US AT ATLASSIAN TEAM 24
Las Vegas | April 30 - May 2

Agile workflow
10 min read

The User Journey Map Begins With Epic Storytelling

Storytelling is an excellent way to describe anything because stories conjure detailed images. Once you create a visual association, cognitive processes leap into action to make the story in the user journey map a reality that is easy to track.
This is what the customer journey map (CJM) is all about—epic storytelling that involves comprehensive planning to capture the design process and deliver a unique customer experience.
Creating a customer journey map (also called the user journey map) involves planning a project from the user’s point of view and using personas, epics, features, user stories, and tasks. This visualization process also involves several stakeholders as user personas on the road to planning perfection.
By the end of the project, your CJM should help achieve business goals and exceed customer expectations with enough touchpoints along the way to motivate satisfaction. The process is a little like rubbing Aladdin's lamp to manifest your deepest wishes.
What is the user journey map?
In contrast to the flat backlog, the customer journey map makes the vision for your project come alive in real-time. You get to use creative storytelling to generate a magical customer experience through visual representations.
Project team members accomplish this by developing an empathy map to an almost-perfect plan from the customer’s perspective. User journey mapping captures the customer’s emotional state, which helps identify touchpoints and pain points. Teams then use these points to elevate the customer experience.
Unlike rubbing a genie’s lamp for results, you get to use convenient software to develop a service blueprint where design thinking reflects a shared vision between stakeholders.
The starting point is to anticipate customer interactions with the mobile app or other e-commerce project development story. That’s why user research is another vital element in developing the customer journey map template.
This customer journey map template should also draw valuable information from the empathy map and the experience map. An in-depth understanding of the KPIs and metrics that go into storytelling helps direct product usability through appreciating customer interactions with the product.
Customer interactions generate feedback, which leads to understanding customer's needs. Additional touchpoints can then be included or modified to build on the overall project outcomes.
Essentially, you use hierarchical storytelling on a magical customer journey map template to meet real-life expectations that resonate with the customer experience.
The customer journey mapping hierarchy

When beginning the journey to create the ideal customer experience, team members should visualize the project from the user’s current state. Once you capture the essence of the current customer perspective, you can better understand what needs to change and improve.
A simple example may be a travel app that encompasses services such as travel agent services, flight bookings, and accommodation in a geographical area (present state). The client wants to create a future state app which contains tourist activities to augment the customer experience. The basic process will then look like this:
For app customers who want a value-add experience with our travel app which is a helpful resource that provides tips on local tourist activities.
Your user journey map hierarchy involves four building blocks to meet customers’ needs:
- Understanding user personas or buyer personas
- Developing themes and epics to address touchpoints
- Using steps or features to support epics and the narrative flow
- The stories in the customer journey map
1. Understand user personas or buyer personas
The user journey map starts with defining the user personas or buyer personas as vital stakeholders in project development. These customer personas represent the top of the hierarchy, which is the starting point of the customer journey map.
A detailed visual reflection of the user persona is vital to getting your final product right. To deliver this, you need to walk through the story mapping journey from the customer’s perspective. This helps avoid the nasty consequences of inadequate planning that results in sub-optimum deliverables and unhappy teams and customers.
To understand user personas, you need to identify the various potential touchpoints in the journey and customer pain points through use cases and feedback. You’ll need to anticipate as many potential scenarios as possible from the buyer persona’s perspective.
Although the “who,” “what,” and “why” are instrumental in defining the user story, it all begins with visualizing user personas and thinking about customer behaviors, demographics, needs, and goals.
Once you define who your customer personas are, you can follow up with themes and epics to deliver on customer expectations. The epics are the heroes or heroines in this story visualization method.
2. Develop themes and epics to address touchpoints
The customer journey map positions epics at the top of the storyboard because they are vital to creating a great project.
Team leaders must consult with the client and relevant stakeholders to develop an overarching project theme, to translate into epics. Epics flow through this theme from left to right. These epics show large bodies of work broken down into smaller features which can meet continuous delivery value.
Epics are also strategic directives that begin with the current state of an issue and move the situation into a desirable future state. This epic future state is built on tactics, or features and tasks, which team members use to clarify project requirements and move toward that magical future state of project success.
Before team members can move forward, they need to get the epics right. Epics cover three fundamental foundations: user persona, product, and design requirements, which reflect visually on the user journey map.
The epics should meet several foundational requirements:
- Follow through by aligning the overall business goals with detailed buyer personas and demographics
- Broadly outline the user persona’s needs
- Meet specific customer needs by addressing touchpoints and pain points
- Include specific functions, features, and benefits
- Produce a future state ideal project
After designing your heroic epics to cover the project's primary goals, you can start breaking these into steps that integrate with the overall narrative flow of the user story.
3. Use epics for highlighting the narrative flow
Once you clearly define your epics, it’s time to generate narrower steps or features.
As your epics move from left to right, you must define each of the necessary steps to accomplish business goals. This customizable process uses epics to relay the user journey over the project duration to reflect project outcomes.
The customer journey map template also forms the basis of the ideal user story as you transition from epics to features. The features originate from the epics, which is why the epics are the heroes in this story. They “save” customers with excellent planning and deliverables.
At its most basic level, features should include the following elements:
- Deliverables that add value and support epics completion
- Generate business value by considering KPIs, metrics, customer acquisition, and retention
- Demonstrate sufficient definition for team members to follow through on time estimates and complete tasks within one to three sprints
- Team members must be able to test the results of their features
- Establish test criteria for each feature to set acceptable quality standards that meet customer expectations before moving to the next step
In short, the user acceptance criteria (UAC) in the user journey map should include a brief item value description, a feature benefit explanation, and the feature quality completion points that team members must achieve.
Only once you nail these details can you tell the user stories from the customer's perspective. Similarly, only once you complete these three fundamental building blocks in the customer journey map can you focus on user stories and business goals that include customer satisfaction and retention.
4. Begin storytelling through the user journey map
After the third step in the hierarchy of the user journey map, the actual user stories begin. This is the final step in design thinking related to the visualization of epics into manageable stories and tasks.
To state the buyer persona case, team members must understand the “who,” “what,” and “why” of the customer experience. Understanding and defining the customer personas forms the basis of user story creation, enabling delivery of the most acceptable product possible.
Developing the best story relies on creating user stories that highlight the customer experience and use cases that highlight the finer details of system performance.
In the story creation phase, team members assume the customer’s perspective to define requests. Team members can consider exploring social media to understand customer behavior and experiences to use as story inputs. User stories can also include enabler tasks to augment feature completion.
Team members typically write their user stories to complete these in short sprints. Sprint completion involves task completion for release before completing one epic and moving to the next, except where concurrent work is possible.
Ultimately, the user journey map must tell the customer’s story of how their need will be met by creating or modifying a product, process, service, or system feature. New developments must follow through on the formula of “as a…” “I want…” “so that...”
As a new Agile team member , I want to understand my and other team member's roles so that I am clear about my tasks and the responsibilities of other team members.
After generating user stories, team members can break tasks into even smaller parts to facilitate work deliverables and reduce potential churn that negatively impacts customer retention.
As the user journey map progresses, the stories should clearly outline the activities for completion, always linking these back to buyer persona goals. The smaller, granular tasks then relate to user behaviors, and the outcomes link to each step of the process to reinforce what deliverables will meet customer needs within set timeframes.
During the customer journey map, stories can be split further to accomplish greater clarity.
Bottom line: The customer journey map
Through the customer journey mapping process, you should capture the primary epics of the user journey in the story map visualization.
You will need to develop the user story map holistically and interrupt it with additions and subtractions in an iterative fashion. This iterative user story mapping process helps minimize churn as you continue to update your story as you move forward.
Once the project is done, you need to test the product on potential customers, gather customer feedback, and improve the user journey map.
The benefits of carefully planning the customer experience through a visual format are exponential.
Tell your project story with Easy Agile User Story Maps for Jira
The customer journey should highlight the ideal user experience. To do this, the user story map should incorporate the project from user personas to achieve stories with valuable touchpoints as markers along the way.
Once the visual representation is done, it should validate the service blueprint for the customer journey mapping process through the current and future states of the project.
Throughout the project, your team should create a unique user journey that delivers the ultimate customer experience and exceeds customer expectations.
Try Easy Agile TeamRhythm and Personas today to make your customers' stories come alive with magic.

Why User Story Mapping?

Anatomy of an Agile User Story Map

What is User Story Mapping?
Subscribe to our blog.
Keep up with the latest tips and updates.
Learn / Guides / Customer journey mapping (CJM) guide
Back to guides
Customer journey mapping in 2 and 1/2 days
How to create a customer journey map that improves customer success.
Last updated
Reading time.
There’s a common saying that you can’t understand someone until you’ve walked a mile in their shoes—and that’s exactly what customer journey maps do: they help you put yourself in different customers’ shoes and understand your business from their point of view.
Why should you do it? How should you do it? Find the answers in this guide, which we wrote after interviewing 10+ customer journey experts who shared methodologies, dos and don’ts, and pro tips with us.
On this page:
What is a customer journey map?
How to create a customer journey map in 2 and ½ working days
4 benefits of customer journey mapping for your business
In later chapters, we dive deeper into customer journey analytics, workshops, and real-life examples.
Start mapping your customer journey
Hotjar lets you experience the customer journey through their eyes, so you can visualize what’s working and what needs improvement.
A customer journey map (CJM) is a visual representation of how customers interact with and experience your website, products, or business across multiple touchpoints.
By visualizing the actions, thoughts, and emotions your customers experience, a customer journey map helps you better understand them and identify the pain points they encounter. This is essential if you want to implement informed, customer-focused optimizations on your site.

Mapping the customer journey: narrow vs. wide focus
A customer journey map can have a very narrow focus and only look at a few, specific steps of the customer experience or buyer’s journey (for example, a product-to-purchase flow on a website), or it can take into account all the touchpoints, online and offline, someone goes through before and after doing business with you.
Each type of customer journey map has its advantages:
A CJM with a narrow focus allows you to zero in on an issue and effectively problem-solve
A CJM with a wide focus gives you a broader, holistic understanding of how customers experience your business

Regardless of their focus, the best customer journey maps have one thing in common: they are created with real customer data that you collect and analyze . The insights are usually organized into a map (hence the name), diagram, or flowchart during a group workshop, which is later shared across the entire business so everyone gets a clear and comprehensive overview of a customer’s journey.
How to create your first customer journey map in 2 and ½ working days
The process of creating a customer journey map can be as long or short as you need. Depending on how many people and stakeholders you involve, how much data you collect and analyze, and how many touchpoints there are across the business, you could be looking at days or even weeks and months of work.
If you’re new to customer journey mapping, start from a narrower scope before moving on to mapping every single customer touchpoint .
Here’s our beginner customer journey mapping framework to help you create your first complete map in 2 and ½ working days:
Day 1: preliminary customer journey mapping work
Day 2: prep and run your customer journey mapping workshop.
Final ½ day: wrap up and share your results
Download your free customer journey map checklist (as seen below), to mark off your tasks as you complete them.

On your first day, you have three essential tasks:
Define the goal and scope of your CJM
Collect customer data and insights
Invite your team to a customer journey mapping workshop
Step 1: define the goal and scope of your CJM
Clarifying what part(s) of the journey you're looking at, and why, helps you stay focused throughout the mapping process.
If this is your first map, start from a known issue or problematic area of your website. Keep the scope small, and focus on anything you can break down into four or five steps. For example:
If you have a high drop-off on a pricing page with five calls-to-action, each of which takes users to a different page, that’s enough for a mappable journey
If your purchase flow is made of five self-contained pages, each of which loses you potential customers, that’s a good candidate for mapping
✅ The output: a one- or two-sentence description of what your map will cover, and why, you can use whenever you need to explain what the process is about. For example: this map looks at the purchase flow on our website, and helps us understand how customers go through each step and the issues or obstacles they encounter. The map starts after users click ‘proceed to checkout’ and ends when they reach the 'Thank You' page .
Step 2: collect customer data and insights
Once you identify your goal and scope, the bulk of your first day should be spent collecting data and insights you’ll analyze as part of your mapping process. Because your map is narrow in focus, don’t get distracted by wide-scale demographics or data points that are interesting and nice to know, but ultimately irrelevant.
Get your hands on as much of the following information as you can:
Metrics from traditional analytics tools (such as Google Analytics) that give you insight into what’s happening, across the pages and stages your customer journey map covers

Data from analyzing your conversion ‘funnels’ , which record how many visitors end up at each stage of the user journey, so you can optimize those steps for potential customers and increase conversions
Behavior analytics data (from platforms like Hotjar) that show you how people interact with your site. For example, heatmaps give you an aggregate view of how users click, move and scroll on specific pages, and session recordings capture a user’s entire journey as they navigate your site
Quantitative and qualitative answers to on-site surveys relevant to the pages you’re going to investigate, as customer feedback will ultimately guide your roadmap of changes to make to improve the journey

Any demographic information about existing user and customer personas that helps you map the journey from the perspective of a real type of customer, rather than that of any hypothetical visitor, ensuring the journey makes sense for your target audience
Any relevant data from customer service chat logs, emails, or even anecdotal information from support, success, and sales teams about the issues customers usually experience
✅ The output: quantitative and qualitative data about your customers' interactions and their experiences across various touchpoints. For example, you’ll know how many people drop off at each individual stage, which page elements they interact with or ignore, and what stops them from converting.
💡Pro tip: as you read this guide, you may not yet have most of this data, particularly when it comes to heatmaps, recordings, and survey results. That’s ok.
Unless you’re running your CJM workshop in the next 12 hours, you have enough time to set up Hotjar on your website and start collecting insights right now. The platform helps you:
Learn where and why users drop off with Funnels
Visualize interactions on key pages with Heatmaps
Capture visitor sessions across your website with Recordings
Run on-site polls with Surveys
When the time comes for you to start your customer journey mapping process, this data will be invaluable.
Step 3: invite your team to a customer journey mapping workshop
In our experience, the most effective way to get buy-in is not to try and convince people after things are done—include them in the process from the start. So while you can easily create a customer journey map on your own, it won’t be nearly as powerful as one you create with team members from different areas of expertise .
For example, if you’re looking at the purchase flow, you need to work with:
Someone from the UX team, who knows about the usability of the flow and can advocate for design changes
Someone from dev or engineering, who knows how things work in the back end, and will be able to push forward any changes that result from the map
Someone from success or support, who has first-hand experience talking to customers and resolving any issues they experience
✅ The output: you’ve set a date, booked a meeting space, and invited a group of four to six participants to your customer journey mapping workshop.
💡Pro tip: for your first map, stay small. Keep it limited to four to six people, and no main stakeholders . This may be unpopular advice, especially since many guides out there mention the importance of having stakeholders present from the start.
However, when you’re not yet very familiar with the process, including too many people early on can discourage them from re-investing their time into future CJM tasks. At this stage, it’s more helpful to brainstorm with a small team, get feedback on how to improve, and iterate a few times. Once you have a firm handle on the process, then start looping in your stakeholders.
On workshop day, you’ll spend half your time prepping and the other half running the actual session.
Step 1: prepare all your materials
To run a smooth workshop, ensure you do the following:
Bring stationery: for an interactive workshop, you’ll need basic materials such as pens, different colored Post-its, masking tape, and large sheets of paper to hang on the wall
Collect and print out the data: use the data you collected on Day 1. It’s good to have digital copies on a laptop or tablet for everybody to access, but print-outs could be the better alternative as people can take notes and scribble on them.
Print out an empathy map canvas for each participant: start the workshop with an empathy mapping exercise (more on this in Step 2). For this, hand each participant an empty empathy map canvas you can recreate from the template below.

Set up a customer journey map template on the wall: use a large sheet of paper to create a grid you'll stick to the wall and fill in as part of the workshop. On the horizontal axis, write the customer journey steps you identified during your Day 1 prep work; on the vertical axis, list the themes you want to analyze for each step. For example:
Actions your customers take
Questions they might have
Happy moments they experience
Pain points they experience
Tech limits they might encounter
Opportunities that arise

Step 2: run the workshop
This is the most interactive (and fun) part of the process. Follow the framework below to go from zero to a completed draft of a map in just under 2 hours .
Introduction [🕒 5–10 min]
Introduce yourself and your participants to one another
Using the one-two sentence description you defined on Day 1, explain the goal and scope of the workshop and the activities it will involve
Offer a quick summary of the customer persona you’ll be referring to throughout the session
Empathy mapping exercise [🕒 30 min]
Using the personas and data available, have each team member map their observations onto sticky notes and paste them on the relevant section of the empathy mapping canvas
Have all participants take turns presenting their empathy map
Facilitate group discussions where interesting points of agreement or disagreement appear
Customer journey mapping [🕒 60 min]
Using Post-its, ask each participant to fill in parts of the map grid with available information. Start by filling in the first row together, so everybody understands the process, then do each row individually (15–20 min). At the end of the process, you should have something like this:
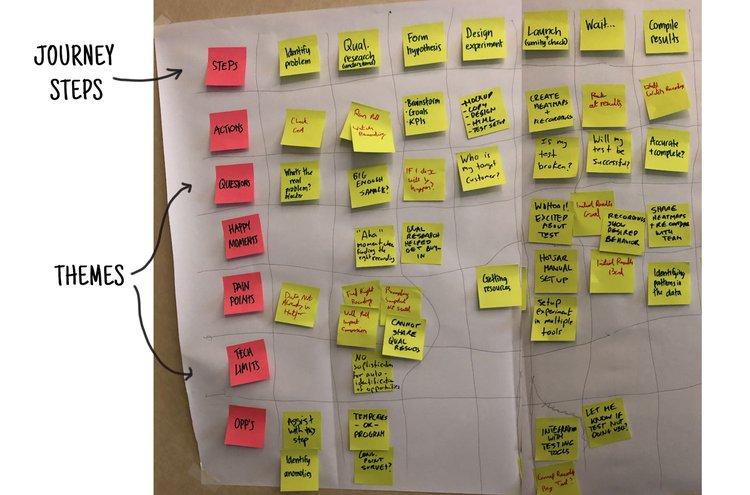
Looking at the completed map, encourage your team to discuss and align on core observations (and take notes: they’ll come in handy on your final half day). At this point, customer pain points and opportunities should become evident for everybody involved. Having a cross-functional team means people will naturally start discussing what can, or cannot, immediately be done to address them (35–40 min).
Wrap up [🕒 5 min]
Congratulations! Your first customer journey map is complete. Finish the session by thanking your participants and letting them know the next steps.
Final half-day: wrap up and share
Once you’ve gone through the entire customer journey mapping workshop, the number one thing you want to avoid is for all this effort to go to waste. Instead of leaving the map hanging on the wall (or worse: taking it down, folding it, and forgetting about it), the final step is to wrap the process up and communicate the results to the larger team.
Digitize the map so you can easily update and share it with team members: it may be tempting to use dedicated software or invest time into a beautiful design, but for the first few iterations, it’s enough to add the map to your team’s existing workflows (for example, our team digitized our map and added it straight into Jira, where it’s easily accessible)
Offer a quick write-up or a 5-minute video introduction of the activity: re-use the description you came up with on Day 1, including who was involved and the top three outcomes
Clearly state the follow-up actions: if you’ve found obvious issues that need fixing, that’s a likely next step. If you’ve identified opportunities for change and improvement, you may want to validate these findings via customer interviews and usability testing.
4 benefits of customer journey mapping
In 2023, it’s almost a given that great customer experience (CX) provides any business or ecommerce site with a competitive advantage. But just how you’re supposed to deliver on the concept and create wow-worthy experiences is often left unsaid, implied, or glossed over.
Customer journey maps help you find answers to this ‘How?’ question, enabling you to:
Visualize customer pain points, motivations, and drivers
Create cross-team alignment around the business
Remove internal silos and clarify areas of ownership
Make improvements and convert more visitors into customers
We’ve done a lot of customer journey work here at Hotjar, so we know that the above is true—but don’t just take our word for it: all the people we interviewed for this guide confirmed the benefits of journey mapping. Let’s take a look at what they shared.
1. Visualize customer pain points, motivations, and drivers
It’s one thing to present your entire team with charts, graphs, and trends about your customers, and quite another to put the same team in front of ONE map that highlights what customers think, want, and do at each step of their journey.
I did my first customer journey map at MADE.COM within the first three months of joining the company. I was trying to map the journey to understand where the pain points were.
For example, people who want to buy a sofa from us will be coming back to the site 8+ times over several weeks before making a purchase. In that time, they may also visit a showroom. So now I look at that journey, at a customer’s motivation for going to the website versus a physical store, and I need to make sure that the experience in the showroom complements what they're doing on-site, and vice-versa, and that it all kind of comes together.
The map helps in seeing that journey progress right up to the time someone becomes a customer. And it also continues after: we see the next touchpoints and how we're looking to retain them as a customer, so that they come back and purchase again.
A customer journey map is particularly powerful when you incorporate empathy into it, bringing to light specific emotions that customers experience throughout the journey.

2. Create cross-team alignment around the business
The best, most effective customer journey maps are not the solo project of the user experience (UX) or marketing team (though they may originate there).
Customer journey maps are a quick, easy, and powerful way to help everybody in your business get a clearer understanding of how things work from a customers’ perspective and what the customers’ needs are—which is the first step in your quest towards creating a better experience for them.
Our first goal for preparing a customer journey map was to improve understanding customers across the company, so that every employee could understand the entire process our clients go through.
For example, people from the shipping department didn't know how the process works online; people from marketing didn't know how customers behave after filing a complaint. Everything seems obvious, but when we shared these details, we saw that a lot of people didn't know how the company itself works—this map made us realize that there were still gaps we needed to fill.

If we discover that customers have a pain point in a specific section of the map, different teams can look at the same section from several angles; customer support can communicate why something is not possible, and engineering can explain why it’s going to take X amount of effort to get it done. Especially in cross-functional teams where we all come from really different disciplines, I find these maps to be an incredible way for us all to speak the same language.
3. Remove internal silos and clarify areas of ownership
As a company grows in size and complexity, the lines of ownership occasionally become blurry. Without clarity, a customer might get bounced like a ping pong ball across Sales, Success, and Support departments—not great for the seamless and frictionless customer experience we all want to offer.
A central source of ‘truth’ in the form of a customer journey map that everybody can refer to helps clarify areas of ownership and handover points.
We were growing as a team, and we realized we needed to operationalize a lot of the processes that, before then, had just been manually communicated. We did it through a customer journey map. Our goal was to better understand where these hand-off points were and how to create a more seamless experience for our customers, because they were kind of being punted from team to team, from person to person—and often, it was really hard to keep tabs on exactly where the customer was in that entire journey.
4. Make improvements and convert more visitors into customers
A customer journey map will take your team from 'It appears that 30% of people leave the website at this stage' to 'Wow, people are leaving because the info is incomplete and the links are broken.' Once everyone is aligned on the roadblocks that need to be addressed, changes that have a positive impact on the customer experience and customer satisfaction will happen faster.
The customer journey map brings it all together: it doesn't matter who you've got in the room. If you’re doing a proper journey map, they always get enlightened in terms of ‘Oh, my word. I did not know the customer's actually experiencing this.’ And when I walk out of the session, we have often solved issues in the business. Accountability and responsibilities have been assigned, and I find that it just works well.

Shaheema (right) working on a customer journey map
Collect the right data to create an effective customer journey map
The secret of getting value from customer journey mapping is not just building the map itself: it's taking action on your findings. Having a list of changes to prioritize means you can also measure their effect once implemented, and keep improving your customers' experience.
This all starts with collecting customer-centric data—the sooner you begin, the more information you’ll have when the time comes to make a decision.
Start mapping your customer journey today
Hotjar lets you experience your customer’s journey through their eyes, so you can visualize what’s working and what needs improvement.
FAQs about customer journey mapping
How do i create a customer journey map.
To create a useful customer journey map, you first need to define your objectives, buyer personas, and the goals of your customers (direct customer feedback and market research will help you here). Then, identify all the distinct touchpoints the customer has with your product or service in chronological order, and visualize the completion of these steps in a map format.
What are the benefits of customer journey mapping?
Customer journey mapping provides different teams in your company with a simple, easily understandable visualization that captures your customers’ perspective and needs, and the steps they’ll take to successfully use your product or service.
Consider customer journey mapping if you want to accomplish a specific objective (like testing a new product’s purchase flow) or work towards a much broader goal (like increasing overall customer retention or customer loyalty).
What is the difference between a customer journey map and an experience map?
The main difference between an experience map and a customer journey map is that customer journey maps are geared specifically toward business goals and the successful use of a product or service, while experience maps visualize an individual’s journey and experience through the completion of any task or goal that may not be related to business.
Jira Software
Project and issue tracking
Content collaboration
Jira Service Management
High-velocity ITSM
Visual project management
- View all products
Marketplace
Connect thousands of apps and integrations for all your Atlassian products
Developer Experience Platform
Jira Product Discovery
Prioritization and roadmapping
You might find helpful
Cloud Product Roadmap
Atlassian Migration Program
Work Management
Manage projects and align goals across all teams to achieve deliverables
IT Service Management
Enable dev, IT ops, and business teams to deliver great service at high velocity
Agile & DevOps
Run a world-class agile software organization from discovery to delivery and operations
BY TEAM SIZE
Small Business
BY TEAM FUNCTION
Software Development
BY INDUSTRY
Telecommunications
Professional Services
What's new
Atlassian together.
Get Atlassian work management products in one convenient package for enterprise teams.
Atlassian Trust & Security
Customer Case Studies
Atlassian University
Atlassian Playbook
Product Documentation
Developer Resources
Atlassian Community
Atlassian Support
Enterprise Services
Partner Support
Purchasing & Licensing
Work Life Blog

Atlassian Presents: Unleash
Product updates, hands-on training, and technical demos – catch all that and more at our biggest agile & DevOps event.
- Atlassian.com
Customer Journey Mapping
Journey mapping helps you visualize how customers experience your product or service, and how they feel along the way. Scroll to step 6 for a real-life example from one of our product teams!
USE THIS PLAY TO...
Understand the customer journey from a specific persona's perspective so that you can design a better experience.

Running the play
Depending on how many touchpoints along the customer journey you're mapping, you might break the journey into stages and tackle each stage in pairs.
Sticky notes
Whiteboards.io Template
Define the map's scope (15 min)
Ideally, customer journey mapping focuses on the experience of a single persona in a single scenario with a single goal. Else, the journey map will be too generic, and you'll miss out on opportunities for new insights and questions. You may need to pause creating a customer journey map until you have defined your customer personas . Your personas should be informed by customer interviews , as well as data wherever possible.
Saying that, don't let perfect be the enemy of good! Sometimes a team just needs to get started, and you can agree to revisit with more rigor in a few months' time. Once scope is agreed on, check your invite list to make sure you've got people who know the details of what customers experience when using your product or service.
Set the stage (5 min)
It's really important that your group understands the user persona and the goal driving their journey. Decide on or recap with your group the target persona and the scope of the journey being explored in your session. Make sure to pre-share required reading with the team at least a week ahead of your session to make sure everyone understands the persona, scope of the journey, and has a chance to delve deeper into research and data where needed. Even better- invite the team to run or attend the customer interviews to hear from customers first hand!
E.g. "We're going to focus on the Alana persona. Alana's role is project manager, and her goal is to find a scalable way for her team to share their knowledge so they spend less time explaining things over email. We're going to map out what it's like for Alana to evaluate Confluence for this purpose, from the point where she clicks that TRY button, to the point where she decides to buy it – or not."
Build a customer back-story (10 min)
Have the group use sticky notes to post up reasons why your target persona would be on this journey in the first place. Odds are, you'll get a range of responses: everything from high-level goals, to pain points, to requested features or services. Group similar ideas and groom the stickies so you can design a story from them.
These narratives should be inspired by actual customer interviews. But each team member will also bring a different perspective to the table that helps to broaden the lens.
Take a look at the example provided in the call out of this section. This back story starts with the pain points – the reasons why Alana would be wanting something like Confluence in the first place.
- E.g., "Her team's knowledge is in silos"
Then it basically has a list of requirements – what Alana is looking for in a product to solve the bottom pain points. This is essentially a mental shopping list for the group to refer to when mapping out the customer journey.
- E.g., "Provide structure"
Then it has the outcomes – goals that Alana wants to achieve by using the product
- E.g., "To keep my team focused on their work instead of distracted by unnecessary emails and shoulder-taps"
And finally the highest-level goal for her and her team.
- E.g., "Improve team efficiency"
Round off the back story by getting someone to say out loud what they think the overall story so far is, highlighting the main goals the customer has. This ensures a shared understanding that will inform the journey mapping, and improve the chances that your team will map it from the persona's point of view (not their own).
- E.g., "Alana and her team are frustrated by having to spend so much time explaining their work to each other, and to stakeholders. They want a way to share their knowledge, and organize it so it's easy for people outside their team to find, so they can focus more energy on the tasks at hand."

For example...
Here's a backstory the Confluence team created.
Map what the customer thinks and feels (30-60 min)
With the target persona, back story, and destination in place, it's time to walk a mile in their shoes. Show participants how to get going by writing the first thing that the persona does on a sticky note. The whole group can then grab stickies and markers and continue plotting the journey one action at a time.
This can also include questions and decisions! If the journey branches based on the answers or choices, have one participant map out each path. Keep in mind that the purpose of this Play is to build empathy for, and a shared understanding of the customer for the team. In order to do this, we focus on mapping the current state of one discrete end to end journey, and looking for opportunities for improvement.
To do a more comprehensive discovery and inform strategy, you will need to go deeper on researching and designing these journey maps, which will need to split up over multiple sessions. Take a look at the variation below for tipes on how to design a completely new customer journey.
Use different color sticky notes for actions, questions, decisions, etc. so it's easier to see each element when you look at the whole map.
For each action on the customer journey, capture which channels are used for the interactions. Depending on your context, channels might include a website, phone, email, postal mail, face-to-face, and/or social media.
It might also help to visually split the mapping area in zones, such as "frontstage" (what the customer experiences) versus "backstage" (what systems and processes are active in the background).
Journey mapping can open up rich discussion, but try to avoid delving into the wrong sort of detail. The idea is to explore the journey and mine it for opportunities to improve the experience instead of coming up with solutions on the spot. It's important not only to keep the conversation on track, but also to create an artefact that can be easily referenced in the future. Use expands or footnotes in the Confluence template to capture any additional context while keeping the overview stable.
Try to be the commentator, not the critic. And remember: you're there to call out what’s going on for the persona, not explain what’s going on with internal systems and processes.
To get more granular on the 'backstage' processes required to provide the 'frontstage' customer value, consider using Confluence Whiteboard's Service Blueprint template as a next step to follow up on this Play.

ANTI-PATTERN
Your map has heaps of branches and loops.
Your scope is probably too high-level. Map a specific journey that focuses on a specific task, rather than mapping how a customer might explore for the first time.
Map the pain points (10-30 min)
"Ok, show me where it hurts." Go back over the map and jot down pain points on sticky notes. Place them underneath the corresponding touchpoints on the journey. Where is there frustration? Errors? Bottlenecks? Things not working as expected?
For added value, talk about the impact of each pain point. Is it trivial, or is it likely to necessitate some kind of hack or work-around. Even worse: does it cause the persona to abandon their journey entirely?
Chart a sentiment line (15 min)
(Optional, but totally worth it.) Plot the persona's sentiment in an area under your journey map, so that you can see how their emotional experience changes with each touchpoint. Look for things like:
- Areas of sawtooth sentiment – going up and down a lot is pretty common, but that doesn't mean it's not exhausting for the persona.
- Rapid drops – this indicates large gaps in expectations, and frustration.
- Troughs – these indicate opportunities for lifting overall sentiments.
- Positive peaks – can you design an experience that lifts them even higher? Can you delight the persona and inspire them to recommend you?
Remember that pain points don't always cause immediate drops in customer sentiment. Sometimes some friction may even buold trust (consider requiring verification for example). A pain point early in the journey might also result in negative feelings later on, as experiences accumulate.
Having customers in the session to help validate and challenge the journey map means you'll be more confident what comes out of this session.
Analyse the big picture (15 min)
As a group, stand back from the journey map and discuss trends and patterns in the experience.
- Where are the areas of greatest confusion/frustration?
- Where is the journey falling short of expectations?
- Are there any new un-met needs that have come up for the user type?
- Are there areas in the process being needlessly complicated or duplicated? Are there lots of emails being sent that aren’t actually useful?
Then, discuss areas of opportunity to improve the experience. E.g., are there areas in the process where seven steps could be reduced to three? Is that verification email actually needed?
You can use quantitative data to validate the impact of the various opportunity areas identified. A particular step may well be a customer experience that falls short, but how many of your customers are actually effected by that step? Might you be better off as a team focused on another higher impact opportunity?
Here's a user onboarding jouney map our Engaging First Impressions team created.
Be sure to run a full Health Monitor session or checkpoint with your team to see if you're improving.
MAP A FUTURE STATE
Instead of mapping the current experience, map out an experience you haven't delivered yet. You can map one that simply improves on existing pain points, or design an absolutely visionary amazeballs awesome experience!
Just make sure to always base your ideas on real customer interviews and data. When designing a totally new customer journey, it can also be interesting to map competitor or peer customer journeys to find inspiration. Working on a personalised service? How do they do it in grocery? What about fashion? Finance?
After the mapping session, create a stakeholder summary. What pain points have the highest impact to customers' evaluation, adoption and usage of our products? What opportunities are there, and which teams should know about them? What is your action plan to resolve these pain points? Keep it at a summary level for a fast share out of key takeaways.
For a broader audience, or to allow stakeholders to go deeper, you could also create a write-up of your analysis and recommendations you came up with, notes captured, photos of the group and the artefacts created on a Confluence page. A great way of sharing this information is in a video walk through of the journey map. Loom is a great tool for this as viewers can comment on specific stages of the journey. This can be a great way to inspire change in your organization and provide a model for customer-centric design practices.
KEEP IT REAL
Now that you have interviewed your customers and created your customer journey map, circle back to your customers and validate! And yes: you might learn that your entire map is invalid and have to start again from scratch. (Better to find that out now, versus after you've delivered the journey!) Major initiatives typically make multiple journey maps to capture the needs of multiple personas, and often iterate on each map. Remember not to set and forget. Journeys are rapidly disrupted, and keeping your finger on the pulse of your customer's reality will enable your team to pivot (and get results!) faster when needed.
Related Plays
Customer Interview
Project Poster
Want even more Playbook?
Drop your email below to be notified when we add new Health Monitors and plays.
Thanks! Now get back to work.
Got feedback?
Drop a question or comment on the Atlassian Community site.
Shared understanding
Different types of teams need to share an understanding of different things.
LEADERSHIP TEAMS
The team has a shared vision and collective purpose which they support, and confidence they have made the right strategic bets to achieve success.
Proof of concept
Project teams.
Some sort of demonstration has been created and tested, that demonstrates why this problem needs to be solved, and demonstrates its value.
Customer centricity
Service teams.
Team members are skilled at understanding , empathizing and resolving requests with an effective customer feedback loop in place that drives improvements and builds trust to improve service offerings.


How to Create a User Journey Map – Made Simple!
Written by samantha ferguson.
Last updated on 9th August 2023
When’s the last time you read a map?
Thanks to Google Maps and other satellite navigation apps, the answer could be never.
According to a recent study , 1 in 7 millennials have never read a map , and only 18% feel ‘very confident’ in their ability to read one.
With all of the other options available, people are spending less time looking at road maps. And this accessibility and breadth of options has also affected user journey maps.
With all of the different ways users can communicate with your brand – email, social media , apps, brick and mortar stores, websites, review sites – it can be tough to track the journey that led them towards becoming a new user of your product or service.

But we’re here to make it less tough!
In this article we’re going to take a look at how to create a user journey map – made simple!
What is a user journey map?
A user journey is the path a user takes, across different touchpoints, while interacting with your brand.
A user journey map , more specifically, is a visualisation of this journey. It can help you understand how users are interacting with your brand, product, or service – and what their needs, motivations, and pain points are.
User journey maps differ from company to company, and industry to industry. But they always reflect a timeline that outlines important steps in the user journey. Here’s an example for a food delivery app:

And here’s another one for a fitness app:

Why you need a user journey map
Finding out more about the user journey can help you to better understand your customers’ motivations and pain points.
And this insight can help you to improve your onboarding of new customers . For example, if you spot a part of your onboarding flow that has a lot of drop-off, a user journey map can help you to understand the reasons behind that drop-off, and ultimately remove or improve that section of your onboarding.
Even if you feel like your user journey is pretty good right now, mapping it out will give you more of an in-depth overview. And this could allow you to create a more memorable experience for your users.
After all, why settle for ‘pretty good’ when you can make it awesome?!
How to create a user journey map
Okay, now into the good stuff! Grab a notepad and pen, or maybe open a fresh Google Sheet, as we take you through four simple steps that will help you create a user journey map.
Step one: Research your users
To understand the journey your users take, you must first understand your users.
If you haven’t done so already, then you’ll need to create buyer personas for your users. Buyer personas are fictional representations of your ideal customers.
When creating a buyer persona, you should go into as much detail as you can for each type of customer you have – think about their age, their home life, their worklife, any struggles they have, and so on. The aim is to make this person as tangible as possible. Here’s an example for a food delivery app:
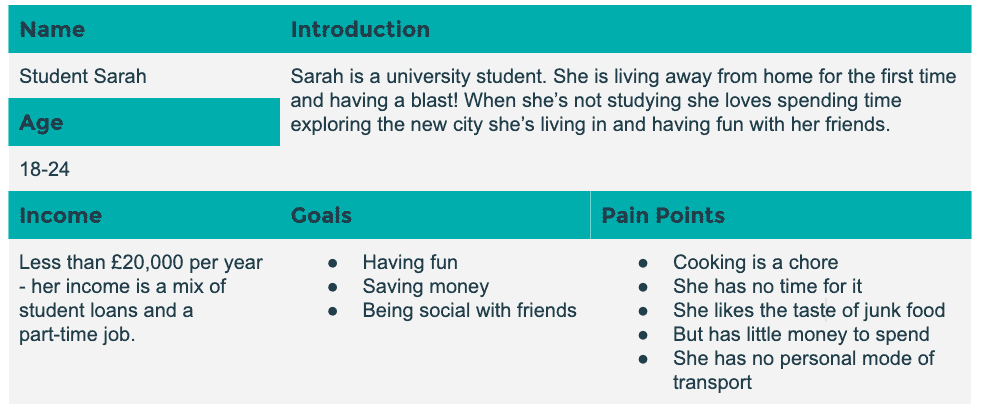
In addition to creating buyer personas, you can also survey your current customers to find out more about them.
For each user journey, it’s important to understand 4 key things:
- Customer goals
- Touchpoints
- Customer activity
- Customer pain points
By creating a user experience survey about your app, product, or service, you could uncover some things about the user journey that you may not already know.
It’s really easy to send out a survey using a platform like SurveyMonkey . Here’s a quick example we made using the Customer Satisfaction template:
SurveyMonkey pulls everything together in seconds, and all of the questions can be customised and personalised to fit your brand.
Step two: List your touchpoints
The next step is to list all the possible touchpoints that your users could interact with along their journey with your app, product, or service.
This is important because it gives you an insight into how customers are discovering you and can also inform you of any overlaps and/or gaps in your user journey.
For example, you could discover that people are coming to your site very early on in the user journey, but because they are missing out steps that could help them build knowledge about your product or service, they aren’t seeing the value – and therefore aren’t converting.
Potential touchpoints could include:
- Social media
- Review sites
- Word of mouth
- Email marketing
- Video marketing
…the list could go on and on. It’s basically anywhere, online or offline, that users could hear about you.
It also helps to check your analytics software and find out which sites are backlinking to you – as this is another potential source of discovery for new users. If you don’t currently have any analytics software, then Google Analytics is a good place to start.
Step three: Sketch out the journey
Now that you have your buyer personas and all of the touchpoints listed, you can use these together to sketch out a user journey – from awareness (just discovering your brand) to loyalty (falling madly in love with your brand).
To start, create a chart that has 6 columns and 5 rows. This is easiest using a spreadsheet software, like Google Sheets .
Your columns should be labelled as each step in the user journey and your rows should be labelled for the four key things we mentioned above – goals, touchpoints, activity, and experience (experience covers ‘pain points’). The top row should include the name of your brand. Here’s an example:

Next, you’ll want to start filling out your journey, one column at a time. A fun way to do this is to take the user journey yourself – as if you’re discovering your brand for the first time.
This activity of viewing your brand with fresh eyes will help you to spot any friction, repetition, or gaps that new users may come across when embarking on your user journey.
If you do find anything that makes the user journey difficult then it’s important to implement changes to fix that.
Step four: Put it all together
Finally, it’s time to put everything together to create your user journey map.
We included some fake examples above, but let’s take one last look at what a user journey would look like for a real company.
Here’s a user journey map that we mocked up for travel company, Airbnb :

As you can see, the customer’s goals are clearly mapped out and all of the potential touchpoints that they interact with are considered. The experience graph also helps to show how new users may be feeling throughout the journey.
Of course, there are many, many different ways to create a user journey map. This is just our simple ‘beginner’s map’ to help you get started. As you begin using your map, you’ll probably find ways to tweak it to make it work in the best way for you.
Final thoughts
The first map was thought to have been created in the 6th century BC! And they’ve been telling us where we need to go ever since.
Your user journey map will help you visualise the steps that your users take and the experiences they have – both positive and negative – on the road to becoming a customer. Helping you to improve that journey, and increase your number of happy users.
For more information on how to start the user journey with a bang, take a look at our onboarding videos .

Related Posts

User onboarding is your first step towards converting new customers into lifelong users of your product, brand or software. Here are some great examples.

We’ve compiled 33 of our favourite onboarding emails, from brands (big and small) across all kinds of different niches. Find out what makes them all so great.

This guide will help you to improve your retention rates and create an onboarding experience that gets your users to stick around, using video.
🎥 One great video example
🗓 Once per week
🤩 Analysed & reviewed
✉️ Direct to your inbox

How to explain anything with video
- Name * First Last
- Hidden cloudamp__data__c *
- Hidden gclid
- Comments This field is for validation purposes and should be left unchanged.
Get info & pricing
Fill out the form below and we’ll send a FREE info pack with everything you need to know about our service. Then we’ll be in touch to discuss how we can help you with your next video 🚀

We make videos! In fact, we’ve made over 3,000 videos for 1,500 companies around the world. We create everything from simple social media videos to explainer videos, customer testimonials and everything in-between.
Complete your details below and we’ll send you a FREE info pack with everything you need to know about our service, straight to your inbox.
The Evergreen Data Visualization Certification Program is now open!
Today is your last chance to enroll in the data visualization academy. this is where you totally change how you think about data., free class october 6: ✨ which viz is it ✨.
Journey maps are some of the most bad-ass visuals I know about. With origins in customer experience and human-centered design, a journey map shows how a client moves through your organization.
Seeing the actual journey a customer takes can be eye-opening for people on staff who only work on one small part of a project. Journey maps can show areas of strength and weakness. They depict the customer’s path.
There are a couple of different contexts for using journey maps, but I find them best used when you’re trying to explore and better understand something that is vague, open-ended, and specific to people’s unique experiences. In both the business and nonprofit industries, it’s easy to be out of touch with your customer.
You build a product or design a program meant to meet demand and need, but are you? Boat loads of stats can be run on product sales, program metrics, and even survey data, but at the end of the day, we often fall short from getting a true understanding of the people we are trying to serve and what it is like in their shoes.
This is where qualitative methods, specifically journey maps come in handy. In journey mapping, you are essentially mapping a customer or client’s journey through your organization. Every single touchpoint with your organization has an impact on customer’s interest, satisfaction, and loyalty.
Journey maps combine the powerful use of both storytelling and visualization. This process gives power to your customer and clients to create a shared vision and at the end of the day leads to stakeholders and organizations learning more about the experiences of their consumers.
When the Smithsonian Office of Visitor Services mapped out their customer experience with a journey map, they were able to identify pain points for first-time visitors, such as inadequate signage and confusing entry logistics. Samir Bitar, past Director, used this journey map to get support from decision-makers to initiate necessary changes, eventually leading to the acclaimed Trip Planner.

Listen here to an interview with Samir to get the scoop on how this whole thing went down.
You don’t need the resources of the Smithsonian behind you to make your own journey map. It is just that building one requires collecting data in a very specific manner. This is one of the few qualitative examples that is both a visual and data collection method rolled into one.
I partnered on a journey map project with a good friend and colleague of mine from a local non-profit agency that works to empower young women of color in middle and high school. We got a group of stakeholders from her organization’s leadership together for the journey mapping session. Together, they worked to build a shared understanding of their client’s journeys.
To start, each person in the room brainstormed touchpoints along the journey. Each touchpoint was written on a sticky note. As a group, we then organized the touchpoints along a continuum or journey, starting with things like initiatives they have to build awareness for their program and their formal intake process.
Touchpoint by touchpoint, they began rating each one based on their understanding of their client’s experience. Each touchpoint got a rating of 1-5, with 1 meaning that touchpoint needs a lot of work and 5 meaning they rock it. Imagine the 5-point scale is on the y-axis and the touchpoints arranged along the continuum according to their rating.

At the end of the session, we had a visual starting to show the peaks of successes and valleys of opportunities for improvement.

Now, to be true to the journey map process, you do not have to move the visual beyond this point. Your organization’s commitment to the process, budget, and time will all factor into how much effort you put into formalizing the collective journey. If you do choose to formalize the visual, all you need is PowerPoint and some time to insert boxes, lines, and text.

Before the journey map was visualized, staff had a hard time thinking through all the touchpoints their participants experienced from the program, let alone being able to rate them on how well the program was managing and executing the different components.
After looking at the visualized map, it became clear that touchpoints with the lower ratings actually happened more at the beginning of programming.
When looking further, they realized that some of the lower rating items were actually easy fixes. They could easily assign an intern to create a community referral packet that gives staff resources on how to refer participants to other community resources when they need it – things like mental health services, food banks, etc.
Going forward, staff plan to use this journey map to help in their strategic planning process. For example, if they want to focus on long-term engagement for participants, they can see that the touchpoints in that section were rated pretty low and they will need more program staff and resources dedicated to improving that part of their programming.
Overall, the process helped them identify how to use resources more effectively. They found that time-intensive and resource-dependent activities were being executed really well, but that they simply lacked some of the capacity to strengthen things they felt they weren’t doing so well.
This helped them identify gaps in staff time, professional development and training, and the need to make space for more roles.
Journey maps are so cool. I have even more ideas for graphing qualitative data, too. Download my Qualitative Chart Chooser.
Get the Scoop.
Want biweekly tips and tricks on better data visualization & reporting? Get my super helpful newsletter right in your inbox. We'll never share your information with anyone else. That would be gross.
From the Blog
When you’ve gotta graph 62 counties, learn something new.
Share this helpful info with a friend who needs an extra perk today or post it to your social where your third cousin can benefit, too.
Customer Journey Maps: How to Create Really Good Ones [Examples + Template]
Updated: April 17, 2024
Published: May 04, 2023
Did you know 70% of online shoppers abandoned their carts in 2022? Why would someone spend time adding products to their cart just to fall off the customer journey map at the last second?

The thing is — understanding your customer base can be very challenging. Even when you think you’ve got a good read on them, the journey from awareness to purchase for each customer will always be unpredictable, at least to some level.

While it isn’t possible to predict every experience with 100% accuracy, customer journey mapping is a convenient tool for keeping track of critical milestones that every customer hits. In this post, I’ll explain everything you need to know about customer journey mapping — what it is, how to create one, and best practices.
Table of Contents
What is the customer journey?
What is a customer journey map, benefits of customer journey mapping, customer journey stages.
- What’s included in a customer journey map?
The Customer Journey Mapping Process
Steps for creating a customer journey map.
- Types of Customer Journey Maps
Customer Journey Mapping Best Practices
- Customer Journey Design
- Customer Journey Map Examples
Free Customer Journey Map Templates
.webp)
Free Customer Journey Template
Outline your company's customer journey and experience with these 7 free templates.
- Buyer's Journey Template
- Future State Template
- Day-in-the-Life Template
You're all set!
Click this link to access this resource at any time.
The customer journey is the series of interactions a customer has with a brand, product, or business as they become aware of a pain point and make a purchase decision. While the buyer’s journey refers to the general process of arriving at a purchase, the customer journey refers to a buyer's purchasing experience with a specific company or service.
Customer Journey vs. Buyer Journey
Many businesses that I’ve worked with were confused about the differences between the customer’s journey and the buyer’s journey. The buyer’s journey is the entire buying experience from pre-purchase to post-purchase. It covers the path from customer awareness to becoming a product or service user.
In other words, buyers don’t wake up and decide to buy on a whim. They go through a process of considering, evaluating, and purchasing a new product or service.
The customer journey refers to your brand’s place within the buyer’s journey. These are the customer touchpoints where you will meet your customers as they go through the stages of the buyer’s journey. When you create a customer journey map, you’re taking control of every touchpoint at every stage of the journey instead of leaving it up to chance.
For example, at HubSpot, our customer’s journey is divided into three stages — pre-purchase/sales, onboarding/migration, and normal use/renewal.

1. Use customer journey map templates.
Why make a customer journey map from scratch when you can use a template? Save yourself some time by downloading HubSpot’s free customer journey map templates .
This has templates that map out a buyer’s journey, a day in your customer’s life, lead nurturing, and more.
These templates can help sales, marketing, and customer support teams learn more about your company’s buyer persona. This will improve your product and customer experience.
2. Set clear objectives for the map.
Before you dive into your customer journey map, you need to ask yourself why you’re creating one in the first place.
What goals are you directing this map towards? Who is it for? What experience is it based upon?
If you don’t have one, I recommend creating a buyer persona . This persona is a fictitious customer with all the demographics and psychographics of your average customer. This persona reminds you to direct every aspect of your customer journey map toward the right audience.
3. Profile your personas and define their goals.
Next, you should conduct research. This is where it helps to have customer journey analytics ready.
Don’t have them? No worries. You can check out HubSpot’s Customer Journey Analytics tool to get started.
Questionnaires and user testing are great ways to obtain valuable customer feedback. The important thing is to only contact actual customers or prospects.
You want feedback from people interested in purchasing your products and services who have either interacted with your company or plan to do so.
Some examples of good questions to ask are:
- How did you hear about our company?
- What first attracted you to our website?
- What are the goals you want to achieve with our company? In other words, what problems are you trying to solve?
- How long have you/do you typically spend on our website?
- Have you ever made a purchase with us? If so, what was your deciding factor?
- Have you ever interacted with our website to make a purchase but decided not to? If so, what led you to this decision?
- On a scale of 1 to 10, how easily can you navigate our website?
- Did you ever require customer support? If so, how helpful was it, on a scale of 1 to 10?
- Can we further support you to make your process easier?
You can use this buyer persona tool to fill in the details you procure from customer feedback.
4. Highlight your target customer personas.
Once you’ve learned about the customer personas that interact with your business, I recommend narrowing your focus to one or two.
Remember, a customer journey map tracks the experience of a customer taking a particular path with your company. If you group too many personas into one journey, your map won’t accurately reflect that experience.
When creating your first map, it’s best to pick your most common customer persona and consider the route they would typically take when engaging with your business for the first time.
You can use a marketing dashboard to compare each and determine the best fit for your journey map. Don’t worry about the ones you leave out, as you can always go back and create a new map specific to those customer types.
5. List out all touchpoints.
Begin by listing the touchpoints on your website.
What is a touchpoint in a customer journey map?
A touchpoint in a customer journey map is an instance where your customer can form an opinion of your business. You can find touchpoints in places where your business comes in direct contact with a potential or existing customer.
For example, if I were to view a display ad, interact with an employee, reach a 404 error, or leave a Google review, all of those interactions would be considered a customer touchpoint.
Your brand exists beyond your website and marketing materials, so you must consider the different types of touchpoints in your customer journey map. These touchpoints can help uncover opportunities for improvement in the buying journey.
Based on your research, you should have a list of all the touchpoints your customers are currently using and the ones you believe they should be using if there’s no overlap.
This is essential in creating a customer journey map because it provides insight into your customers’ actions.
For instance, if they use fewer touchpoints than expected, does this mean they’re quickly getting turned away and leaving your site early? If they are using more than expected, does this mean your website is complicated and requires several steps to reach an end goal?
Whatever the case, understanding touchpoints help you understand the ease or difficulties of the customer journey.
Aside from your website, you must also look at how your customers might find you online. These channels might include:
- Social channels.
- Email marketing.
- Third-party review sites or mentions.
Run a quick Google search of your brand to see all the pages that mention you. Verify these by checking your Google Analytics to see where your traffic is coming from. Whittle your list down to those touchpoints that are the most common and will be most likely to see an action associated with it.
At HubSpot, we hosted workshops where employees from all over the company highlighted instances where our product, service, or brand impacted a customer. Those moments were recorded and logged as touchpoints. This showed us multiple areas of our customer journey where our communication was inconsistent.
The proof is in the pudding — you can see us literally mapping these touch points out with sticky notes in the image below.

Don't forget to share this post!
Related articles.
![How AI Image Misuse Made a World of Miscommunication [Willy's Chocolate Experience]](https://blog.hubspot.com/hubfs/ai%20image%20misuse%20the%20willy%20wonka%20experience%20%281%29.png "project journey map")
How AI Image Misuse Made a World of Miscommunication [Willy's Chocolate Experience]

7 Ways to Delight Your Customers This Holiday Season

14 Customer Experience Fails that Companies Can Learn From
![How Customer Experience Has Evolved Over the Last Decade [+ 2024 Trends]](https://blog.hubspot.com/hubfs/future-of-customer-experience.png "project journey map")
How Customer Experience Has Evolved Over the Last Decade [+ 2024 Trends]
![Memorable Examples of AR in Customer Experience [+Tips for Implementing the Technology]](https://blog.hubspot.com/hubfs/augmented%20reality%20customer%20experience.png "project journey map")
Memorable Examples of AR in Customer Experience [+Tips for Implementing the Technology]

Digital Customer Experience: The Ultimate Guide for 2023
![How to Implement a Hybrid Customer Service Strategy That Works [Expert Tips]](https://blog.hubspot.com/hubfs/hybrid%20customer%20service_featured.png "project journey map")
How to Implement a Hybrid Customer Service Strategy That Works [Expert Tips]

User Flows: 8 Tips For Creating A Super Smooth User Experience

11 Best Practices for B2B Customer Experience
![Customer Experience vs. User Experience: What’s the Difference? [+ Examples]](https://blog.hubspot.com/hubfs/customer-experience-vs-user-experience_2.webp "project journey map")
Customer Experience vs. User Experience: What’s the Difference? [+ Examples]
Outline your company's customer journey and experience with these 7 free customer journey map templates.
Service Hub provides everything you need to delight and retain customers while supporting the success of your whole front office
All Mars Resources

Perseverance’s ‘Bunsen Peak’ Sample
NASA’s Perseverance Mars rover captured this image of a sample cored from a rock called “Bunsen Peak” on March 11,…

NASA’s Curiosity Rover Reaches Gediz Vallis Channel (360 View)
360-degree panorama provided by NASA’s Curiosity Mars rover. This view was captured at Gediz Vallis channel, a feature that formed…

Animation of Mars Helicopter Flight Test
This animation shows a simulation of the response of NASA’s Ingenuity Mars Helicopter to the system identification, or “Sys-ID,” process.…

Rover, Helicopter Locations in Jezero Crater
This map shows the locations of NASA’ Perseverance rover (white star) and Ingenuity Mars Helicopter (cyan star) on Dec. 19,…

Sol 4132: Right Navigation Camera, Cylindrical Projection
NASA’s Mars rover Curiosity took 31 images in Gale Crater using its mast-mounted Right Navigation Camera (Navcam) to create this…

Sol 4130: Right Navigation Camera, Cylindrical Projection
NASA's Mars rover Curiosity took 31 images in Gale Crater using its mast-mounted Right Navigation Camera (Navcam) to create this…

Sol 4128: Right Navigation Camera, Cylindrical Perspective
NASA's Mars rover Curiosity took 30 images in Gale Crater using its mast-mounted Right Navigation Camera (Navcam) to create this…

Sol 4128: Left Navigation Camera, Vertical Projection
NASA's Mars rover Curiosity took 30 images in Gale Crater using its mast-mounted Left Navigation Camera (Navcam) to create this…

Sol 4128: Left Navigation Camera, Cylindrical Perspective

Sol 4128: Left Navigation Camera, Cylindrical Projection

Sol 4128: Mast-Mounted Navigation Camera, Cylindrical Perspective
NASA's Mars rover Curiosity took 30 image pairs in Gale Crater using its mast-mounted Navigation Camera (Navcam) to create this…

Sol 4128: Right Navigation Camera, Cylindrical Projection

Sol 4125: Right Navigation Camera, Cylindrical Projection
NASA's Mars rover Curiosity took 52 images in Gale Crater using its mast-mounted Right Navigation Camera (Navcam) to create this…

Sol 4123: Right Navigation Camera, Cylindrical Projection
NASA's Mars rover Curiosity took 51 images in Gale Crater using its mast-mounted Right Navigation Camera (Navcam) to create this…

Sol 4118: Right Navigation Camera, Cylindrical Projection
NASA's Mars rover Curiosity took 49 images in Gale Crater using its mast-mounted Right Navigation Camera (Navcam) to create this…
IMAGES
VIDEO
COMMENTS
Journey mapping is a tool used to understand the user's experience with a product or service. It helps you to identify user needs, pain points, and opportunities in a systematic way. In this article, I will illustrate the value of journey maps, lay out the necessary ingredients, and finally demonstrate an example.
Definition of a Journey Map. Definition: A journey map is a visualization of the process that a person goes through in order to accomplish a goal. In its most basic form, journey mapping starts by compiling a series of user actions into a timeline. Next, the timeline is fleshed out with user thoughts and emotions in order to create a narrative.
Create a User Journey Map in Miro is a hands-on course where you'll build a user journey map for a UX design project that documents the user's actions, emotions, and thoughts while using a product so you can identify opportunities for improvement. Learn where and how user journey mapping is used in the design process with Google's course Start ...
Columns capture the five key stages of the user journey: awareness, consideration, decision, purchase, and retention (see below). Rows show customer experiences across these stages—their thoughts, feelings, and pain points. These experiences are rated as good, neutral, and bad. To see how this works, consider a practical example.
Journey maps rely on certain components to organize the narrative and ensure that the artifact is easy to understand and process. These components can be identified either at the initiation of the journey-mapping project or during key milestones within the journey-mapping process, such as research phases and workshops.
Journey maps visualize the process that a user goes through to accomplish a goal. They provide a holistic view of the customer experience, highlighting both positive and negative moments from the user's point-of-view.. Leading a journey-mapping initiative is no small challenge. It takes product knowledge and research savvy, along with project- and stakeholder-management skills.
The user journey map, also known as customer journey map or user experience journey map is a way to visually structure your knowledge of potential users and how they experience a service.. Customer journey mapping is also a popular workshop task to align user understanding within teams. If backed up by user data and research, they can be a high-level inventory that helps discover strategic ...
Understanding whom the user is is an essential step to creating a successful and comprehensive journey map. This entails using qualitative, quantitative, analytical, and anecdotal methods to gather and analyze information about the consumers' needs, motivations, levels of satisfaction, and attitudes towards the product, service or business.
The user journey map is an overview of the key touchpoints and interactions and describes the user's motivation, feelings, emotions, and goals stage-by-stage. At a rudimentary level, a user journey map is a compilation of the user's actions into a timeline. The next step sees the timeline being infused with the user's thoughts, feelings ...
A journey map is a holistic, visual representation of a user's experience with a product or service over time. Journey maps combine data and insight from other research and discovery methods to provide a detailed description from the user's point of view of steps taken, decisions made, successes, pain points, and emotions felt.
A product journey map is a key part of the product development and design process as it serves as a peek into how your users see and experience your product or service. It also enhances the overall product experience and improves chances of customers reaching the activation then retention stages. In this article, we'll cover what a product ...
Journey maps, in other words, are a great way to take us as product managers out of our own product-focused bubbles and force us to take a fresh and honest look — through our customers' eyes — at what it's like to interact with us. 3. A journey map can help bring together the various departments across your company, and help more ...
This is what the customer journey map (CJM) is all about—epic storytelling that involves comprehensive planning to capture the design process and deliver a unique customer experience. Creating a customer journey map (also called the user journey map) involves planning a project from the user's point of view and using personas, epics ...
Here's our beginner customer journey mapping framework to help you create your first complete map in 2 and ½ working days: Day 1: preliminary customer journey mapping work. Day 2: prep and run your customer journey mapping workshop. Final ½ day: wrap up and share your results.
Define the map's scope (15 min) Ideally, customer journey mapping focuses on the experience of a single persona in a single scenario with a single goal. Else, the journey map will be too generic, and you'll miss out on opportunities for new insights and questions. You may need to pause creating a customer journey map until you have defined your ...
Step three: Sketch out the journey. Now that you have your buyer personas and all of the touchpoints listed, you can use these together to sketch out a user journey - from awareness (just discovering your brand) to loyalty (falling madly in love with your brand). To start, create a chart that has 6 columns and 5 rows.
A user journey map (also called a customer journey map) visually represents a typical user's path when using a product. It's a popular user experience research technique that reveals how users interact with and use a product over time - starting with your new user onboarding flow.. The purpose of journey mapping is to get inside the head of your users, allowing you to make meaningful ...
6. Make the customer journey map accessible to cross-functional teams. Customer journey maps aren't very valuable in a silo. However, creating a journey map is convenient for cross-functional teams to provide feedback. Afterward, make a copy of the map accessible to each team so they always keep the customer in mind.
With origins in customer experience and human-centered design, a journey map shows how a client moves through your organization. Seeing the actual journey a customer takes can be eye-opening for people on staff who only work on one small part of a project. Journey maps can show areas of strength and weakness. They depict the customer's path.
By the end of this project, you will be able to create a customer journey map that includes touchpoints from the internet (IoT). When customer journey maps include IoT touchpoints, they enable businesses to understand the holistic customer experience by considering their user experience (UX) and when user interface (UX) design may influence that experience.
To help guide your business in its direction, here are examples to draw inspiration from for building out your customer journey map. 1. HubSpot's Customer Journey Map Templates. HubSpot's free Customer Journey Map Templates provide an outline for companies to understand their customers' experiences.
This map shows the locations of NASA' Perseverance rover (white star) and Ingenuity Mars Helicopter (cyan star) on Dec. 19,… Sol 4132: Right Navigation Camera, Cylindrical Projection NASA's Mars rover Curiosity took 31 images in Gale Crater using its mast-mounted Right Navigation Camera (Navcam) to create this…