How to browse full screen on the iPhone using Safari

When the iPhone 5 and iPod touch 5 went 16:9 there was a risk that, while browsing the web in landscape, the top and bottom navigation menus in Safari would not only look ridiculously long, but the screen would look far too short to be enjoyable. Luckily, Apple thought of that and included a new, full-screen mode for Safari in iOS 6 . Using full-screen, every pixel of that new, widescreen display is available to show you content and nothing but content.
Here's how it works.
- Launch the Safari app from the Home screen of your iPhone.

- Navigate to the page you'd like to view in full screen mode.

- Rotate your iPhone or iPod touch so it's in landscape mode if you haven't already.
- Tap the Full Screen button in the bottom right hand corner. (it looks like two diagonal arrows.)

- Tap the Full Screen button (now transparent) again to return to regular mode.

You can now browse to your heart's content in full screen mode until you choose to turn it off. How do you like that bigger screen now?

Master your iPhone in minutes
iMore offers spot-on advice and guidance from our team of experts, with decades of Apple device experience to lean on. Learn more with iMore!

iMore senior editor from 2011 to 2015.
iPhone 17: Everything you need to know
Your iPhone has a hidden sound library that will help you sleep better — here's how to access it
Delta iPhone emulator also works on Mac and Apple Vision Pro — but you'll need a controller for the best experience
Most Popular
- 2 iPhone 17: Everything you need to know
- 3 The creator of a PSP emulator has said it will come to iPhone but ‘it all depends on how Apple interprets their own rules’
- 4 Do Snapdragon X Elite benchmarks spell danger for Apple's M3 chip?
- 5 Your iPhone has a hidden sound library that will help you sleep better
Full Screen Safari iPhone: How to Maximize Your Browsing Experience

Enabling Full Screen Mode in Safari
When using Safari on your iPhone or iPad, full screen mode lets you enjoy more screen real estate, offering an uninterrupted and immersive browsing experience. Here’s how you can maximize content viewing on your devices.
Access Full Screen on iPhone
On an iPhone, Safari provides a straightforward way to enter full screen mode. While browsing a web page, simply change your iPhone’s orientation to landscape. You’ll see a button with two diagonal arrows in the bottom right corner of the screen. Tap this button to switch to full screen mode, which hides the address bar and tabs, giving you a wider view of the content you’re exploring.
Full Screen Mode on iPad
For iPad users, the process is slightly different due to the larger screen. Safari on iPad doesn’t offer a dedicated full screen button like on the iPhone. However, you can achieve a full screen experience by hiding the toolbar. Swipe up on any web page to hide the toolbar and enjoy a more expansive browsing interface. Swipe down to bring the toolbar back into view when needed.
Navigating the Full Screen Safari Interface
Experience the web on your iPhone like never before by learning how to browse in full-screen mode on Safari. This section will teach you about Safari’s interface and how to make the most out of its full-screen capabilities.
Understanding Safari’s Interface
Apple’s Safari browser on iOS provides a clean and user-friendly interface. It has an address bar at the top where you can type in URLs or search queries, and a toolbar at the bottom containing navigation buttons and tools for managing tabs. When you switch to landscape mode on your iPhone, the option to enter full-screen mode appears, represented by two diagonal arrows, allowing for a more immersive browsing experience. In full-screen, Safari hides distractions such as the address bar and toolbar, so you can focus on the content.
Utilizing Safari’s Full Screen Features
To activate full-screen mode in Safari:
- Open Safari from your iPhone’s Home screen.
- Navigate to your desired website.
- Rotate your iPhone to landscape mode.
- Tap the full-screen icon (two diagonal arrows) in the bottom right corner.
While in full screen:
- Swipe down at the top edge of the screen to access the address bar and search functionality.
- Access open tabs by tapping the tabs icon, which minimizes the full-screen view and shows your open pages.
Exiting full-screen is just as simple; rotate your iPhone back to portrait mode, or tap the full-screen icon again. Full-screen browsing effectively utilizes the entire display of your iPhone, eliminating borders and other on-screen elements that could compete with the web content you’re viewing. This mode is perfect for reading articles, watching videos, or examining images without extraneous distractions.
Advanced Full Screen Safari Tips
Exploring beyond basic navigation in Safari on an iPhone opens up a host of options for savvy users. This section highlights techniques for viewing web pages in full screen and customizing the browsing experience on small screens.
Requesting Desktop Sites
In Safari, the demand for viewing full websites as on a Mac rather than their mobile versions continues to grow. Desktop Site functionality enables this, and Safari has made it increasingly straightforward. To request the desktop version of a website on an iPhone:
- Open Safari and navigate to the desired website.
- Press the Share Button at the bottom of the screen.
- Scroll down the list and tap Request Desktop Site .
Since iOS 13 , this feature has been optimized for users, ensuring that websites are scaled correctly for touch interactions on smaller screens. The pages sync seamlessly with iCloud across devices, so changes reflect on Safari on Mac too.
Creating Web App Shortcuts
With Safari on iPhone, users have the ability to create shortcuts on their home screen for quick access to their favorite websites. This simulates the experience of using a native app, all without the need to download anything from the App Store. To set up a web shortcut:
- Navigate to the desired webpage in Safari.
- Tap the Share Button .
- Select Add to Home Screen and name the shortcut.
The meta tag apple-mobile-web-app-capable in a webpage’s code indicates that the site is optimized for full screen. This tag tells Safari that the site is prepared to function as an application, making the user experience smoother and more integrated for iOS users. Starting from iOS 6 , this has become a commonly used feature, allowing for chrome-less browsing where the browser UI elements are not displayed, spotlighting the content itself.
Frequently Asked Questions
This section addresses some common questions about using full-screen mode in Safari on the iPhone to enhance your browsing experience.
How can I enable full-screen mode in Safari on my iPhone?
To enter full-screen mode in Safari, simply rotate your iPhone to the landscape orientation and tap the full-screen icon in the bottom right corner. If this option isn’t visible, ensure that screen rotation isn’t locked in your device’s Control Center.
Why isn’t Safari on my iPhone switching to full-screen mode?
If Safari isn’t switching to full-screen, first check that your iPhone’s orientation lock is turned off. Then, ensure you’re using a website that supports full-screen viewing as some websites might restrict this feature.
How do I hide the address bar in Safari on my iPhone to view websites in full screen?
Hide the address bar in Safari by scrolling up on a webpage, which allows you to view content in full-screen. The bar will reappear when you scroll back down.
What steps should I follow to view web pages in full-screen on Safari for iOS 15?
In iOS 15, full-screen mode is achieved by scrolling up on any webpage, which will hide the address and tab bars. To bring them back, simply tap the bottom of the screen or scroll down.
How can I use JavaScript to create full-screen experiences in Safari on iOS?
Full-screen experiences on Safari can be programmed using JavaScript by employing the Fullscreen API. However, this often requires user interaction – like a button press – to activate full-screen mode due to browser security settings.
What is the method to exit full-screen mode in Safari on an iPhone?
To exit full-screen mode, tap the screen to bring up the address and navigation bars, then tap the full-screen icon in the bottom right corner again. Rotating your iPhone back to portrait orientation will also exit full-screen mode.
Similar Posts
 2")
The Best Guide For Fixing An iPhone That Won’t Charge (2024)
If your iPhone is no longer charging you might only have a short amount of time to…

How To Fix An iPhone 13 Pro Max That Is Overheating
The iPhone 13 Pro Max is prone to overheating issues (an issue also shared with the 12…

How To Fix A Cell Phone Vibrating Motor
Is your smartphone’s vibrating motor giving you the silent treatment? Vibrations in a phone are more than…

How To Fix The iPhone Camera Black Screen Issue
Ever grabbed your iPhone to capture a moment, only to find your camera screen as black as…

How To Repair Cracked Back Glass On An iPhone: DIY Guide
Options To Repair Cracked Back Glass (iPhone) Option Pros Cons Apple Repair Professional job, warranty on repair,…

iPhone Dot Projector Explained
The iPhone’s Dot Projector is an important part of Face ID technology. It works by projecting over…

How To : Turn Any Website into a Full-Screen App on Your iPhone
Not all websites need a dedicated mobile app, which is why so many don't. Web apps are now designed to scale to whatever the size of your screen is, so the mobile versions of desktop sites in your web browser are easy enough to navigate and utilize. Still, there's just something about an app on your home screen that makes it all so much easier.
If you have an iPhone, you can bookmark the web app on your home screen from Safari . In the browser, tap the Share button on a webpage, hit " Add to Home Screen ," then select "Add." That gives you a home screen icon that looks just like other app icons but is merely a shortcut to the webpage chosen.
Site developers can even configure these types of shortcuts to look and behave like native iOS apps; they can give their site a unique app icon, change the status bar's appearance, and hide Safari interface components. However, many sites do not provide an optimized standalone-like experience for their home screen icons. Home screen bookmarks for unconfigured web apps just open the sites in Safari and look like regular tabs. It's quicker than typing a URL or search term in Safari, but it's the same old Safari experience.
- Don't Miss: The Easiest Way to Place Apps, Folders & Widgets Anywhere on Your iPhone's Home Screen
To make every site bookmark on your home screen look and feel like a standalone app, we can turn to Shortcuts . The shortcut we'll be using creates a WebClip device management profile you'll install on your iPhone. With the profile, whatever site you set will open the URL as a web app in full-screen view — without any browser — so there's no URL or search bar and no toolbar at the bottom.
It's technically still a bookmark but won't open as a tab in your regular Safari session. Best of all, it showcases the website in full-screen, taking advantage of your entire display and getting rid of the distractions that normally appear in Safari and other web browsers.
- iOS 14 : The shortcut is optimized for iOS 14. It may work on iOS 13 but has not been tested on older systems.
- Shortcuts : Apple's app comes pre-installed on your iPhone, but if you've deleted it, you can re-install it from the App Store.
- Allow untrusted shortcuts : Go to Settings –> Shortcuts and toggle on "Allow Untrusted Shortcuts" to allow third-party shortcuts.
Step 1: Add the 'URL App' Shortcut
The " URL App " shortcut, from RoutineHub user Changmeister, creates a web clip of any site you want. Simple copy a URL to your clipboard, paste it into the shortcut, name your app, choose an icon, and add the web clip as an app to your home screen. Unlike a regular bookmark, the website won't open in Safari but will appear in its own full-screen window like regular native standalone apps.
- Original iCloud Link: Make app from URL (free)
- Updated iCloud Link: Make app from URL (free)
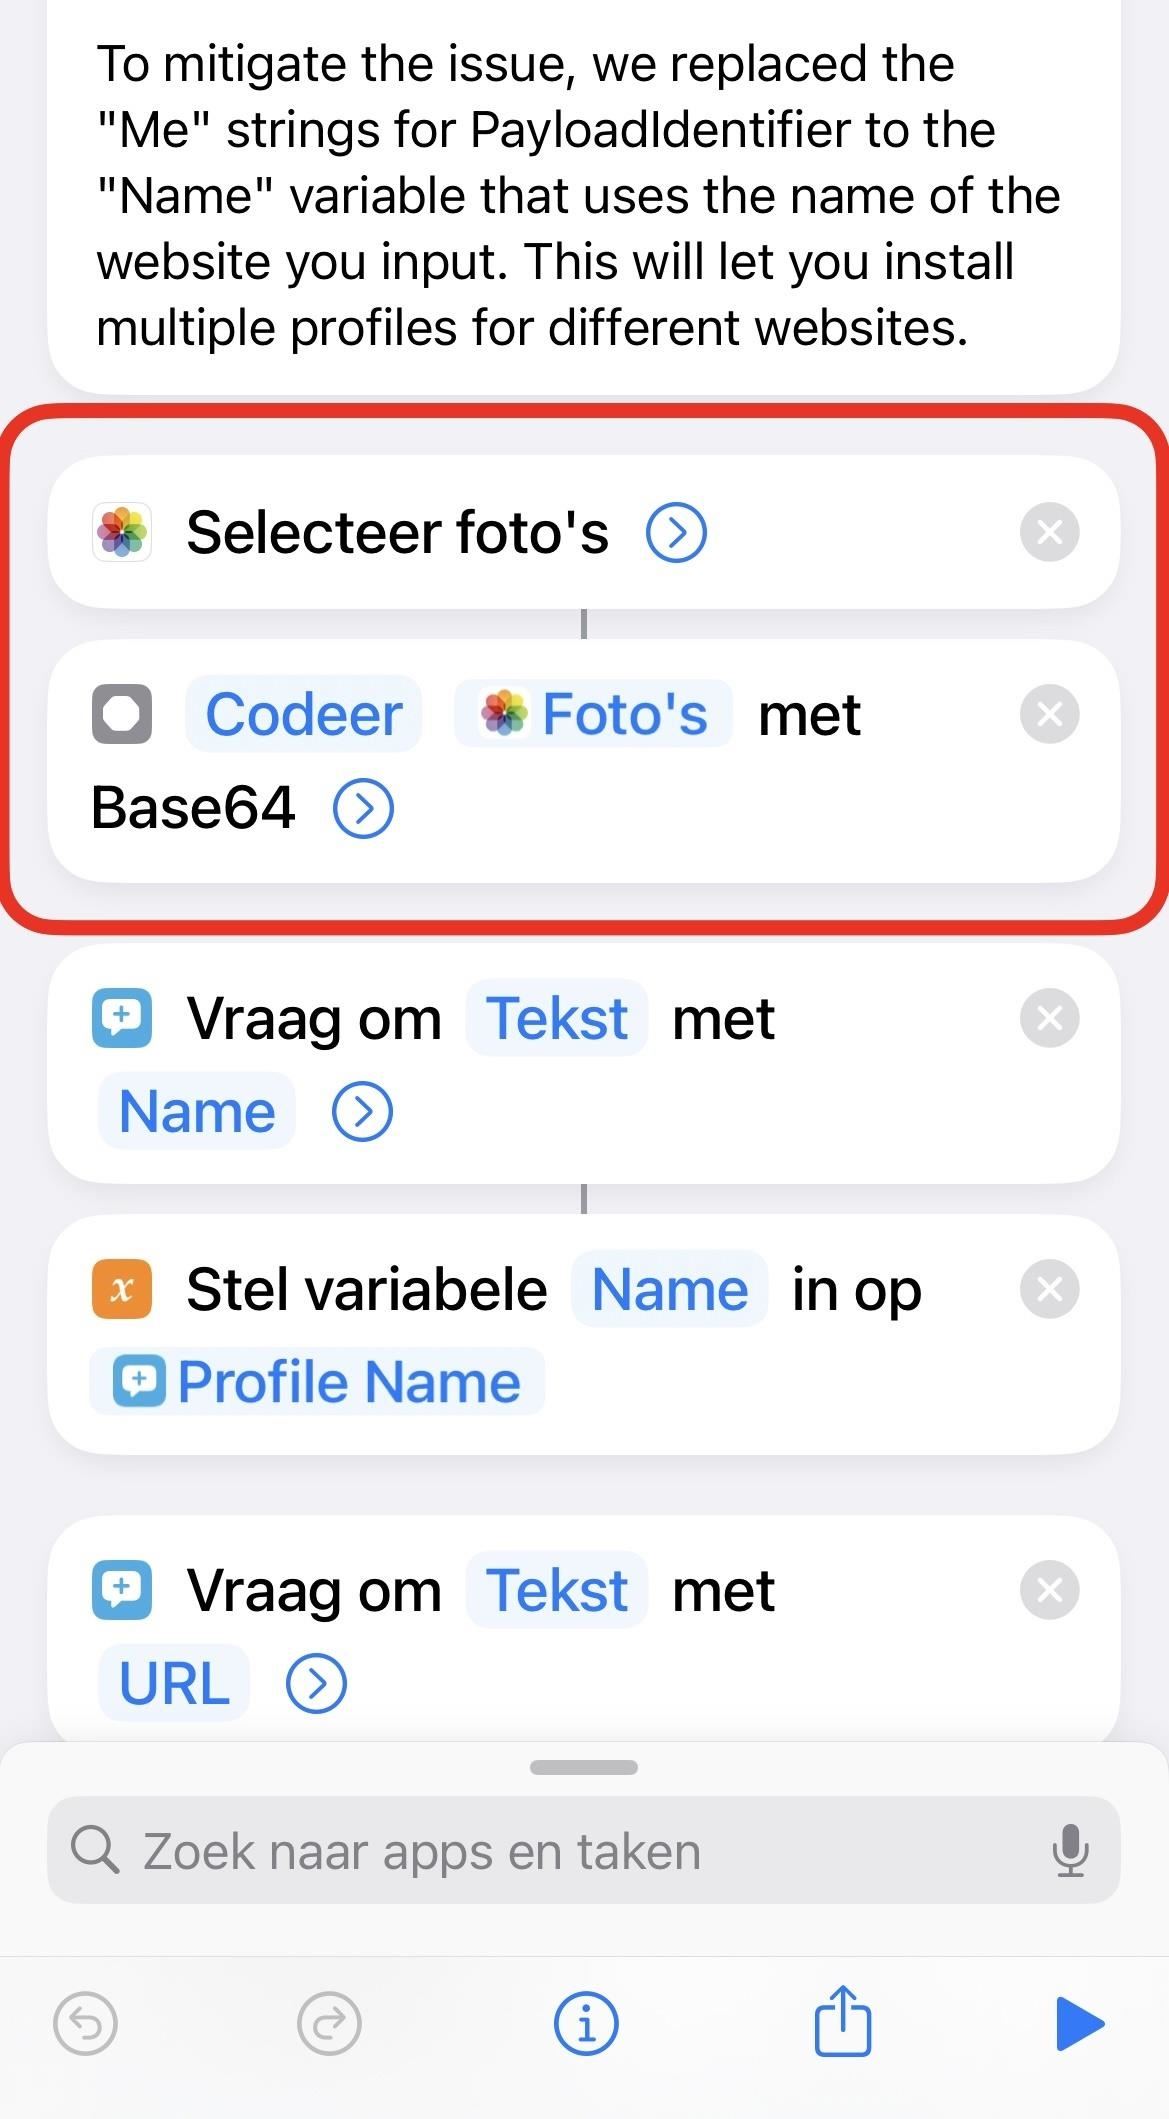
Use the updated iCloud link above to download the shortcut. The update fixes an issue that made it impossible to install multiple profiles for different websites. It simply switches out the PayloadIdentifier strings with the "Name" variable.
You should be automatically redirected to Shortcuts, but if you're not, tap "Get Shortcut." To add the shortcut to your library, scroll through the preview and tap "Add Untrusted Shortcut."

Step 2: Get the URL of the Webpage
Before you run the shortcut, go to Safari or your preferred web browser and copy the URL of the website you want to turn into a web clip. If you know the URL by heart, you can obviously skip this step. It's good to only do this for sites you often use that don't already have a native iOS app or an optimized interface for "Add to Home Screen" bookmarks.
As an example, I'll create an app for the Gadget Hacks website.

Step 3: Get an Image for the App Icon
While Safari can generate an app icon for websites via the "Add to Home Screen" action, the shortcut we're using here will not, so you'll need an image to use for the icon.
In the shortcut, you can choose any image in the Photos app, so you can either download a photo from the web or use an existing picture. A square-sized image works best to fit perfectly, but the shortcut will automatically crop any longer-shaped images down.
I'll use the official Gadget Hacks logo for my web clip's app icon.

Step 4: Run 'URL App' to Build the Profile
Now, head over to "My Shortcuts" in Shortcuts and run the "URL App" shortcut; it's the card called "Make app from URL." First, enter the name you'll see underneath the app icon on your home screen, then hit "Done."

Second, type in or paste the website URL you copied earlier and hit "Done" again.
Third, the shortcut will ask you for access to your Photos app. Grant it permission, then choose the image you want to upload as your app icon from the photo picker that appears.

Step 5: Download the Configuration Profile
Developers use configuration profiles so that iOS users install and test apps that are not ready or won't ever appear in the App Store. The "URL App" shortcut uses this same method to turn your URL into a web clip without a browser, as described earlier. If you're wary about installing profiles on your iPhone, you can review the WebClip payload XML that our updated shortcut uses below:
After you upload the app icon, you'll be redirected to Safari, where you'll be asked to allow a configuration profile to be downloaded to your iPhone. Hit "Allow," then tap "Close" when prompted.

Step 6: Install the Configuration Profile
The final step is to install the config profile you just downloaded. To do so, open Settings, and you should see a "Profile Downloaded" option near the top (it only appears when a profile needs to be installed). Tap that, and you can then preview the config profile. If you other Settings notifications, you will see "More for Your iPhone" instead. Tap that, and you'll see "Profile Downloaded."
If you don't see this quick link, go to "General," then "Profile" or "Profiles" to find and open the profile you downloaded.
You can see that it contains a web clip on the profile's description, just as we discussed earlier. Tap on "Install" in the top right, then enter your passcode when prompted.

The next page will show a message from the developer, which simply lays out the last few steps you took. Hit "Next" to continue, then tap "Install" in the top right, and then again at the bottom. Your profile is now installed.

Step 7: Open Your New Web Clip Self-Contained App
Your new web clip app will appear on your home screen. If you have iOS set to push new app installs to your App Library without touching the home screen, you'll still see this web clip app on your home screen since it's not a native app. However, you can still access the web clip from App Library.
Find and tap on the newly created web clip app icon, and the website will open up in full-screen, with no navigation bars or other features obstructing your view.

However, if you tap around to go to other pages in the web clip, you'll see in-app nav bars on the top and bottom to access reader view, request desktop sites, view website settings, share the website, and open the page in Safari, just like you would in other in-app web browsers. If you swipe up or down, the nav bars will disappear. This is a limitation of web clips for iOS, as any external links will be opened in a Safari view.

Removing the Web Clip & Profile
Let's say you no longer want the web clip app and want to remove it. Simply deleting the app icon from your home screen is not enough because the configuration profile will continue to exist in your settings. To get rid of both the app and profile , go into Settings –> General –> Profiles (or Profile).

Next, tap the profile and tap "Remove Profile." You'll be prompted to enter your passcode. Finally, tap "Remove" when it appears, and the profile, along with the web clip, will be deleted from your iPhone.

Just updated your iPhone? You'll find new emoji, enhanced security, podcast transcripts, Apple Cash virtual numbers, and other useful features. There are even new additions hidden within Safari. Find out what's new and changed on your iPhone with the iOS 17.4 update.
13 Comments
Very useful. However, I can only create one profile on my iOS device. If you created another profile for another web app, it will replace the first one. How to have multiple profiles so you can have different web as an iOS app on your home screen?
You're right. The original shortcut seems just to replace each profile you install for different sites. You can get around this by replacing the two "Me" strings for PayloadIdentifier with the "Name" variable. That should do the trick. We've updated the guide with a link to an updated shortcut you can download. Thanks for bringing this up!
Hi, Thank you! So glad with the solution! This becomes a very useful and neat tools!
I am seeing an error: Bad Profile This profile is corrupted and cannot be read
Is this something I am doing wrong on my end? Thanks!
I had the same error, but found that if I pasted in the WebClip payload XML myself, I needed to re-link the template variables before it would work. I edited the XML as Text in the Shortcuts app, deleted the places it said "Name", "URL", or "Base64 Encoded" (for the image), and replaced them with the corresponding Shortcuts variable from the accessory above the keyboard.
Thanks for this post, it's a great Shortcut!
Is there a way to create more than 1 shortcut at a time and possibly share the profiles to others? I'm wanting to create multiple App Clips but not download and install 13 profiles etc?
Does this still work in iOS 15.1? Feels just the same as adding a page to the homescreen.
My problem is that adding to the home screen opens the page perfectly in full screen, but as soon as I click an internal link a Safari header is shown.
I've been using this method to create various apps for certain websites. This morning I noticed every time I open any of the apps made this way that my camera is being activated. The little green dot appears at the top of my phone when I open one of these apps and disappears when I close it. I'm guessing this isn't normal behaviour? Is it something I should be concerned about? I should note I've been using them without concern for about a year.
Yep works fine but would like to know how to share without rebuilding on each phone.
What if I want to do the reverse, turn a website that has been pre-configured by it's makers to only display a link from the home page as full screen without controls into a regular website with controls, so that I get the ability to turn reader mode on?
This doesn't seem to work anymore on iOS 17.1.2. Please make an update. Thanks!
Hi Justin! I wanted to thank you for this very useful feature. However, since the iOS 17.2 update it seems that the shortcut is no longer functional Unfortunately. could you do an update to make it work again? Thank you very much in advance ??
"It's quite simple and you can easily solve it yourself. Edit the Shortcut and move the picture selector upwards so that it's the first call. The Shortcut will then work again in iOS 17.x.
Success, Patrick
Share Your Thoughts
Warning : sensitive info you black out in images can be revealed with a few quick edits on your iphone, how to : turn gifs into live photos on your iphone, how to : you may be sharing your iphone's location with other people — here's how to stop it, how to : safari for iphone lets advertisers track your 'clicks' — here's how to disable it, how to : 16 harry potter spells for siri that turn your iphone into a magical elder wand, how to : clear your frequently used and recent emoji from your iphone's keyboard, how to : 20 surprisingly practical uses for apple airtags, how to : everything you need to disable on your iphone for maximum security, how to : dial these secret codes to see if someone is hijacking calls & texts on your iphone, how to : make siri say whatever you want every time you connect your iphone to a charger, how to : add unsupported cards and passes to apple wallet for quick, easy access on your iphone, how to : the simple way to stop your iphone from sending unwanted audio messages, how to : the easiest way to secretly record someone's conversation with your iphone, how to : 34 new features and changes for your iphone on ios 17.4, how to : prevent thieves from turning on your iphone's airplane mode, so you have a better chance to track it down, how to : switch between miles and kilometers in apple maps on ios 16, how to : can't find an app on your iphone's home screen its icon is likely hiding from you, how to : make siri run google assistant commands on your iphone, how to : can't access any icloud data from a web browser this is how you fix it.
- All Features
- All Hot Posts
- Great Tech Gifts for Any Occasion
- The Best Gadgets for The Beach or Pool
How to Get a Full Screen on iPad
Maximize your iPad screen
:max_bytes(150000):strip_icc():format(webp)/SamCostello-d7fcf106ec2048ccb06d1e2190b3396d.jpg "ios safari vollbildmodus")
- Ithaca College
:max_bytes(150000):strip_icc():format(webp)/image-5e6611aebe974bb7886a24b5070c834f.jpg "ios safari vollbildmodus")
What to Know
- There's no way to make your iPad full screen in every situation, but there are a few ways to make it work.
- Some websites can go full screen, but only if they're coded to support it.
- You can make videos and iPhone apps run on iPad full screen by tapping the button showing two arrows going in opposite directions.
This article explains the situations in which you can get full screen on iPad and how to do it.
If you want to get full screen on your iPad—that is, no clock, date, or battery icon on the screen—we've got bad news for you: There's no way to do it in every situation. The iPadOS doesn't provide that option. But, there are some cases in which you can do something similar in certain apps.
How to Get a Full Screen on iPad in Safari
One of the most common cases in which people want an iPad to be full screen is the Safari web browser . Getting iPad Safari in full screen appeals to people who wish to have the most immersive web browsing experience possible. Here's what to do:
This tip doesn't work on all websites. It works on relatively few. This tip is the only way to make Safari full screen on an iPad. It relies on web developers who have added a bit of code to the site, and most developers don't do that.
Find the website you want to view full screen.
Tap the action button (the button with the arrow coming out of it).
Tap Add to Home Screen . This creates a shortcut to the site on your iPad home screen (aka a web clip).
Edit the display name for the shortcut and then tap Add .
When you tap the shortcut from your home screen, it will open the website in Safari.
How to Get a Full Screen on iPad: For Video
Another way to get full screen on iPad is in video apps. Some video apps offer actual full screen, with no menu bar at the top, while others keep the menu bar but otherwise go full screen. Users can't control which is which; it's up to the developer of the app.
Whichever your video app supports, you can view it full screen by tapping the icon that looks like two arrows pointing in opposite directions.
If you're viewing the video picture-in-picture, tap the right-corner icon showing two squares with one that has an arrow in it.
Get the Latest Tech News Delivered Every Day
- How to Download and Save Photos and Images to the iPad's Camera Roll
- How to Share Your Screen in FaceTime
- How to Capture an iPad Screenshot
- How to Get the Most Out of the iPad
- How to Change the Default Search Engine in Chrome for iOS
- How to Add and Save a Website to the Home Screen on Your iPad
- 4 Ways to Go Full Screen in Windows 11
- How to Change Your Homepage in Safari
- How to Control F on iPad
- How to Bookmark on an iPad
- How to Add Safari Bookmarks on iPad
- How to Get Instagram for iPad
- How to Use Split Screen on iPad
- How to Use the Safari Web Browser on iPhone
- How to Use Picture-in-Picture on iPad (iOS 14)
- How to Add, Edit, and Delete Bookmarks in iPhone's Safari
Setup your website to allow full-screen on iOS
New Course Coming Soon:
Get Really Good at Git
While using the iPad Pro I decided to add a few sites to the home screen. It’s not something I usually do on the iPhone, although the same thing works on the iPhone too:

Press the share button (the one in the middle at the bottom) to show the options panel:

Choose “Add to Home Screen”:

Now you’ll see an app on the home screen with the site favicon.
Clicking it will simply open the site in Safari.
But if you add this meta tag to the page:
Clicking the app icon will open the site in full screen:

This works on the iPad as well:

This will help you save screen real estate, as the Safari UI would be useless, and will also make the overall app use experience much better.
Of course this has to be supported by the site/app developers, otherwise you can’t make it full screen.
Here is how can I help you:
- COURSES where I teach everything I know
- THE VALLEY OF CODE your web development manual
- BOOTCAMP 2024 cohort in progress, next edition in 2025
- BOOKS 16 coding ebooks you can download for free on JS Python C PHP and lots more
- SOLO LAB everything I know about running a lifestyle business as a solopreneur
- Interesting links collection
- Follow me on X
You’re using an older browser version. Update to the latest version of Google Chrome , Safari , Mozilla Firefox , or Microsoft Edge for the best site experience.
- eLearning Blog
- eLearning Basics
- Instructional Design
- Corporate Training
- Course Selling
- Manufacturing
- Products iSpring Suite iSpring Learn
- Use Cases Onboarding Compliance Training Induction Training Product Training Channel Partner Training Sales Training Microlearning Mobile Learning
- Company About Us Case Studies Customers Partnership Course Development Contact Us Academy Blog Webinars Guides
- Community Academy Blog Webinars Guides Experts on iSpring
- Language EN English Français Deutsch Español Italiano Nederlands Português Polski 中文 日本語 العربية Indonesia
- Shopping Cart
Free Online eLearning Conference | May 2nd–3rd
iSPRING DAYS 2024
Seize the human-centric future of learning
How to Make a Website Go Full Screen on Your iPad

You can view almost any type of web content on an iPad, but it doesn’t readily support full-screen mode. People who prefer to use the Safari browser on the iPad face a problem viewing web content without browser panels, elements, etc.
If you want to view a webpage, course, or HTML5 presentation, it will be much more convenient to do it in full-screen mode. Full-screen viewing looks more native and provides additional space for your content, while hiding all Safari elements but the main window.
In this article, we provide a brief guide on how to view a website full screen on an iPad — and you won’t even need to change your iPad settings.
How to Open Safari in Full-Screen Mode on an iPad
- First, launch the Safari browser from the home screen and go to the webpage that you wish to view in full-screen mode.

Note : This way of viewing a webpage, course, or presentation in full-screen mode works if the source code of the webpage contains the following tag:
<meta name=”apple-mobile-web-app-capable” content=”yes “>
You can add this tag to your webpage using a third-party tool like iWeb SEO Tool or any other tool you wish. Please note that you need to first add the tag, refresh the page, and then add a bookmark to your home screen.
How to View a Video in Full-Screen Mode on an iPad
To get a video to show in full-screen mode on an iPad, you’ll need to download a standalone video app. There are multiple apps on the market, but you can use YouTube’s app, for example. Its interface will look almost the same as it would in a browser on a PC, but there are some differences to YouTube on a touch screen device in regard to switching to a full-screen mode.
To make the YouTube app play in full-screen mode, choose and open a video. When the video starts playing, tap on it once. You’ll see several additional options, including dual arrows at the bottom right corner. Tap the arrows to go to full screen.

How to View a PowerPoint Presentation on an iPad
If you want to make your PowerPoint projects available on the iPad, you can easily do so by converting PowerPoint slides to HTML5 with iSpring Converter . It works as a PowerPoint add-in, so you can convert your presentation right from PowerPoint with all of its functionality and appearance preserved. If you want to protect your content from unauthorized access, you can add an extra layer of protection to your presentation by setting a password, restricting the time allowed for viewing, and adding a watermark.
Would you like to get more useful information about online content for your iPad? Discover the easiest way for you to view PowerPoint presentations on an iPad or how to create an iPad app easily using tools you’re already familiar with.
How to Make Apps Full Screen on the iPad
Some apps don’t fill the entire screen of the iPad, but you can resize them to take full advantage of the expanded aspect ratio.
To have an app take up the full screen, drag the handle to the bottom corner of the iPad. If you’re using a mouse or trackpad, then use the mouse pointer on any edge of the window to resize it.
How to Troubleshoot Safari Display Issues
If Safari doesn’t open a webpage or work as expected on your iPad, here a few solutions that might help:
- Reload the page
- Install software updates and restart
- Turn extensions off if there are any installed in your browser
- Try opening the website in a private browser window
- Check the privacy, security, and website settings
- Reload the page without Private Relay if you’re subscribed to iCloud+ and are using this feature
- Check your VPN or other security software if you have these installed on your iPad
- Check network settings
To get the details about using these methods, check out the official Apple website .
How to Remove Split Screen on Safari
Apple devices are multitasking tools. The clearest evidence of this is that the Safari browser features a split screen. It allows you to open two websites in two separate windows simultaneously. These split-screen windows work independently of each other and help users to be more productive. For example, you can open YouTube to watch an instructional video in one window and open another website next to it to find some additional information on a topic.
Split View is enabled by default, so you can’t disable it forever. But there are a few tricks that can help you get your iPad screen back to full size.
To close Split View, tap the Multitasking button in the Safari window that you want to keep, then tap the full screen button. You can also drag the central app divider left or right over the Safari window that you want to close.
You can also merge your Safari windows into a single one to enable full-screen mode. Just touch and hold the tabs button in the toolbar and tap Merge All Windows .
To go into more details about how to use split screen in Safari on your iPad, visit the Apple website .
What to Do if Safari Opens in a Small Window
If a website opens as a small, narrow window off to the side, you likely have an instance of Safari opening in slide-over view.
To make Safari full screen, pull down on the gray grab bar at the top of the browser view that allows you to transform the view into split screen. Then drag a central app divider all the way to the edge of the screen.
Fast PowerPoint to HTML5 Converter
Convert presentations to HTML5 with all effects and transitions preserved

Content creator:
Helen Colman
She enjoys combining in-depth research with expert knowledge of the industry. If you have eLearning insights that you’d like to share, please get in touch .
You might also like this

Subscribe to our blog
Stay tuned to get our latest eLearning tips and tricks!
By clicking “Subscribe”, you agree to our Privacy Policy . All emails include an unsubscribe link, so that you can opt-out at any time.
We use cookies to give you the best possible experience on our website and also for analytics and marketing purposes. You can enable or disable optional cookies as desired. See our Cookie Policy for more details.
Manage your cookies
Essential cookies are always on. You can turn off other cookies if you wish.
Essential cookies
Analytics cookies
Social media cookies
Bei Safari in den Vollbildmodus schalten
Den Vollbildmodus unter Mac OS X aktivieren
- Starten Sie den Internetbrowser Safari und besuchen Sie damit eine beliebige Webseite.
- Möchten Sie den Vollbildmodus aktivieren, so klicken Sie mit der Maus auf das Doppelpfeil-Symbol rechts oben.
- Die Menüs vom Safari verschwinden automatisch und Sie können die Webseite im Vollbild genießen. Beenden können Sie den Modus mit dem Symbol nicht, denn dieses wird im Vollbild nicht mehr angezeigt. Drücken Sie stattdessen einfach zweimal auf die Esc-Taste und die Leisten werden wieder eingeblendet.
- Alternativ können Sie für den Modus auch die Tastenkombination Apfel + Ctrl + F verwenden. Mit dieser lässt sich nicht nur der Browser ins Vollbild versetzen, sondern auch andere Anwendungen.
Safari beim iPhone und iPad maximieren
Safari steht Ihnen auf allen Geräten, die das iOS-Betriebssystem verwenden, zur Verfügung. Den Vollbildmodus aktivieren Sie auf dem iPhone aber auf eine andere Art und Weise als beim Mac OS X.
Das iPad ist der bekannteste Tablet-Computer und wurde vom Hersteller Apple entwickelt. Dieses …
- Starten Sie den Safari-Browser auf Ihrem iPhone und öffnen Sie eine beliebige Webseite.
- Drehen Sie das iPhone ins Querformat und der Vollbildmodus wird automatisch aktiviert. Die Menüs verschwinden dann von alleine.
- Möchten Sie die Menüs wieder anzeigen lassen, dann wischen Sie einfach mit Ihrem Finger über eine freie Stelle der Webseite nach oben.
Während Sie den Vollbildmodus beim Apple iPhone ohne große Probleme aktivieren können, funktioniert dies beim iPad nicht. Der Safari lässt sich auf dem Tablet-Computer nicht maximieren. Möchten Sie dennoch im Vollbildmodus im Internet surfen, dann sollten Sie sich den Webbrowser Google Chrome besorgen. Diesen bekommen Sie kostenlos im App Store von Apple.
- Mit dem iPad ins Internet - so geht's über WLAN
- iPhone, iPad und Mac - Geräte synchron halten
- Kann Safari nicht öffnen - was tun?
- AirPrint aktivieren
- Übersicht: Alles zum Thema Internet
Wie hilfreich finden Sie diesen Artikel?
Verwandte Artikel
Redaktionstipp: hilfreiche videos.
Übersicht Internet
Voting in der Community ⬆️⬇️
Wenn euch Beiträge von anderen Usern gefallen, könnt ihr dies durch eine positive Bewertung zeigen und wenn ihr angemeldet seid, so sogar Punkte vergeben. Erfahrt hier mehr zu unserem Bewertungssystem: Voting in der deutschen Apple Support Community
Thread wurde vom System oder vom Community-Team geschlossen.
Vollbild unter iOS 15 mit iPad
Hallo, nach Update auf IOS 15 ist unter Safari der Vollbildmodus nur mit 3 Tasten rückwärsts zu erreichen. Das tritt auf wenn ich aus den FAVORITEN eine gespeicherte Seite aufrufe. Habt Ihr das auch?
iPad Pro 10.5-inch, Wi-Fi
Gepostet am 28. Sept. 2021 15:43
Ähnliche Fragen
- Homescreen, wieviel Seiten sind möglich? IOS 14 Hi, wieviel Seiten kann der Homescreen haben? Früher wurde ein neue Seite aufgemacht, bei mir ist bei 15 Seiten Schluss und die neuen Apps werden nicht dargestellt. Grüsse Werner 1164 2
- Die Ansicht ist stets gezoomt bei Safari in meinem iPad Air 2. wie kehre ich zur normalen Ansicht zurück? mein iPad Air 2 zeigt bei Safari stets eine gezoomte Ansicht. Wie kehre ich zur normalen Ansicht zurück? 222 2
- Leere Homescreen Seite auf iPhone mit iOS 16 erstellen Hallo, ich verzweifele bald…. Beim IPhone mit IOS 16 lässt sich keine neue Homescreen Seite erstellen. Icon gedrückt halten und nach ganz rechts verschieben bringt nichts… auf der App-Mediathek Seite ist Schluss und es entsteht keine leere, neue Seite. [Betreff vom Moderator bearbeitet] 473 2
Seiteninhalt wird geladen
Seiteninhalt wurde geladen
30. Sept. 2021 10:51 als Antwort auf Du-ede
Hallo Du-ede ,
passiert das denn nur bei den Favoriten oder auch einer normalen Seite?
Hast du bereits einen erzwungenen Neustart probiert? Viele Probleme lassen sich dadurch bereits beheben:
Neustarten des iPad
Ich bin gespannt auf deine Antwort,
Liebe Grüße
02. Okt. 2021 15:27 als Antwort auf Du-ede
ich habe einmal nachgeschaut, bei mir sieht es auch so aus.
Hinterlasse dazu doch ein Feedback: Product Feedback
Auch wenn die Feedback-Seite auf Englisch ist, Feedbacks in deutscher Sprache werden ebenfalls berücksichtigt!
Wenn du die Favoriten in Safari auf jeder neuen Seite sehen möchtest könntest du die Favoriten als Startseite auswählen.
Alles Gute und
30. Sept. 2021 16:02 als Antwort auf ju_ga
Hallo j_gabriel,
danke für die Antwort, ja NEUSTART ist erfolgt jedoch ohne Veränderung.
Hänge mal 3 Bilder an. So sieht es aus wenn ich Webseiten aus den Favpriten auswähle. Um ein Vollbild zu erhalten muß ich oben links < zurück klicken, danach auf < Safari und zum Schluß < oberhalb von Safari das Buch. Erst dann erhalte ich ein Vollbild.
Überigens war ich im Apple Store, auch mit den neuesten iPad's sieht es genauso aus.
Mir fehlt ein Button auf der geteilten Seite den ich nur einmal klicken muß.
03. Okt. 2021 15:36 als Antwort auf ju_ga
Danke j_gabriel,
habe ich so gemacht, mal sehen was passiert. Gestern kam ein Update auf IOS 15.01, hatte schon gehofft das es da drin enthalten war. mal abwarten.
More than patches
Views, hints, tips and info from an it guy, add an ios full screen web link in microsoft intune.
Recently I had a request to be able to deploy a “web link” to an iOS device and also make it full screen when launched, as if to look like an app. This concept of a web link exists already in Microsoft Intune – https://docs.microsoft.com/en-us/mem/intune/apps/web-app
To add some context, that’s a fairly specific request of course but then we have this capability within a managed Google Play account to serve the same functionality for Android devices. However with Android, the app has to be configured within the managed Google play account which will then be synchronised across to Intune. Of course, this request came about because we wanted to match the same or similar behaviour for iOS.
I always want to add credit to others where possible and in this case my colleague Marc Nahum is to thank for the inspiration. I’m really writing this one up as an obvious solution is seemingly not that easy to find if you’re approaching this from an Intune perspective.
In order to do this you need to add this as a custom setting – https://docs.microsoft.com/en-us/mem/intune/configuration/custom-settings-ios
Taking a step back from here, you will need to create the custom settings profile and within that you are adding configuration for a “Web Clip” which is effectively the same as what Microsoft refer to more generically as a Web Link. The link above says we can use Apple Configurator or Apple Profile Manager to create those profiles. Another option is iMazing Profile Editor which is free, quite straight forward to use and is available on both MacOS and Windows.
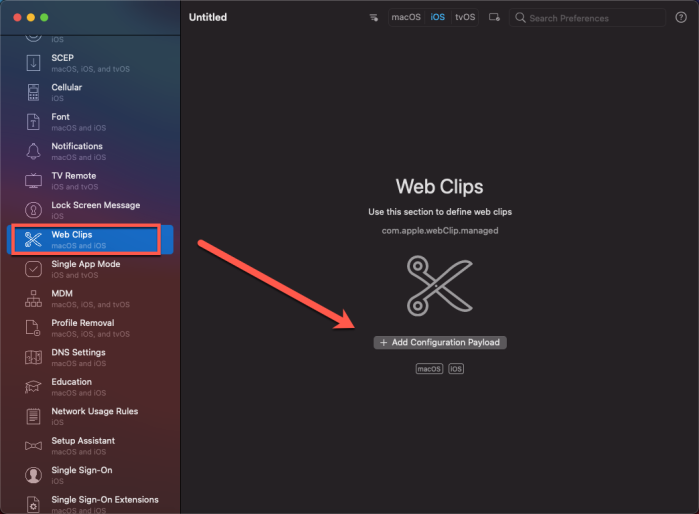
Once we have created the profile and marked the web clip to run full screen, we can save the mobileconfig profile.
Now in the Microsoft Endpoint Manager Admin Center we can add an iOS configuration profile like so.

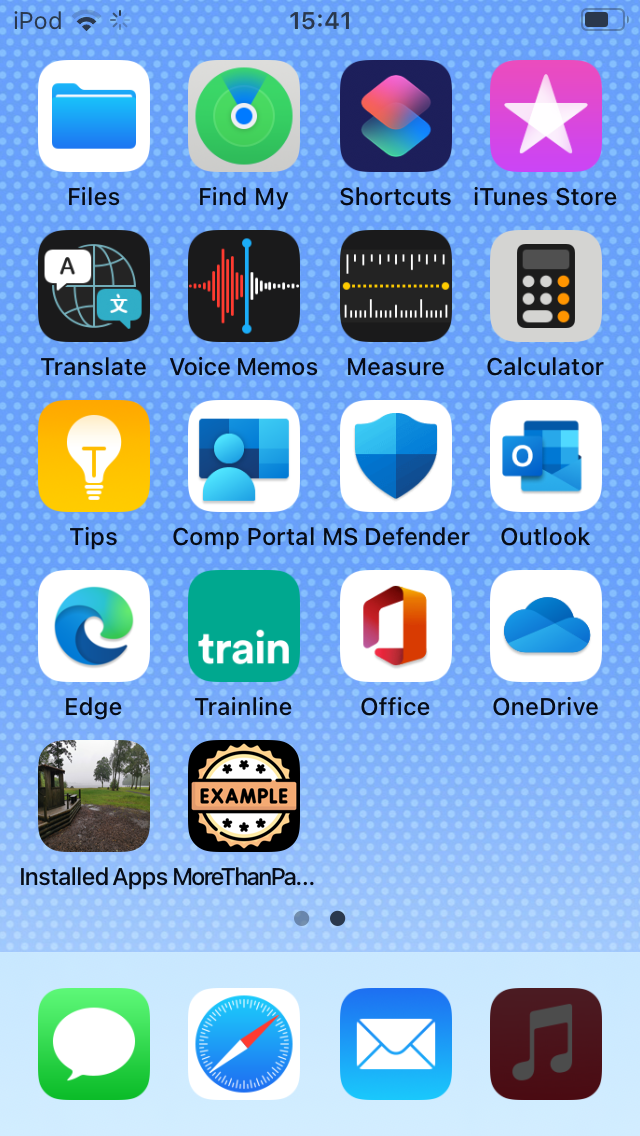
Finally, now we have assigned the configuration profile to the correct group and the device has synchronised, we will see the web clip appear just like an app on the home screen. In my screenshot you see the icon logo EXAMPLE.
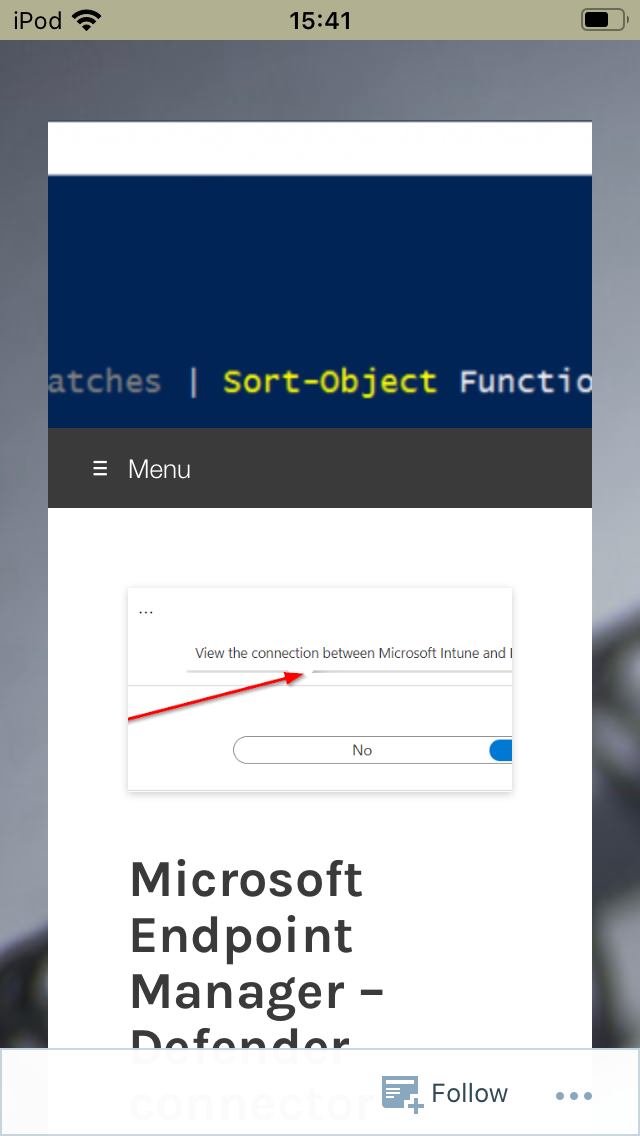
When we launch the web clip we can see it does indeed launch full screen despite my blog evidently requiring some attention for mobile devices :)
I hope that’s useful to someone and you have any feedback then just let me know.
Share this:
Related posts, scom: an object of type monitoringalert with id xxxxxxxx-xxxx-xxxx-xxxx-xxxxxxxxxxxx was not found, configmgr remote tools problems, no cluster.log on your windows 2008 cluster, list all your mailbox sizes with powershell, list all your smtp addresses from powershell, export multiple mailboxes with a powershell script, security hardening for your servers, microsoft system center 2012 sp1 update rollup 1, “hard code” your kms server into the registry, add machines to different ou’s in sccm task sequence, 2 thoughts on “ add an ios full screen web link in microsoft intune ”.
Great work, thank you very much.
Like Liked by 1 person
thanks. it actually launch using the default browser in full screen when there are multiple browsers on the device?
Leave a comment Cancel reply
This site uses Akismet to reduce spam. Learn how your comment data is processed .

- Already have a WordPress.com account? Log in now.
- Subscribe Subscribed
- Copy shortlink
- Report this content
- View post in Reader
- Manage subscriptions
- Collapse this bar
Safari: Fenster im Vollbild öffnen - so geht's
Wie Sie ein Safari-Fenster im Vollbildmodus öffnen, lesen Sie im folgenden Praxistipp. Möchten Sie Ihre Statusleiste und das Dock komplett ausblenden, lesen Sie im nächsten Abschnitt, wie Sie dabei am besten vorgehen.

Vermeiden Sie finanzielle Verluste auf Reisen mit American Express
Unabhängig und kostenlos dank Ihres Klicks
Die mit einem Symbol gekennzeichneten Links sind Affiliate-Links . Erfolgt darüber ein Einkauf, erhalten wir eine Provision ohne Mehrkosten für Sie. Die redaktionelle Auswahl und Bewertung der Produkte bleibt davon unbeeinflusst. Ihr Klick hilft bei der Finanzierung unseres kostenfreien Angebots.
So öffnen Sie ein Safari-Fenster im Vollbildmodus
Lesen Sie jetzt, wie Sie den Vollbildmodus im Safari-Browser einstellen.
- Wählen Sie oben rechts in der Ecke die beiden Pfeile. (siehe Screenshot)
- Alternativ navigieren Sie über "Darstellung" zu "Vollbild ein" oder drücken Sie die Tastenkombination [Ctrl] + [Cmd] + [F].
- Sie verlassen den Vollbildmodus, indem Sie [Esc] wählen.

Der Praxistipp beschreibt einen Lösungsweg unter Mac OS X 10.9.5 und Safari Version 7.1. In einem weiteren Artikel lesen Sie, wie Sie mehrere Startseiten in Safari festlegen.
Aktuell viel gesucht
KI-Bilder erstellen: Diese Möglichkeiten gibt es

Handynummer suchen und Besitzer herausfinden - so geht's

Handynummer suchen und Besitzer herausfinden - so geht's
Payback-Punkte auf Konto überweisen lassen - so einfach geht's

Payback-Punkte auf Konto überweisen lassen - so einfach geht's
YouTube Musik runterladen - so klappt der Download

Word: Seitenzahl ab Seite 3 - Nummerierung von 1 beginnend

Windows 10: Screenshot erstellen - so klappt's

Windows 10: Screenshot erstellen - so klappt's
Stichsäge sägt schief: Das sind mögliche Ursachen

Die fünf besten kostenlosen Email-Adressen: E-Mail Anbieter im Vergleich

"Das DHL-Paket ist im Lager eingetroffen und kann aufgrund von unvollständigen Adressangaben..." Betrug oder Real?

"Das DHL-Paket ist im Lager eingetroffen und kann aufgrund von unvollständigen Adressangaben..." Betrug oder Real?
ChatGPT kostenlos nutzen: Das müssen Sie wissen

Der Mars: Interessante Fakten zum roten Planeten

Deutsche Bank Phishing: Alles zur Fake-SMS "PhotoTAN App läuft ab"

Deutsche Bank Phishing: Alles zur Fake-SMS "PhotoTAN App läuft ab"
Neueste MacOS-Tipps
- Apple Watch: Walkie Talkie funktioniert nicht - Lösungsmöglichkeiten
- Mac: Zwischenablage anzeigen - so geht's
- Mac OS: Unendlich-Zeichen schreiben - so klappt's
- Apple ID: Einstellungen aktualisieren - so gehen Sie vor
- Hochzahlen am Mac: Hoch 2 per Tastenkombination & Co.
- Abgesicherter Modus beim Mac starten: So klappt's
- Excel: Daten konsolidieren - so funktioniert's
- Weitere neue Tipps
Beliebteste MacOS-Tipps
- At-Zeichen mit Apple-Mac-Tastatur (@) - so geht's
- iMac und MacBook zurücksetzen: Werkseinstellung herstellen
- macOS Versionen: Alle Betriebssysteme im Überblick
- Programme von Mac deinstallieren - wie geht das?
- Mac: Externe Festplatte wird nicht erkannt - was tun?
- Android mit Mac verbinden: 3 Möglichkeiten im Check
- Weitere beliebte Tipps
Die besten Shopping-Gutscheine
- Gutscheine von OTTO
- Deinhandy.de-Gutscheine
- Rabatte bei Saturn
- Home24-Rabattcodes
- Weitere Gutscheine
Screen Rant
Make mac safari go full screen & more ways to expand your viewport.
Apple Mac users can customize Safari to see more content from a website and less browser chrome by using full screen, zooming, and hiding controls.
Apple 's Safari browser for the Mac is more customizable than ever and there are several ways to expand the viewport to show more of a website at once, including full screen mode. When looking at a photo or a video, more is usually better and the same is true of data-heavy websites that may have several large tables filled with relevant information. Fitting that all in on a MacBook screen might be a tight squeeze.
It feels like Safari has been around forever, but Apple first launched its browser in 2003. Before that, Mac users primarily relied upon Microsoft's Internet Explorer , although, Opera, Netscape, and Mozilla were well known and good solutions as well. Google's Chrome followed soon after and, over the years, the browser wars have settled into a fairly consistent rendering and performance level, making the differentiating factor more about user-friendliness as well as the overall look and feel of the browser. Apple usually opts for minimizing the appearance and letting the website shine, but there are ways to show even more of a website's content with Safari.
Related: How To Clear Cookies On A MacBook & Why You Should
Switching to full screen mode is the quickest way to hide all of Safari's chrome, the developer terminology for the user interface, including the address bar, tab bar, and any other controls that are open. Basically, the entire screen becomes a window to the current website. To enter full screen on a MacBook , simply hold the globe key, also known as the function key, and tap the letter 'F.' Tapping the escape key will exit full screen mode. On a Mac that doesn't have such a key on its keyboard, a combination of control and the command key, which looks a bit like a four-leaf clover, plus the letter 'F' switches to full-screen. This is as much screen space as possible, but there is a way to see even more of a web page. Also, Apple gives Safari users ways to minimize the chrome without hiding it all.
See More Website, Less Safari
With Safari on the Mac, some controls can be hidden to allow more room for content while keeping the tab bar visible. Under the View menu, there are options to show or hide the favorites bar and sidebar. Full screen can be accessed from this menu as well. Reader mode, also found there, offers a different type of content viewing that hides ads and removes the website's styling, instead formatting the page in a narrow column with a large font. For anyone looking for a distraction-free view of an article, going to Reader and full screen displays the words and photos in a minimalist fashion. For those running macOS Monterey , opening preferences from the Safari menu and choosing compact tabs will merge the search field and the tab bar together, an easy way to gain vertical space, which is tight on a MacBook, but might be less of an issue on a desktop Mac.
Another way to view more of a website on a Mac computer is to zoom out, which is easily accomplished by holding the command key and tapping the minus key. Zooming back in is done with a combination of command and equals key, which is the same key used for the plus sign but there is no need to hold the shift key. Command plus the zero key restores the zoom level to normal. Zooming affects both text, images and other graphics on a page and Safari remembers the zoom level set for each website, so upon returning it will default to the magnification used at the last visit, which is a nice touch by Apple . If there is a need to reduce images and graphics on a website, but keep text readable, under the advanced preferences pane, there is an option to set a minimum font size. Apple's Safari offers several ways to customize the view of a website to help the user see more of the content and less of the browser.
Next: A Safari Feature That Apple Killed In macOS Monterey Is Finally Coming Back
Source: Apple
iPad – Benutzerhandbuch
- Mit iPadOS 17 kompatible iPad-Modelle
- iPad mini (5. Generation)
- iPad mini (6. Generation)
- iPad (6. Generation)
- iPad (7. Generation)
- iPad (8. Generation)
- iPad (9. Generation)
- iPad (10. Generation)
- iPad Air (3. Generation)
- iPad Air (4. Generation)
- iPad Air (5. Generation)
- iPad Pro 10,5"
- iPad Pro 11" (1. Generation)
- iPad Pro 11" (2. Generation)
- iPad Pro 11" (3. Generation)
- iPad Pro 11" (4. Generation)
- iPad Pro 12,9" (2. Generation)
- iPad Pro 12,9" (3. Generation)
- iPad Pro 12,9" (4. Generation)
- iPad Pro 12,9" (5. Generation)
- iPad Pro 12,9" (6. Generation)
- Grundlagen konfigurieren
- Die persönliche Note für dein iPad
- Mit Freundeskreis und Familie in Kontakt bleiben
- Anpassen deines Arbeitsbereichs
- Mehr schaffen mit dem Apple Pencil
- Anpassen des iPad für dein Kind
- Neue Funktionen in iPadOS 17
- Einschalten und Konfigurieren des iPad
- Beenden des Ruhezustands und Entsperren
- Einrichten eines Mobilfunkdiensts
- Herstellen der Verbindung zum Internet
- Mit Apple-ID anmelden
- Verwenden von iCloud
- Abonnieren von iCloud+
- Suchen nach Einstellungen
- Einrichten von Accounts für Mail, Kontakte und Kalender
- Bedeutung der Statussymbole
- Batterie laden
- Batterieladung in Prozent anzeigen
- Batterienutzung anzeigen
- Verwenden des Stromsparmodus, um die Batterielaufzeit zu verlängern
- Lesen des Benutzerhandbuchs und Setzen von Lesezeichen
- Grundlegende Gesten
- Erlernen von erweiterten Gesten
- Anpassen der Lautstärke
- Öffnen von Apps
- Finden von Apps in der App-Mediathek
- Umschalten zwischen Apps
- Vergrößern einer Grafik-App für den Vollbildmodus
- Beenden und erneutes Öffnen einer App
- Drag & Drop
- Öffnen von zwei Objekten in Split View
- Ändern eines App-Fensters in ein Slide Over-Fenster
- Anzeigen der Fenster und Arbeitsbereiche einer App
- Multitasking mit Bild-in-Bild
- Bewegen, Skalieren und Verwalten von Fenstern
- Zugriff auf Funktionen aus dem Sperrbildschirm
- Ausführen von Schnellaktionen
- Suchen auf dem iPad
- Abrufen von Informationen über dein iPad
- Anzeigen oder Ändern der Einstellungen für die Mobilfunknutzung
- Reisen mit dem iPad
- Ändern oder Deaktivieren von Tönen
- Eigenen Sperrbildschirm erstellen
- Ändern des Hintergrundbildes
- Anpassen von Helligkeit und Farbbalance des Bildschirms
- Anpassen der Textgröße und Zoomeinstellung
- Namen deines iPad ändern
- Ändern von Datum und Uhrzeit
- Ändern von Sprache und Region
- Verwalten von Apps in Ordnern
- Hinzufügen, Bearbeiten und Entfernen von Widgets
- Bewegen von Apps und Widgets im Home-Bildschirm
- Entfernen von Apps
- Verwenden und Anpassen des Kontrollzentrums
- Ändern oder Sperren der Bildschirmausrichtung
- Anzeigen und Beantworten von Mitteilungen
- Ändern der Mitteilungseinstellungen
- Einrichten eines Fokus
- Stummschalten oder Erlauben von Mitteilungen für einen Fokus
- Aktivieren oder Deaktivieren eines Fokus
- Anpassen der Teilen-Funktionen
- Tippen mit der Bildschirmtastatur
- Text diktieren
- Bewegen der Bildschirmtastatur
- Text auswählen und bearbeiten
- Verwenden von Textvorschlägen
- Verwenden von Textersetzungen
- Hinzufügen oder Ändern von Tastaturen
- Hinzufügen von Emoji und Stickern
- Bildschirmfoto aufnehmen
- Erstellen einer Bildschirmaufnahme
- Schreiben und zeichnen in Dokumenten
- Hinzufügen von Text, Formen, Signaturen und mehr
- Ausfüllen von Formularen und Unterschreiben von Dokumenten
- Verwenden von Live Text zum Interagieren mit Inhalten in einem Foto oder Video
- Verwenden von „Visuelles Nachschlagen“ zum Identifizieren von Objekten in Fotos und Videos
- Ablösen des Motivs vom Hintergrund eines Fotos
- Laden von Apps
- Abonnieren von Apple Arcade
- Laden von Spielen
- Spiele mit Freund:innen in Game Center
- Verbinden eines Spielecontrollers
- Verwenden von App Clips
- Apps aktualisieren
- Anzeigen oder Kündigen von Abonnements
- Verwalten von Käufen, Einstellungen und Beschränkungen
- Installieren und Verwalten von Schriften
- Kaufen von Büchern und Hörbüchern
- Lesen von Büchern
- Markieren von Büchern
- Zugreifen auf Bücher auf anderen Apple-Geräten
- Anhören von Hörbüchern
- Festlegen von Lesezielen
- Verwalten von Büchern
- Lesen von PDF-Dokumenten
- Erstellen und Bearbeiten von Ereignissen in der App „Kalender“
- Senden von Einladungen
- Antworten auf Einladungen
- Ändern der Darstellung von Ereignissen
- Suchen nach Ereignissen
- Ändern der Einstellungen für Kalender und Ereignisse
- Planen oder Anzeigen von Ereignissen in einer anderen Zeitzone
- Ereignisse im Blick behalten
- Verwenden mehrerer Kalender
- Verwenden des Kalenders „Feiertage“
- Teilen von iCloud-Kalendern
- Aufnehmen von Fotos
- Aufnehmen eines Selfies
- Aufnehmen von Selfies im Modus „Porträt“
- Aufnehmen von Videos
- Ändern der erweiterten Kameraeinstellungen
- Anpassen von HDR-Kameraeinstellungen
- Anzeigen, Teilen und Drucken von Fotos
- Verwenden von Live Text
- Scannen eines QR-Codes
- Anzeigen der Weltzeit
- Wecker stellen
- Verwenden der Stoppuhr
- Verwenden mehrerer Timer
- Hinzufügen und Verwenden von Kontakten
- Bearbeiten von Kontakten
- Hinzufügen deiner Kontaktdaten
- Senden von Kontakten auf dem iPad
- Verwenden von Kontakten anderer Accounts
- Ausblenden doppelter Kontakte
- Exportieren von Kontakten
- Einführung in die App „FaceTime“
- Tätigen von FaceTime-Anrufen
- Annehmen von FaceTime-Anrufen
- Erstellen eines FaceTime-Links
- Aufnehmen eines Live Photo
- Aktivieren von Live-Untertiteln
- Verwenden anderer Apps während eines Anrufs
- Tätigen eines FaceTime-Gruppenanrufs
- Anzeigen der teilnehmenden Personen in einem Raster
- Verwenden von SharePlay für gemeinsamen Seh-, Hör- und Spielspaß
- Teilen des Bildschirms während eines FaceTime-Anrufs
- Zusammenarbeiten an Dokumenten in einem FaceTime-Anruf
- Verwenden von Videokonferenzfunktionen
- Handoff eines FaceTime-Anrufs auf ein anderes Apple-Gerät
- Ändern der FaceTime-Videoeinstellungen
- Ändern der FaceTime-Audioeinstellungen
- Ändern deines Aussehens
- Beenden eines Anrufs oder Umschalten zur App „Nachrichten“
- Blockieren unerwünschter Anrufer
- Anruf als Spam melden
- Verbinden externer Geräte oder Server
- Dateien, Ordner und Downloads ändern
- Suchen nach Dateien und Ordnern
- Verwalten von Dateien und Ordnern
- Senden von Dateien
- Einrichten von iCloud Drive
- Teilen von Dateien und Ordnern auf iCloud Drive
- Teilen des Standorts
- Hinzufügen oder Entfernen einer anderen Person
- Orten einer anderen Person
- Erhalten einer Mitteilung, wenn eine Person ihren Standort ändert
- Andere Person bei Standortänderungen benachrichtigen
- iPad hinzufügen
- Erhalten einer Mitteilung beim Zurücklassen eines Geräts
- Orten eines Geräts
- Markieren eines Geräts als „Verloren“
- Löschen eines Geräts
- Entfernen eines Geräts
- AirTag hinzufügen
- Teilen eines AirTag oder eines anderes Objekts in der App „Wo ist?“ auf dem iPad
- Drittanbieter-Produkt hinzufügen
- Erhalten einer Mitteilung beim Zurücklassen eines Objekts
- Orten eines Objekts
- Markieren eines Objekts als „Verloren“
- Entfernen eines Objekts
- Anpassen von Karteneinstellungen
- Einführung in die App „Freeform“
- Erstellen von Freeform-Boards
- Zeichnen oder Schreiben per Hand
- Hinzufügen von Text
- Formen hinzufügen
- Hinzufügen von Dateien
- Anwenden durchgehender Stile
- Positionieren von Objekten auf einem Board
- Durchsuchen von Freeform-Boards
- Teilen und Zusammenarbeiten
- Löschen und Wiederherstellen von Boards
- Einführung in die App „Health“
- Hinterlegen deiner Gesundheitsinfos
- Einführung zu Gesundheitsdaten
- Anzeigen deiner Gesundheitsdaten
- Teilen von Gesundheitsdaten
- Ansehen von Gesundheitsdaten, die andere geteilt haben
- Herunterladen der Gesundheitsakte
- Anzeigen von Gesundheitsakten
- Protokollieren von Zyklusinformationen
- Anzeigen von Vorhersagen und Verlauf des Menstruationszyklus
- Protokollieren deiner Medikamenteneinnahme
- Weitere Informationen über deine Medikamente
- Gemütszustand protokollieren
- Mentale Gesundheit testen
- Anpassen des Fokus „Schlafen“
- Aktivieren oder Deaktivieren des Fokus „Schlafen“
- Anzeigen des Schlafprotokolls
- Prüfen der Audio-Lautstärkepegel von Kopfhörern
- Verwenden von Audiogrammdaten
- Erstellen eines Backups deiner Gesundheitsdaten
- Einführung in die App „Home“
- Durchführen des Upgrades auf die neue Home-Architektur
- Einrichten von Geräten
- Geräte steuern
- Steuern deines Zuhauses mit Siri
- Verwenden von Stromnetzprognose zur Planung deines Energieverbrauchs
- Konfigurieren des HomePod
- Steuern deines Zuhauses
- Erstellen und Verwenden von Szenen
- Verwenden von Automationen
- Konfigurieren von Sicherheitskameras
- Verwenden der Gesichtserkennung
- Konfigurieren eines Routers
- Andere zum Steuern von Geräten einladen
- Hinzufügen weiterer Haushalte
- Abrufen von Musiktiteln, Filmen und TV-Sendungen
- Klingeltöne abrufen
- Verwalten von Käufen und Einstellungen
- Vergrößern von Objekten
- Ändern der Einstellungen
- Anwesenheit von Personen in deiner Umgebung erkennen
- Erkennen von Türen in deiner Nähe
- Abrufen von Bildbeschreibungen für deine Umgebung
- Vorlesen von Text und Beschriftungen in deiner Nähe
- Einrichten von Kurzbefehlen für den Erkennungsmodus
- Hinzufügen und Entfernen von E-Mail-Accounts
- Konfigurieren einer eigenen E-Mail-Domain
- Abrufen von E-Mails
- Senden von E-Mails
- Zurückrufen von E-Mails mit „Senden widerrufen“
- Beantworten und Weiterleiten von E-Mails
- Speichern eines E-Mail-Entwurfs
- Hinzufügen von E-Mail-Anhängen
- Herunterladen von E-Mail-Anhängen
- Markieren von E-Mail-Anhängen
- Einrichten von E-Mail-Mitteilungen
- Suchen nach einer E-Mail-Nachricht
- Organisieren von E-Mails in Postfächern
- Markieren oder Blockieren von E-Mails
- Filtern von E-Mails
- „E-Mail-Adresse verbergen“ verwenden
- Verwenden des E-Mail-Datenschutzes
- Ändern von E-Mail-Einstellungen
- Löschen und Wiederherstellen von E-Mail-Nachrichten
- Hinzufügen des Widgets „Mail“ zum Home-Bildschirm
- Drucken von E-Mail-Nachrichten
Verwenden von Tastaturkurzbefehlen
- Anzeigen von Karten
- Abrufen von Reiserouten
- Auswählen weiterer Routenoptionen
- Suchen von Stopps auf einer Route
- Anzeigen einer Routenübersicht oder einer Routenliste
- Ändern der Einstellungen für gesprochene Wegbeschreibungen
- Abrufen von Fahrtrouten
- Melden von Verkehrsstörungen
- Abrufen von Fahrradrouten
- Abrufen von Fußgängerrouten
- Abrufen von ÖPNV-Routen
- Löschen der letzten Routen
- Abrufen von Verkehrs- und Wetterinformationen
- Wegzeit und voraussichtliche Ankunftszeit schätzen
- Laden von Offline-Karten
- Suchen von Orten
- Finden von Sehenswürdigkeiten, Restaurants und Dienstleistungen in der Nähe
- Abrufen von Informationen über Orte
- Markieren von Orten
- Teilen von Orten
- Orte bewerten
- Sichern von Lieblingsorten
- Entdecken von neuen Orten mit Reiseführern
- Organisieren von Orten in „Meine Reiseführer“
- Löschen wichtiger Orte
- Umsehen an Orten
- Flyover-Touren
- Abrufen der Einstellungen für die App „Karten“
- Größenmessungen
- Ansehen und Sichern von Messungen
- Messen der Größe einer Person
- Einrichten der App „Nachrichten“
- Informationen zu iMessage
- Senden und Antworten auf Nachrichten
- Zurückrufen und Bearbeiten von Nachrichten
- Verfolgen von Nachrichten
- Weiterleiten und Teilen von Nachrichten
- Gruppenkonversationen
- Mit SharePlay gemeinsam Inhalte ansehen, anhören oder spielen
- Zusammenarbeiten an Projekten
- Verwenden von mit iMessage-Apps
- Aufnehmen und Bearbeiten von Fotos oder Videos
- Teilen von Fotos, Links und mehr
- Senden von Stickern
- Anfordern, Senden und Empfangen von Zahlungen
- Senden und Empfangen von Audionachrichten
- Animieren von Nachrichten
- Ändern von Mitteilungen
- Blockieren, Filtern und Melden von Nachrichten
- Löschen von Nachrichten und Anhängen
- Wiederherstellen gelöschter Nachrichten
- Laden von Musik
- Anzeigen von Alben, Playlists und anderen Objekten
- Wiedergeben von Musik
- Anzeigen von Titelinfos und Liedtexten
- Hinzufügen von Musik zur Warteliste
- Anhören von Radiosendern
- Apple Music abonnieren
- Anhören von verlustfrei komprimierter Musik (Format „Lossless“)
- Anhören von Dolby Atmos-Musik
- Apple Music Sing
- Suchen nach neuer Musik
- Hinzufügen von Musiktiteln zum Offline-Anhören
- Personalisierte Empfehlungen erhalten
- Suchen nach Musik
- Erstellen von Playlists
- Anzeigen der Musikauswahl deiner Freund:innen
- Verwenden von Siri für die Musikwiedergabe
- Art der Musikwiedergabe ändern
- Einführung in die App „News“
- Verwenden von News-Widgets
- Anzeigen speziell für dich ausgewählter Storys
- Lesen von Storys
- Folge deinen Lieblingsteams mit „My Sports“
- Apple News+ abonnieren
- Durchsuchen und Lesen von „Apple News+“-Storys und -Ausgaben
- Laden von „Apple News+“-Ausgaben
- Lösen von Kreuzworträtseln
- Suchen nach neuen Storys
- Sichern von Storys in der App „News“ zum späteren Lesen
- Abonnieren einzelner News-Kanäle
- Einführung in die App „Notizen“
- Hinzufügen oder Entfernen von Accounts
- Erstellen und Formatieren von Notizen
- Zeichnen oder Schreiben
- Hinzufügen von Fotos, Videos und vielem mehr
- Scannen von Text und Dokumenten
- Arbeiten mit PDFs
- Hinzufügen von Links
- Erstellen von Schnellnotizen
- Suchen von Notizen
- Verwalten in Ordnern
- Verwalten mit Tags
- Intelligente Ordner verwenden
- Exportieren oder Drucken von Notizen
- Sperren von Notizen
- Ändern von Einstellungen für Notizen
- Löschen, Teilen und Kopieren eines Fotos
- Ansehen und Bearbeiten von Photo Booth-Fotos in der App „Fotos“
- Anzeigen von Fotos und Videos
- Wiedergeben von Videos und Diashows
- Löschen oder Ausblenden von Fotos und Videos
- Bearbeiten von Fotos und Videos
- Kürzen von Videos und Anpassen der Zeitlupe
- Bearbeiten von Live Photos
- Bearbeiten von Videos im Kinomodus
- Bearbeiten von Porträts
- Verwenden von Fotoalben
- Bearbeiten, Teilen und Organisieren von Alben
- Filtern und Sortieren von Fotos und Videos in einem Album
- Erstellen von Stickern aus Fotos
- Duplizieren und Kopieren von Fotos und Videos
- Zusammenfassen doppelter Fotos
- Suchen nach Fotos
- Personen und Haustiere identifizieren
- Fotos nach Aufnahmeort durchsuchen
- Teilen von Fotos und Videos
- Teilen von langen Videos
- Anzeigen von mit dir geteilten Fotos und Videos
- Ansehen von Rückblicken
- Personalisieren von Rückblicken
- Verwalten von Rückblicken und empfohlenen Fotos
- Verwenden von iCloud-Fotos
- Erstellen von geteilten Alben
- Hinzufügen und Entfernen von Personen in einem geteilten Album
- Hinzufügen und Löschen von Fotos und Videos in einem geteilten Album
- Einrichten oder Beitreten zu einer geteilten iCloud-Fotomediathek
- Hinzufügen von Inhalten zu einer geteilten iCloud-Fotomediathek
- Verwenden der geteilten iCloud-Fotomediathek
- Importieren und Exportieren von Fotos und Videos
- Drucken von Fotos
- Suchen nach Podcasts
- Anhören von Podcasts
- Verwenden der Option „Folgen“ für deine Lieblingspodcasts
- Verwenden des Widgets „Podcasts“
- Verwalten deiner Podcast-Mediathek
- Laden, Sichern oder Teilen von Podcasts
- Abonnieren von Podcasts
- Hören von Inhalten für Abonnent:innen
- Ändern der Downloadeinstellungen
- Einkaufsliste erstellen
- Hinzufügen von Objekten zu einer Liste
- Bearbeiten und Verwalten einer Liste
- Suchen und Verwalten von Listen
- Vorlagen verwenden
- Verwenden von intelligenten Listen
- Drucken von Erinnerungen
- Das Widget „Erinnerungen“ verwenden
- Ändern von Einstellungen in der App „Erinnerungen“
- Surfen im Web
- Suchen nach Websites
- Anpassen der Safari-Einstellungen
- Ändern des Layouts
- Verwenden von Safari-Profilen
- Öffnen und Schließen von Tabs
- Verwalten deiner Tabs mit Tabgruppen
- Anzeigen deiner Tabs von einem anderen Gerät
- Teilen von Tabgruppen
- Verwenden von Siri für das Anhören einer Webseite
- Hinzufügen von Lesezeichen für eine Website
- Hinzufügen von Lesezeichen für eine Website als Favoriten
- Sichern von Seiten in einer Leseliste
- Anzeigen von mit dir geteilten Links
- Hinzufügen von Anmerkungen zu einer Webseite und Sichern als PDF
- Automatisches Ausfüllen von Formularen
- Laden von Erweiterungen
- Ausblenden von Werbeanzeigen und ablenkenden Inhalten
- Leeren des Cache
- Privates Surfen im Web
- Verwenden von Passkeys in der App „Safari“
- Kurzbefehle
- Verfolgen von Aktienkursen
- Verwalten mehrerer Aktienlisten
- Lesen von Wirtschaftsnachrichten
- Hinzufügen von Gewinnberichten zu deinem Kalender
- Verwenden des Widgets „Aktien“
- Übersetzen von Text, Sprache und Konversationen
- Text in Apps übersetzen
- Übersetzen mit der Kameraansicht
- Abonnieren von Apple TV+, MLS Season Pass und Apple TV-Kanälen
- Hinzufügen deines TV-Anbieters
- TV-Sendungen, Filmen und andere Inhalte abrufen
- Ansehen von Sportsendungen
- Folge deinen Lieblingsteams mit „Meine Sportarten“
- Ansehen von Major League Soccer mit MLS Season Pass
- Mehrere Live-Sportsendungen ansehen
- Wiedergabe steuern
- Mediathek verwalten
- Einstellungen ändern
- Erstellen einer Aufnahme
- Wiedergabe einer Aufnahme
- Bearbeiten oder Löschen einer Aufnahme
- Aufnahmen auf dem aktuellen Stand halten
- Verwalten von Aufnahmen
- Suchen oder Umbenennen einer Aufnahme
- Aufnahme teilen
- Aufnahme duplizieren
- Anzeigen von Wetterdaten
- Anzeigen der Wetterbedingungen an anderen Orten
- Anzeigen von Wetterkarten
- Verwalten von Wettermitteilungen
- Verwenden von Widgets „Wetter“
- Kennenlernen der Wettersymbole
- Verwenden von Siri
- Potenzial von Siri erkunden
- Bereitstellen von Informationen über dich für Siri
- Ankündigen von Anrufen und Mitteilungen durch Siri
- Hinzufügen von Siri-Kurzbefehlen
- Vorschläge von Siri
- Ändern der Einstellungen für Siri
- Einrichten der Familienfreigabe
- Hinzufügen von Mitgliedern in der Familienfreigabe
- Entfernen von Mitgliedern in der Familienfreigabe
- Teilen von Abonnements
- Teilen von Einkäufen
- Teilen des Standorts mit der Familie und Orten von vermissten Geräten
- Konfigurieren von Apple Cash für Familien und Apple Card für Familien
- Konfigurieren der Kindersicherung
- Konfigurieren eines Geräts für ein Kind
- Einführung in „Bildschirmzeit“
- Schonen deiner Augen mit „Bildschirmentfernung“
- Bildschirmzeit für dich selbst einrichten
- Festlegen von Kommunikations- und Sicherheitslimits und Blockieren von unangemessenen Inhalten
- Bildschirmzeit für ein Familienmitglied einrichten
- Einrichten von Apple Pay
- Apple Pay in Apps und im Web verwenden.
- Bestellungen nachverfolgen
- Verwenden von Apple Cash
- Apple Card verwenden
- „Savings“ verwenden
- Verwalten von Zahlungskarten und Aktivitäten
- Netzteil (Power Adapter) und Ladekabel
- Verwenden von AirPods
- Verwenden von EarPods
- Verwenden der Funktionen für die Kopfhörergeräuschpegel
- Apple Pencil-Kompatibilität
- Koppeln und Laden des Apple Pencil (1. Generation)
- Koppeln und Laden des Apple Pencil (2. Generation)
- Koppeln und Laden des Apple Pencil (USB- C)
- Texteingabe mit der Funktion „Kritzeln“
- Zeichen mit dem Apple Pencil
- Aufnehmen und Markieren eines Bildschirmfotos mit dem Apple Pencil
- Schnelles Schreiben von Notizen
- Vorschau auf Werkzeuge und Steuerelemente mit der Option „Schwebender Stift“.
- Drahtloses Streamen von Videos und Fotos an ein Apple TV oder Smart-TV
- Anschließen eines Displays über ein Kabel
- HomePod und andere kabellose Lautsprecher
- iPad-Tastaturen
- Wechseln zwischen Tastaturen
- Eingeben von Buchstaben mit diakritischen Zeichen
- Verwenden von Kurzbefehlen
- Auswählen eines alternativen Tastaturlayouts
- Ändern von Optionen für Eingabehilfen
- Anschließen eines Magic Trackpad
- Trackpad-Gesten
- Ändern von Trackpad-Einstellungen
- Anschließen einer Maus
- Mausaktionen und -gesten
- Ändern der Einstellungen für die Maus
- Externe Speichergeräte
- Bluetooth-Zubehör
- Apple Watch in Verbindung mit Fitness+
- Teilen der Internetverbindung
- Tätigen und Annehmen von Anrufen
- Verwenden des iPad als zweiten Bildschirm für den Mac
- Verwenden des iPad als Webcam
- Verwenden von Maus und Tastatur oder Trackpad zwischen Mac und iPad
- Handoff von Aufgaben zwischen Geräten
- Ausschneiden, Kopieren und Einsetzen zwischen iPad und anderen Geräten
- Streamen von Videos oder Spiegeln des iPad-Bildschirms
- Verwenden von AirDrop zum Senden von Objekten
- Kabelverbindung zwischen iPad und Computer
- Dateien geräteübergreifend übertragen
- Übertragen von Dateien per E-Mail, Nachrichten oder AirDrop
- Übertragen von Dateien oder Synchronisieren von Inhalten mit dem Finder oder mit iTunes
- Dateien mit iCloud auf dem aktuellen Stand halten
- Verwenden eines externes Speichergeräts, eines Dateiservers oder eines Cloud-Speicherdienstes
- Einführung in die Funktionen der Bedienungshilfen
- Aktivieren von Bedienungshilfen für die Konfiguration
- Anpassen der Bedienungshilfeneinstellungen für Siri
- Öffnen von Funktionen mit dem Bedienungshilfen-Kurzbefehl
- Vergrößern von Text durch Bewegen des Zeigers
- Ändern von Farben und Helligkeit
- Text leichter lesbar machen
- Reduzieren von Bewegung auf dem Bildschirm
- App-spezifisches Anpassen visueller Einstellungen
- Vorlesen von Bildschirminhalt und Eingaben
- Vorlesen der Audiobeschreibungen
- Aktivieren und Einüben von VoiceOver
- Ändern der VoiceOver-Einstellungen
- Verwenden von VoiceOver-Gesten
- Verwenden des iPad bei aktiviertem VoiceOver
- Steuern von VoiceOver mithilfe des Rotors
- Verwenden der Bildschirmtastatur
- Schreiben mit dem Finger
- Verwenden von VoiceOver mit einer externen Apple-Tastatur
- Verwenden eines Brailledisplays
- Eingeben von Brailleschrift auf dem Bildschirm
- Anpassen von Gesten und Tastaturkurzbefehlen
- Verwenden von VoiceOver mit einem Zeigergerät
- Verwenden von VoiceOver für Bilder und Videos
- Verwenden von VoiceOver in Apps
- AssistiveTouch verwenden
- Verwenden eines Eye-Tracking-Geräts
- Anpassen der Reaktion des iPad auf Berührungen
- Anrufe automatisch beantworten
- Ändern der Einstellungen für Face ID und Aufmerksamkeit
- Verwenden der Sprachsteuerung
- Anpassen der oberen Taste oder der Home-Taste
- Verwenden der Apple TV Remote-Tasten
- Anpassen der Zeigereinstellungen
- Anpassen der Tastatureinstellungen
- Anpassen der AirPod-Einstellungen
- Anpassen der Einstellungen für den Apple Pencil
- Steuern eines Apple-Geräts in der Nähe
- Einführung in die Schaltersteuerung
- Konfigurieren und Aktivieren der Schaltersteuerung
- Objekte auswählen, Aktionen ausführen und mehr
- Steuern von mehreren Geräten mit einem Schalter
- Verwenden von Hörhilfen
- Verwenden von Live-Mithören
- Verwenden der Geräuscherkennung
- Einrichten und Verwenden von RTT
- Auslösen des LED-Blitzes bei Hinweisen
- Anpassen der Audioeinstellungen
- Abspielen von Hintergrundgeräuschen
- Anzeigen von Untertiteln und erweiterten Untertiteln
- Anzeigen von Transkriptionen für Intercom-Mitteilungen
- Anzeigen von Live-Untertiteln (Beta)
- Text eingeben, um zu sprechen
- Aufnehmen deiner eigenen Stimme
- Verwenden der Funktion „Geführter Zugriff“
- Verwenden der integrierten Datenschutz- und Datenschutzfunktionen
- Festlegen eines Codes
- Einrichten von Face ID
- Einrichten von Touch ID
- Festlegen des Zugriffs auf Informationen im Sperrbildschirm
- Schützen deiner Apple-ID
- Verwenden von Passkeys zum Anmelden bei Apps und Websites
- Mit Apple anmelden
- Teilen von Passwörtern
- Automatisches Ausfüllen von starken Passwörtern
- Ändern von schwachen oder kompromittierten Passwörtern
- Anzeigen von Passwörtern und zugehörigen Informationen
- Sicheres Teilen von Passkeys und Passwörtern mit AirDrop
- Verfügbarkeit von Passkeys und Passwörtern auf all deinen Geräten
- Automatisches Ausfüllen von Bestätigungscodes
- Mit weniger CAPTCHA-Abfragen anmelden
- Zwei-Faktor-Authentifizierung
- Sicherheitsschlüssel entfernen
- Steuern der Zustimmungen zum App-Tracking
- Kontrolle über geteilte Standortdaten
- Festlegen des Zugriffs auf Informationen in Apps
- Festlegen, wie Apple Werbung präsentiert
- Festlegen des Zugriffs auf Hardwarefunktionen
- Erstellen und Verwalten von E-Mail-Adressen für die Option „E-Mail-Adresse verbergen“
- Sicheres Internetsurfen mit iCloud Privat-Relay
- Verwenden einer privaten Netzwerkadresse
- Verwenden der Option „Erweiterter Datenschutz“
- Blockierungsmodus verwenden
- Warnungen zu sensiblen Inhalten erhalten
- Kontaktschlüsselbestätigung verwenden
- iPad ein- oder ausschalten
- Neustart des iPad erzwingen
- Aktualisieren von iPadOS
- Erstellen eines Backups für das iPad
- Zurücksetzen des iPad auf die Standardwerte
- Wiederherstellen aller Inhalte aus einem Backup
- Wiederherstellen von gekauften und gelöschten Objekten
- iPad verkaufen, verschenken oder in Zahlung geben
- Löschen des iPad
- Installieren oder Entfernen von Konfigurationsprofilen
- Wichtige Informationen zur Sicherheit
- Wichtige Informationen zur Handhabung
- Weitere Ressourcen für Software und Service
- FCC-Konformitätserklärung
- ISED-Konformitätserklärung (Kanada)
- Apple und die Umwelt
- Informationen zu Laserklasse 1
- Informationen zur Entsorgung und zum Recycling
- Nicht autorisierte Änderungen von iPadOS
- ENERGY STAR-Konformitätserklärung
Anpassen der Safari-Einstellungen auf dem iPad
Startseite anpassen
Bei jedem Öffnen eines neuen Tab wird standardmäßig deine Startseite geöffnet. Du kannst deine Startseite mit neuen Hintergrundbildern und Optionen anpassen.

Scrolle auf der Seite nach unten und tippe auf „Bearbeiten“.
Wähle Optionen für deine Startseite.
Favoriten: Zeige Kurzbefehle zu deinen Lieblingswebseiten an, die mit einem Lesezeichen versehen wurden. Weitere Informationen findest du unter Website zu Favoriten hinzufügen .
Häufig besucht: Zeige häufig von dir besuchte Websites direkt an.
Mit dir geteilt: Sieh dir die Links an, die in der App „Nachrichten“ mit dir geteilt wurden. Weitere Informationen findest du unter Anzeigen von mit dir geteilten Links .
Datenschutzbericht: Informiere dich darüber, wie viele Tracker und Websites von Safari blockiert wurden. Weitere Informationen findest du unter Datenschutzbericht anzeigen .
Siri-Vorschläge: Du kannst erlauben, dass während der Suche in der App „Kalender“ und anderen Apps geteilte Websites angezeigt werden.
Leseliste: Webseiten anzeigen, die sich aktuell in deiner Leseliste befinden. Weitere Informationen findest du unter Aktuelle Webseite zur Leseliste hinzufügen .
Zuletzt geschlossene Tabs: Öffne zuletzt geschlossene Tabs erneut.
iCloud-Tabs: Zeige geöffnete Tabs von anderen Apple-Geräten an, auf denen du mit derselben Apple-ID angemeldet bist und auf denen Safari in den iCloud-Einstellungen oder Systemeinstellungen aktiviert ist. Weitere Informationen findest du unter Verwalten deiner Tabs mit Tabgruppen .
Hinweis: Deine Einstellungen für die Startseite werden auf allen Apple-Geräten aktualisiert, auf denen die Option „Startseite auf all deinen Geräten verwenden“ aktiviert ist und auf denen du mit derselben Apple-ID mit der Zwei-Faktor-Authentifizierung angemeldet bist.
Textgröße für eine Website in Safari ändern
Tippe auf das große A, um die Schrift zu vergrößern, oder das kleine A, um sie zu verkleinern.

Anzeigesteuerelemente für eine Website in Safari ändern
Du kannst das Suchfeld ausblenden, zur Reader-Darstellung wechseln und mehr.
Suchfeld ausblenden: Tippe auf „Symbolleiste ausblenden“ (tippe auf den oberen Teil des Bildschirms, um sie wieder einzublenden).
Reduzierte Ansicht einer Webseite anzeigen: Tippe auf „Reader einblenden“ (wenn verfügbar).
Tippe auf „Reader ausblenden“, um zur normalen Ansicht zurückzukehren.
Darstellung einer Webseite auf einem Desktop-Computer ansehen: Tippe auf „Desktop-Website anfordern“ (wenn verfügbar).
Du kannst auch die Safari-Einstellungen in den Einstellungen „Bedienungshilfen“ anpassen. Wähle „Einstellungen“ > „Bedienungshilfen“ > „App-spezifische Einstellungen“. Tippe auf „App hinzufügen“ und dann auf „Safari“, um die Einstellungen anzupassen.
Position für das Sichern von Downloads auswählen
Wenn du in Safari eine Datei lädst, kannst du auswählen, ob sie in iCloud oder auf deinem iPad gespeichert wird.
iCloud Drive: Wähle diese Option aus, um Downloads im Ordner „Downloads“ in iCloud Drive zu sichern. Dann kannst du auf jedem iPhone, iPad oder Mac auf die geladene Datei zugreifen, wenn du mit derselben Apple-ID angemeldet bist.
Auf meinem iPad: Wähle diese Option aus, um Downloads im Ordner „Downloads“ auf deinem iPad zu sichern.
Passwörter für Websites mit einer Gruppe teilen
Du kannst eine Gruppe von vertrauenswürdigen Kontakten erstellen und mit dieser eine Reihe von Passwörtern teilen. Die Passwörter sind für jedes Gruppenmitglied immer aktuell und du kannst jederzeit ein Mitglied entfernen.
Weitere Informationen findest du unter Erstellen von Gruppen für geteilte Passwörter .
Datenschutzeinstellungen für Safari anpassen
Du kannst die Datenschutzeinstellungen auswählen, die für alle Websites in Safari gelten sollen, und Ausnahmen für einzelne Websites erstellen. Weitere Informationen findest du unter Privates Surfen im Web .
Du kannst in Safari mithilfe von Tastaturkurzbefehlen navigieren, wenn du eine externe Apple-Tastatur hast, die mit dem iPad verbunden ist.
Verbinde deine Tastatur und halte die Befehlstaste gedrückt, um alle verfügbaren Tastaturkurzbefehle anzuzeigen.
IMAGES
VIDEO
COMMENTS
Here's how it works. Launch the Safari app from the Home screen of your iPhone. Navigate to the page you'd like to view in full screen mode. Rotate your iPhone or iPod touch so it's in landscape mode if you haven't already. Tap the Full Screen button in the bottom right hand corner. (it looks like two diagonal arrows.)
Navigate to your desired website. Rotate your iPhone to landscape mode. Tap the full-screen icon (two diagonal arrows) in the bottom right corner. While in full screen: Swipe down at the top edge of the screen to access the address bar and search functionality. Access open tabs by tapping the tabs icon, which minimizes the full-screen view and ...
Although it is possible for certain iOS apps (depending on the way they are programmed) to hide the status bar in iPhone and iPad, most of the app (barring games, video streaming apps) choose not to do so. Safari and Chrome web browsers for iPad have no native control to take browser full screen.
Doesn't work on iOS 17 (17.3). However, when I put console.log('some text') in pwa-everything.user.js I can see the output via the Web Inspector (safari extension). The problem might be caused by other tags in document's head. Can't seem to figure this out.
Step 1: Add the 'URL App' Shortcut. The "URL App" shortcut, from RoutineHub user Changmeister, creates a web clip of any site you want. Simple copy a URL to your clipboard, paste it into the shortcut, name your app, choose an icon, and add the web clip as an app to your home screen. Unlike a regular bookmark, the website won't open in Safari ...
Wenn du in Safari eine Datei lädst, kannst du auswählen, ob sie in iCloud oder auf deinem iPhone gespeichert wird. Wähle „Einstellungen" > „Safari" > „Downloads" und wähle eine der folgenden Optionen aus: iCloud Drive: Wähle diese Option aus, um Downloads im Ordner „Downloads" in iCloud Drive zu sichern. Dann kannst du auf jedem iPhone, iPad oder Mac auf die geladene Datei ...
Webseiten-Betreiber können für Ihre Nutzer den Vollbildmodus in Safari auf dem iPad aktivieren. Wir zeigen Ihnen, wie dies genau funktioniert. ... Wie eine Webseite im Vollbild-Modus auf dem iPad aussieht, sehen Sie zum Beispiel auf Perpetual-Beta.org. iPad: so aktivieren sie den Vollbildmodus in Safari imago images / ZUMA Wire
Find the website you want to view full screen. Tap the action button (the button with the arrow coming out of it). Tap Add to Home Screen. This creates a shortcut to the site on your iPad home screen (aka a web clip). Edit the display name for the shortcut and then tap Add . When you tap the shortcut from your home screen, it will open the ...
Customize your start page. When you open a new tab, you begin on your start page. You can customize your start page with new background images and options. Open the Safari app on your iPhone. Tap , then tap . Scroll to the bottom of the page, then tap Edit. Favorites: Display shortcuts to your favorite bookmarked websites.
Press the share button (the one in the middle at the bottom) to show the options panel: Choose "Add to Home Screen": Now you'll see an app on the home screen with the site favicon. Clicking it will simply open the site in Safari. But if you add this meta tag to the page: Clicking the app icon will open the site in full screen: This works ...
In the drop-down menu, tap the. Add to Home Screen. option. In the Add to Home window, you can give the new icon a title on the home screen of your iPad. When you're done, tap on the Add button. The new icon should now appear on your home screen. Tapping on the icon will open the webpage in full-screen mode.
Auf dem iPad bietet Safari keinen Vollbildmodus. Safari ist ein Internetbrowser von Apple und läuft unter anderem auf dem Mac OS X und auf dem Apple iPhone. Wenn Sie den Browser in den Vollbildmodus schalten, dann blenden Sie alle anderen Elemente aus und haben ein großes Bild.
There are numerous hacks and viewport properties that enable us to get more screen real estate, but none are quite as effective as minimal-ui (introduced in iOS 7.1). News came yesterday that iOS 8 beta4 had removed minimal-ui from Mobile Safari (see Webkit section in iOS 8 Release Notes), which left us wondering: Q1.
If you don't see Safari on your Home Screen, you can find it in App Library and add it back. On the Home Screen, swipe left until you see the App Library. Enter "Safari" in the search field. Press and hold , then tap Add to Home Screen. In Safari on iPhone, view websites, preview website links, translate webpages, and add the Safari app ...
So sieht es aus wenn ich Webseiten aus den Favpriten auswähle. Um ein Vollbild zu erhalten muß ich oben links < zurück klicken, danach auf < Safari und zum Schluß < oberhalb von Safari das Buch. Erst dann erhalte ich ein Vollbild. Überigens war ich im Apple Store, auch mit den neuesten iPad's sieht es genauso aus.
Vergrößern einer Grafik-App für den Vollbildmodus auf dem iPad. Die meisten Apps für das iPhone können auch auf dem iPad verwendet werden, nutzen aber möglicherweise nicht den gesamten Bildschirm. Tippe in diesem Fall du auf , um die App zu vergrößern. Tippe auf , um zur ursprünglichen Größe zurückzukehren. Im App Store kannst du ...
I plan to create a website with the required info and want to have the iPad to display just that site, Stack Exchange Network Stack Exchange network consists of 183 Q&A communities including Stack Overflow , the largest, most trusted online community for developers to learn, share their knowledge, and build their careers.
Vollbildmodus aktivieren. Um ein Vollbild zu erhalten, nutze bitte die Option Bildschirmdrehung. Drehe dafür dein iPhone einfach ins Querformat. Zusätzlich kannst du das Bild danach noch vergrößern, indem du den Bildschirm mit Doppelklick berührst. Dies ist besonders für Sendungen nützlich, welche im Format 4:3 übertragen werden.
Viele Apps auf deinem Mac unterstützen den Vollbildmodus, die App füllt die gesamten gesamte Anzeigefläche deines Bildschirms. Du kannst also den gesamten Bildschirm nutzen, ohne den Platz für die Anzeige des Schreibtisches zu verschwenden. Bewege den Zeiger auf deinem Mac auf die grüne Taste oben links im Fenster und wähle dann ...
Once we have created the profile and marked the web clip to run full screen, we can save the mobileconfig profile. Now in the Microsoft Endpoint Manager Admin Center we can add an iOS configuration profile like so. Finally, now we have assigned the configuration profile to the correct group and the device has synchronised, we will see the web ...
Alternativ navigieren Sie über "Darstellung" zu "Vollbild ein" oder drücken Sie die Tastenkombination [Ctrl] + [Cmd] + [F]. Sie verlassen den Vollbildmodus, indem Sie [Esc] wählen. Safari-Fenster im Vollbild öffnen. Der Praxistipp beschreibt einen Lösungsweg unter Mac OS X 10.9.5 und Safari Version 7.1.
To enter full screen on a MacBook, simply hold the globe key, also known as the function key, and tap the letter 'F.' Tapping the escape key will exit full screen mode. On a Mac that doesn't have such a key on its keyboard, a combination of control and the command key, which looks a bit like a four-leaf clover, plus the letter 'F' switches to ...
Du kannst deine Startseite mit neuen Hintergrundbildern und Optionen anpassen. Öffne die App „Safari" auf deinem iPad. Tippe auf oben rechts auf dem Bildschirm, um einen neuen Tab zu öffnen. Scrolle auf der Seite nach unten und tippe auf „Bearbeiten". Wähle Optionen für deine Startseite.