When you buy through our links, we may earn a commission. Learn more .

How To Wire Multiple 12V Or 6V Batteries To An RV

Why Connect More Than One Battery To An RV?
An RV uses more electricity than you think. RVers usually figure this out pretty quick when they try out boondocking or dry camping without electrical hookups.
Every time you turn on a light, use the water pump, a fan, or the furnace, power is being drained from the batteries.
Even when switched over to LP gas (propane) the fridge is using electricity.
Related Product: We use the reliable VMAX 100Ah AGM battery (click to view on Amazon) in our RV.
No matter what kind of RV battery or batteries you are using, it’s not good to drain them completely.
Lead-acid batteries should only be discharged down to around 50% and Lithium-ion around 20%.
Any more than that will slowly damage the batteries and make them lose the ability to hold a full charge.
Even if you use a generator or solar panel to charge the RV batteries every day, you are going to want a lot of stored power.
That way, you can use as much electricity as you need between charging without damaging the RV batteries.
See Also: Best Deep Cycle RV Batteries (AGM, SLA, 12V, 6V)
One of the easiest ways to add more battery power to your camper is to add more RV batteries.
In this article, I’m going to show the best ways to wire both 12 volt and 6 volt batteries to an RV.
This is about adding 12 volt power to your RV, not creating a solar power bank.
My knowledge is very limited when it comes to large solar power banks that require a lot of batteries.
But, if you want to know more about RV batteries and how to wire them, you’ve come to the right place.
Table of Contents show Why Connect More Than One Battery To An RV? How To Correctly Wire Multiple 12 Volt Batteries To An RV What You Will Need What Is Parallel Wiring? The Wrong Way To Parallel Connect 12 Volt Batteries The Best Way To Parallel Wire Multiple 12V Batteries How To Wire 2 12V Batteries To An RV How To Wire 3 12V Batteries To An RV How To Wire 4 12V Batteries To An RV How To Correctly Wire Multiple 6 Volt Batteries To An RV How To Wire 2 6V Batteries To An RV How To Wire 4 6V Batteries To An RV How To Wire 6 6V Batteries To An RV How To Wire 8 6V Batteries To An RV Frequently Asked Questions What AWG of wire should be used to connect RV batteries? Where do I connect the battery charger on multiple batteries wired together? Does an RV need 2 batteries? Can you mix batteries with different amp hours (ah)? How do you hook up 3 12V batteries to an RV? Should you leave your RV plugged in all the time? Should I wire my RV batteries in series or parallel? What is the difference between RV batteries in series and RV batteries in parallel? Do RV batteries in parallel last longer?
How To Correctly Wire Multiple 12 Volt Batteries To An RV
Wiring multiple 12V RV batteries to an RV isn’t very difficult and most people can do it themselves.
There are a few ways to do it wrong, and I’ll try to cover some common mistakes.
The goal is to wire the 12V batteries together in parallel correctly, so the power output and input is balanced between all the batteries.
This will make the RV batteries last longer and work better.
What You Will Need
The first thing you need to wire RV batteries together is the proper wire. The best sizes to use are 6-4 AWG copper wire.
I suggest 4 AWG because less resistance equals a more efficient transfer of power from battery to battery.
Because every set-up is going to be a little different, depending on the sizes of batteries used and the storage space, I suggest getting a long length of red and black 4 AWG copper wire with the right battery terminal connectors.
See Also: Best 12 Volt RV Lithium Battery Reviews + How To Charge
The Windy Nation 4 AWG Wire Kit (click to view on Amazon) is perfect for most deep cycle RV batteries and there should be enough wire for your average RV battery connections.
If you plan on connecting more than 4 RV batteries or there will be some distance between them, get more wire just in case.
For RV setups that will have a lot of power draw, like if you have a large inverter, you may want to go as high as 2 AWG wire to increase the capacity.
To do the job right, you will also need a crimping tool (click to view on Amazon) .
You can try without it, but your terminal connections might not be as tight or secure, which could mean more resistance or a battery that isn’t connected.
What Is Parallel Wiring?
When you connect batteries through parallel, you are combining the positive terminals to the positive ones and the negative to negative.
This combines the batteries to create one large one that still has the same voltage.
You cannot combine batteries of different voltages. It’s also not recommended to combine different ages and sizes of batteries even though it is possible to do so with parallel wiring.
See Also: How Long Will An RV Battery Run The Furnace? + Calculations
I won’t go into the specifics of what parallel wiring is because that’s not really what this article is about.
You can read more about parallel and series wiring here if you want to learn more.
The main thing you need to know is that you parallel wire 12V batteries for RVs.
You want the voltage to stay the same unlike when you wire 6V batteries in series because, in that case, you want to double the voltage.
The Wrong Way To Parallel Connect 12 Volt Batteries
This way of parallel connecting 12V RV batteries technically works.
You can see in the graphic below that the positive terminals are connected and so are the negatives.

The wrong part is the load wires that connect the batteries to the RV are both placed on the same battery.
This setup draws most of the power from the first battery and the least amount of power from the battery furthest down the line.
If you parallel wire your RV batteries like this, the first batteries are going to wear out much faster than the others.
You want the load to be evenly distributed so all the batteries are charging and discharging equally.
See Also: NOCO Genius 5 Tested & Reviewed For Deep Cycle RV Batteries
The Best Way To Parallel Wire Multiple 12V Batteries
I’ve shown you the worst way. Now I’ll talk about the best way to wire multiple 12V batteries in parallel.
In the graphic below, you see all the 12 volt batteries are wired to external battery terminal posts.
Each wire running from each battery needs to be the same length, otherwise you will add more resistance to one battery than others, and the circuit will be unbalanced.

The major downside to this method is not everyone has space in their RV to add external terminal posts.
Also, the difference in balance between this method and others may not be enough to make it worth it.
If you are creating a large solar power bank with 8 or more batteries, apply this method to keep all the batteries healthy.
For small RV battery banks, you can wire in other ways to create balanced batteries.
How To Wire 2 12V Batteries To An RV
Two 12 volt RV batteries wired in parallel is one of the most common set-ups and the one most RV manufacturers add compatments for.
Even my travel trailer came with two deep cycle 12 volt batteries in plastic battery boxes, wired in parallel, and neatly stored on the front of the trailer.

In the graphic above, you see the terminals are wired in parallel using even lengths of cable.
The main difference between this wiring and the one I called wrong is the load wires from the RV are connected to different batteries.
Doing this distributes the load, and with just two batteries, you will have a balanced circuit.
See Also: Power Queen 100Ah Smart Lithium Battery Tested & Reviewed
How To Wire 3 12V Batteries To An RV
Once you add over two batteries, the simple 2 RV battery method gets a little less efficient.
But just adding one more battery will not make a huge difference, so I still suggest wiring a 3 12 volt RV battery setup in a similar way to the 2 battery method.

You still need to put the load wires on the end batteries so the middle RV battery is being drawn from evenly.
The middle will put out fewer amps than the end two, but the difference should be small enough that it’s not a huge deal.
If you want three absolutely perfectly balanced RV batteries, you can use the best method I mentioned in the beginning of this section, or apply the Cross-Diagonal method I talk about next.
How To Wire 4 12V Batteries To An RV
If you’re going to add 4 batteries to your RV, you are going to have to get a little fancier with the wiring.
You can still just chain the terminals together like the 2 or 3 battery method, but things will be very unbalanced.
The Cross-Diagonal method is a simple way to keep 4 or more batteries balanced without having to apply the terminal post method seen in Graphic 1.

It looks complicated, but if you follow each wire, you will see that it’s easier than it looks.
You can start by connecting two pairs of batteries using a short wire. Then take the two pairs and connect them using one long wire.
This combines the two groups. You connect the RV Power wires to the center terminal that has both the short and long wire on it.
Make sure the negative and positive load wires are still connected to two different batteries.
If everything was wired right, the load wires will connect to the middle batteries.
See Also: Best Portable Solar Panel Charger For RV Camper/Boondocking
Each battery has both a long and short wire connected to it, which helps balance out the resistance, and keeps the 4 batteries even.
By adding a few more connections, it has created a better balance than if you were to use the standard chain connections with the load wires on each end.
If you can’t fit 4 batteries in a row in your RV battery storage space, you can connect them the Cross-Diagonal way in a block, as shown in the graphic below.

Each battery still has a long and short connecting wire and should still be perfectly balanced.
Right now my travel trailer has 2 12V deep cycle RV batteries sitting on the tongue.
When they finally stop holding a charge, I plan to install 4 12V AGM deep cycle RV batteries like the top choice in this article on the best RV batteries .
After measuring, I found I should be able to fit them all on the trailer tongue like in the graphic below.

I’ll still be able to use the Cross-Diagonal method to keep the batteries balanced.
The only obstacle is finding a box that can fit all the batteries to keep them protected from the weather.
The reason I want to keep the batteries loaded on the front of the travel trailer is to keep the weight evenly distributed for safer towing.
How To Correctly Wire Multiple 6 Volt Batteries To An RV
6V RV Batteries can be a good choice if you are looking for an increase in durability and total amp hours in a battery.
There are many pros and cons to both 6 and 12 volt batteries for RVing, but it mostly comes down to preference.
You can read more about each kind of RV battery setup and its pros and cons here .
If you’re going with 6 volt RV batteries, the wiring is going to be a little different.
You need to increase the voltage to 12 volts because no RV is made to run on 6 volt power.
You can do this by wiring two 6 volt batteries together in series, which means connecting a positive to a negative terminal.
When you do this, you increase the voltage but not the amperage.
See Also: Best Portable Power Station/Solar Generator For Camping
For example, if you have two 12V 100ah deep cycle RV batteries and you wire them together in parallel, you end up with 12 volts and 200ah.
If you wire two 200ah 6 volt batteries together in series, you end up with 12 volts but the amp hours remain 200.
The good news is you can combine series and parallel wiring with 6 volt batteries so you can combine 4 or more and keep the voltage at 12 for an RV, but increase the amp hours.
I’ll go through each of these wiring methods below.
Note that you should never combine different amp hour 6V batteries. They must be the same size, kind, and, if possible, age.
How To Wire 2 6V Batteries To An RV
As I mentioned before, the first thing you need to do is connect two 6V batteries in series to create a 12 volt battery bank.
You do this with a small piece of wire, preferably the 4 AWG copper wire I mentioned in the 12V section of this article.
The wire color doesn’t matter. I made the series wire blue in the graphics so they are easier to understand.

You still attach the load wires that power the RV to different batteries. You should never have both load wires on one 6V battery.
How To Wire 4 6V Batteries To An RV
Once you’ve wired 2 6V batteries in series to make a 12V battery, it’s really easy to wire 2 more 6V batteries together in series and parallel to increase the amp hours.
You can do this by combining each pair of 6V batteries and then wiring them together in parallel like you would 2 12V batteries.

Make sure you connect the load (RV power) wires to the different pairs of 6V batteries, as shown in the graphic above.
This will help keep the batteries balanced, which keeps them healthy and holding a full charge for longer.
See Also: When To Charge A Deep Cycle Battery
How To Wire 6 6V Batteries To An RV
You can make huge battery banks using 6V batteries, but for RV use, even having over 4 6V batteries is going to weigh a lot.
But if your energy needs are high, you can easily wire 6 6V RV batteries together using the same series and parallel method used above.

The batteries will be reasonably balanced, much like wiring 3 12V batteries together.
You can use the Cross-Diagonal method to balance them even more if you want, but the difference may not be enough to make it worth it.
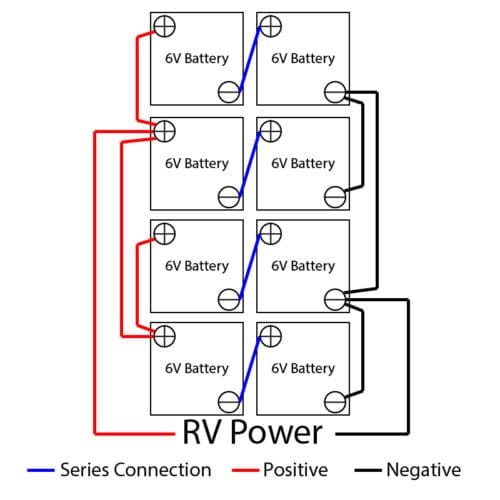
How To Wire 8 6V Batteries To An RV
While having 8 6V batteries in an RV isn’t super common, it may be the right choice for you.
I decided to add this diagram to illustrate how 8 6V RV batteries can be wired in series but also balanced in parallel using the Cross-Diagonal method.
Frequently Asked Questions
What AWG of wire should be used to connect RV batteries?
4 AWG is going to be the best for connecting RV batteries, but you can also use 6 AWG and get good results.
Where do I connect the battery charger on multiple batteries wired together?
The battery charger should always be connected to the same battery terminals the load wires are connected to.
This will help the batteries charge at an even rate so no battery is getting overcharged while another on the same circuit isn’t getting charged enough.
See Also: Best Deep Cycle Battery Chargers Reviewed (12V, 6V, RV, AGM)
Does an RV need 2 batteries?
If you are going to use 6 volt RV batteries, then you have to have at least two of them to reach 12 volts of power.
If you are going to use 12 volt batteries, only one is necessary, but I suggest getting either a large 100ah 12V deep cycle RV battery or two smaller 35-50ah 12V deep cycle RV batteries.
Can you mix batteries with different amp hours (ah)?
When connecting batteries in series as you would with 6V batteries, you cannot mix batteries with different amp hour capacities.
When wiring in parallel, like you would with 12V batteries, you can use different sizes of 12V batteries.
That being said, it’s important to try to not mix different ages of batteries. I wouldn’t wire anything together that are older than 6 months apart.
How do you hook up 3 12V batteries to an RV?
It’s easy to wire 3 12V batteries in parallel to an RV.
You can scroll up and check out the diagram labeled graphic 3 in this article for more information.
Should you leave your RV plugged in all the time?
If you are going to leave your RV plugged in all the time, you should check and make sure your RV has a smart or 3 stage charger installed in the power center (converter area).
Older RVs may only have an older kind of trickle charger in the converter, which can cause your batteries to get overcharged, which can be just as bad for them as going dead.
If your RV has an older charger in it, you can swap it out for a different one pretty easily.
See Also: Should I Disconnect My RV Battery When Plugged In?
If you have a smart or 3 stage charger in your RV, it should be safe to leave the batteries plugged in all the time.
Remember to do regular maintenance on the batteries and check the water levels if they are flooded lead-acid.
Should I wire my RV batteries in series or parallel?
12V RV batteries should always be wired in parallel. You want to keep the voltage the same but increase the amp hours.
6V RV batteries need to be wired in series in pairs to create a 12V battery.
Once two 6V batteries are wired together in series, you can wire them to another pair of 6V batteries using parallel wiring.
What is the difference between RV batteries in series and RV batteries in parallel?
When wiring batteries in series, you are increasing the voltage they will put out.
For example, two 12V batteries wired in series will become a large 24V battery, which is too high for RV use.
That’s why you wire them in parallel instead, because you only want to increase the amp hours, not the voltage.
Because of the increased voltage when wiring batteries in series, you can connect two 6V batteries to create a 12V battery that is compatible with an RV.
Do RV batteries in parallel last longer?
When wired the correct and balanced way, 12V batteries wired in parallel can last a long time.
If they are wired incorrectly, the battery the RV is directly connected to may wear out faster than the others.
It can be slightly harder on batteries to be wired in series, but 6V batteries are known to be tough.
The difference between 2 6V batteries wired in series compared to 2 high quality 12V RV deep cycle batteries wired in parallel will be very small.
Have any more questions about wiring multiple RV batteries? Leave a comment below.

76 thoughts on “How To Wire Multiple 12V Or 6V Batteries To An RV”
Great article. But I still have a question.
I’ve got Six, 6 volts, series, then parallel. They are brand new, but two are slightly lower in voltage than the other four. I know it’s a warranty issue, but I bought them while travelling and taking them back is not an option.
So, moving forward, is it best to put the two “lower volt” batteries on the outside of the wiring chain?
I have them as you shown in your article, were in my case the two that are connected to RV load in are “First in line”
My after thought is to have them in the middle set wired in series together as they might be causing more resistance the way I have it now.
I value your knowledge. Thank you. Gary
The problem with combining batteries that are different voltages in a battery bank, especially one with 6 batteries, is it can create an unsafe circuit. The larger batteries are going to try and charge the lower voltage ones no matter where they are placed in the circuit, which will result in overcharging and reduce the lifespan of all of the batteries. In a worse case scenario, it could even destroy the smaller voltage batteries.
In large battery banks like yours, it’s even recommended to always use the same brand of batteries as different brands can have slightly different voltages even if the label says they are the same.
Since all the batteries are new I would sell the two odd 6V batteries and buy two new ones that match the other 4 perfectly. Even though you may lose a little money initially your battery bank will be much safer and all the batteries will last longer which saves you money in the long run.
Hello Jenni, Thank you for your “balanced” 8 6v battery wiring design! Last night I compared all the configurations I could find on the web and agree that your scheme is the most balanced with the fewest resistance creating cables and terminals. I have jumped into the deep end on my RV battery problems as we are moving to more dry camping and less dependency on shoreline power occasions. I have questions that you might help me with and am hoping I’m not in over my head…
I bought 8 6v 225Ah AGMs that I will wire in series-parallel identical to your last figure above. Understanding that all cables and connectors need to be the best quality copper I can find and all of identical length and resistance throughout. I perceive that less is more in terms of gauge? I’ll assume that 2 AWG is overkill and 6 AWG or smaller is just OK or climbing in resistance. Thank you for that recommendation!
On the RV’s Converter/Charger: But what am I getting into going from 2 “weak” 90Ah (<180Ah total) 12v batteries as the RV with built with when going to 900Ah total in the bank? I will check the converter/charger to make sure it is a “smart charger” type but will I need to modify the converter/charger to accommodate a battery bank 5 times normal capacity? Is there a formula to determine what output my converter/charger should produce to service 900Ah of battery?
On my solar panel charging: I have been using a 100W solar panel with a 30A charge controller which seemed to do just fine servicing the 2 “weak’ 12V batteries. Will an addition of one more 100W solar panel be sufficient to support a 900Ah bank?
I’m treading in deep water here in terms of understanding… Help!
Thanks again for great info!
You will need to get a different kind of charger that will be capable of handling that amount of amp hours. This Go Power! GPC-100amp 4 stage converter charger (click to view on Amazon) can handle up to 10 batteries and should be able to handle 900Ah. I suggest putting the charger as close to the bank as possible and making sure the wiring is the right size.
That being said I am not a professional and I can only help you with what I know. With a battery bank of that size in an RV I would suggest getting a professional to help you with the charging and wiring aspects. If it’s done right the batteries will last a long time but charging them wrong could ruin them.
As for the solar panels. If you do the math two 100W solar panels will give you about 60Ah per day. At that rate, it would take 15 days to generate 900Ah. Of course, you probably won’t be using that much power daily but you will probably end up wanting more solar panels so you can recharge your power bank quicker.
Jenni, I have upped my game a bit on the solar panels to service the 900Ah battery bank. Thanks for your help! In regards to your drawing above, which I intend to use, I have a question with respect to balancing all cables to equalize the resistance so no One battery gets charged any more or less than the others. So does that mean that if the cables that I use to “Bridge” the 2 banks of 4 is 20”, does that mean that the cables that tie them in parallel and the cables that connect in series (blue) all have to be 20”?
Yes, making all the connecting cables the same length is going to give you the best results.
The 30 amp charger controller is fine for maybe 5 of those tiny panels, so you’re set there. The “converter” should also be fine. It will take more time with any source to charge a much larger bank. The first thing I would do is add panels to the limit of the charge controller, unless it is very limited (PWM), in which case I would change out the entire solar side of it with residential panels and a 60 amp MPPT controller, IF you have the roof space for normal panels. These days, if you buy standard panels, you can get brand name for under 200 bucks with a 400 watt output. If you’re not swapping to LiFePo4, and keeping the same chemistry, you should not need to change anything rlse, but you might want to.
My setup will be the same as “Travel Trailer Tongue” but in a metal, ventilated box behind the steps on my RV. Would it be advantageous to just flip the second and fourth battery in that diagram so that each cable will be the exact same length when you connect them together in a crosshatch pattern with three “X”s ? If so where would I connect the load cables?
The cross diagonal method shown on the travel trailer tongue is about the same thing, you just don’t have to run the wires across the tops of the batteries. I think it will work about the same either way. Here’s a diagram with the 2nd and 4th batteries flipped to help show where the load cables should be connected.

Hi Jenni and thank you for such great information. I have two questions if you can please:
We are going for off-grid stays in our van and I will be augmenting the existing 600a of lithium batteries with two additional batteries. They have one season with very few cycles and I have read that in parallel, mixing these with two new is not a concern. Is this ok?
Also, assuming I wire two banks as you have shown for 400a, how should they connect and where should I take 12V power from?
Much appreciated
As batteries are used and age they slowly lose their capacity. When you add a new one to the mix you are basically putting batteries with two different capacities together which is not recommended because either the newer battery will not get charged enough or the older battery will get charged too much which may damage it.
However, if the lithium batteries in your bank have only been used a few times and you have kept them charged with a proper lithium battery charger they probably haven’t lost very much of their original capacity. There will be some difference between the new and old but probably not enough to damage the old batteries when charging. The thing that will most likely happen is the new batteries will lose some capacity a little quicker than they normally would.
I agree that it’s probably not a big concern to add the two new ones.
For your other question about the wiring, are you asking about parallel wiring 4 12V batteries together or 4 6 volt?
Thank you for the response – and I agree. I am trying to fine a diagram for wiring 8-12V batteries in parallel. Thank you
Sorry Jesse – saw Jenni from a previous post…
Great article – thanks! I’m in the process of buying a 1999 National Dolphin. For the first 18 months it will be my weekend home on a lot I’ve recently purchased (while my house is being built). Let’s assume that the two 6 volt batteries currently installed are old. In my “perfect world”, I’ve got a 100W solar array that is charging two or four deep cycle batteries that keep me comfortable while I’m there, and then are kept charged during the week by the solar (I have a full south exposure). My questions: 1. do I disconnect the two 6V for now, and just connect the cables to those leads? 2. If I permanently wanted to move over two my new battery array, besides building a stable holder for them, do I need to do anything beyond ensuring that I connect the cables from my new batteries into the existing system? I expect I will be boondocking as I will do some cross country travel during the summer, so the strong battery backup will be of value. 3. Is there any reason to consider doing this with 6V batteries v. 12V? 4. can I have the solar charger connected to the battery array while I’m using the RV?
Thanks in advance for any insights or redirects.
1. Yes, I assume the old 6V batteries are wired in series, if you end up getting 12V batteries you will need to wire them in parallel. Also, never combine old batteries with new ones. 2. No, but again you need to make sure you wire them right. If you go with lithium you will need to make sure you have a lithium compatible charge controller on your RV and solar panel. You can read more about charging lithium batteries in this article here . 3. This is a good question that has a lot to do with personal preference. I have written an article about it you can find here . 4. Yes.
Hope this was helpful, good luck with the RV, if you have any more questions feel free to ask.
Thanks for the quick response – I’ll review the articles you called out!
I want to connect two 12V batteries in series and parallel. Is this possible. This is on my boat so that I can charge the batteries with the 12V charging system from the boat motor and still be able to run my 24V trolling motor.
Hey Marshall,
Connecting your batteries in series for the motor and parallel for the charger won’t work. What you can do is connect a 12V charger to each battery (use 2 12V chargers) or get a 24V battery charger.
I’m in the process of wiring two banks of 6V batteries. Bank 1 is approximately 8 feet from bank 2. What would the recommended gauge wire from the positive terminal on bank 2?
Hi Richard,
The size of wire you need to use depends a lot on how many amps you plan on running from the banks to your RV. If you are connecting them to an inverter you should consult the inverters manual to find out what gauge of wire is recommended.
If the battery bank is just for running the 12V appliances in your RV then something in the 2 to 4 AWG range should work fine.
Keep in mind that I am not a professional and wiring big battery banks like that can be complicated. You may want to consult a professional, especially if you are wiring them to an inverter.
Yes the two battery banks are for running the 12V RV appliances (tv, lights, refrigerator, fans) or through the 300W inverter (tv, laptop, iPhone, etc). Thanks
Jenni, I have installed 4 new/matching 6-V batteries in my RV and have used the most common (included on your site and most others) series/parallel method. Should all hot/ground be connected to one terminal at each end of the battery pack or can I hook to the other end of the hot and ground jumpers?
I think that would be possible and it probably won’t unbalance everything too much. It is best to use the outer terminals to connect the hot wires because that’s the most balanced way but if you need to use the opposite ends than what’s shown in the graphic it will probably be fine.
No matter what don’t connect the hot wires on the same end of the battery bank. They need to be as opposite as possible for a balanced charge and output.
Thank You Jenni, I’ll stick to the original layout as that seemed to to be the best alterative, but was just curious. Thanks for your help…
I have a two battery system that I am trying to wire in parallel with 2 more batteries in a separate location 3-4ft away. If the OEM install had two batteries with primary RV Power lines there, what is the best way to wire the 2nd bank of 2 batteries or do i need to move the RV power Negative to the second battery bank? These are all 12volt – Marine batteries.
I think the best way is going to be to turn the two battery banks into a large 4 battery bank by moving the negative RV power. For an even draw, you will also need to make sure all the connecting wires are the same length. If there is any way to move the batteries so they can be together that’s going to simplify things a lot.
These are in the bilge of a boat so not possible to move together, but if I extend the negative RV Power, do I need to extend the Positive RV Power line the same, looks like they different in length by a bit already. Should I extend the shortest one? This is house batteries so mostly concerned with Amp hours, but is there a slightly imbalanced approach that will work alternatively? Thank You Jenni!
From what I know about 12 volt battery systems it actually will probably be ok to just extend the negative wire to reach the other group of batteries. There will definitely be a little bit of loss from the long cable but it should still work.
I think the most important thing will be to use thicker wires to connect each pair of batteries so the power draw and battery charge will be as balanced as possible. If you use the cross diagonal method for connecting 4 12V batteries in parallel it should be ok. It’s not an optimal set up with the two pairs being so far apart but hopefully, they will still be fairly balanced.
Makes sense. I will look for a connection block to extend it. Thanks for your help!
Thanks for the informative article. I have an RV that has four 12 V batteries in parallel installed by the manufacturer, but I have space for one more. As it they are getting old, I’m replacing all of the batteries using the original wiring harness, but I’d like to add an additional one. What would be the best way to add the additional battery without having to replace the existing wiring harness. Best as I can tell, the existing batteries are wired per your 4 12v battery diagram.
Thanks again
From what I know about wiring batteries, and I’m no professional, it doesn’t seem like it’s possible to add the 5th battery and still use the cross diagonal method. The extra battery just throws everything out of balance.
Even though it will require a little more work, I think using the terminal post method, which is the most balanced, is going to be the best way to go.
I wish I had a better answer but I’ve only ever seen that method used for larger battery banks that use over 4 batteries like the one you want to build.
I might contact a professional, and if I get any more information, I’ll post it here. Thanks again for your help!
Great article. I’m about to pick up a 41’ fifth wheel. I’ll be moving in the RV for several months. The lot doesn’t have power right now so I’ll be using a generator.
The RV only has on 12 v battery but I’m considering adding several to create a power bank. I’m still very new to this but I wanted to ask if I have a power bank of 6 batteries, will the generator charge the batteries as is? Or will I need to retrofit some extra equipment to ensure the newly fitted batteries get recharged?
Hopefully that makes sense
For a battery bank of that size, I would get a second opinion on what size of charger you might need. My knowledge is pretty limited when it comes to banks larger than 4 batteries.
For charging it all depends on how many amp hours each battery has and what rate you want them to be charged at. If we’re talking 6 100 amp hour batteries you will have 600 ah. If you want to charge at a rate of 10% you’re going to need a charger that can output a minimum of 60 amps.
The converter/charger in your RV probably isn’t capable of amperage that high and neither is the wiring. It might be a good idea to get a better charger and wire it close to the battery bank with the recommended size of wire for the amps that will be going through it.
As for the generator, it also depends on what size that is as well.
Help! We have 2 6vt batteries wired in a series as the diagram above. There is no power to my camper or tongue Jack. It has to be a battery issue because when I hook up a single 12 volt everything works fine. The 6 colts are brand new. Thank you.
It sounds like the wiring is the problem. Are you sure the RV negative is on a different battery? Both the RV negative and positive need to be connected to different batteries to make the circuit work.
I can only help as far as the wiring goes. It’s possible that one of the terminals on a battery is bad. The issue with using 6V batteries is everything has to be working and wired properly to run an RV.
Check everything again including the wires that are running between the batteries to connect them in series. If all the wiring looks right then it must be a bad battery.
I need to find out how to connect the power lines and fuse lines to my 4 6volt batteries.
If you look at the graphic for how to wire 4 6 volt batteries to an RV it shows you where to connect the positive and negative power lines coming from the RV.
If you want to add a fuse put it on the positive line coming from the RV near the battery. The size of fuse depends on the kind of set up you have but 30 amp fuses are pretty commonly used. I would try and match the amperage coming out of the charger/converter in your camper.
Hi, Thanks for the great information. I keep my 2005 5th wheel in storage and use at an rv park. So it is plugged in all the time. My heater stopped igniting and I found it might be my batteries causing the problem. I have 2 6v Trojan batteries and I am sure they have gone dead (over 6 years old). After reading your articles, how would I switch over to one 12v DC 75 to 100 ah battery? How does the wiring go?
Thanks for your help,
Because you are using a 12V battery you don’t need to do any fancy wiring. Just connect the positive RV wire to the positive 12V battery terminal and the negative to the negative.
I have a 2020 bullet 30′ trailer and I’d like to add a 3rd 12v battery to the existing 2. Do you think the existing charger/inverter will be adequate to support the 3rd battery? You have provided great information!! It’s a great service to all of us with RV’s Rich
I hope you are reading comments still. The 6 -6v example. Why would you not wire 3 in parallel to create effectively 6v with 3xAH then series the two? To create 12v with the same AH. 6-6v220ah would still equal 12v660ah.
I’m going to have to do a little more research on that. The main reason I can see would be just having technically two batteries connected in series would create a very unbalanced battery bank but I’m actually not 100% sure on that. I’m going to contact some people and hopefully get back to you with a good answer soon.
I have 6 12v SOK LFP batteries that I want to hook up in two rows of three. The 4 battery cross connect method seems doable but how do I extrapolate for six vs 4 in the diagram?
The cross-connect method is really only good for 4 batteries. A battery bank with 6 batteries is pretty large and I would definitely go with the terminal post method. You can still do two rows of 3 that way and it’s going to be better balanced.
I have two 6 volt batteries wired in a series, can I hook them up to two 12 volt batteries so that I have 3 12 volt batteries?
You should never wire batteries that are different voltages together. Even though they are technically the same voltage when wired in series the 6 volt batteries will charge and behave differently than the 12 volt ones.
It’s recommended when building a battery bank to use batteries that are the same voltage, age, and even the same brand.
Hi Jenni, This article was very informative to me since I am a new RV owner. I need to store my RV for 5 months and the storage facility does not have 30 or 50 amp service. So, I can’t connect my shoreline power cable. I have a Newmar Class A 2021 model and Newmar does not advise to use a “dogbone” conversion of their shoreline power connector to a standard 110V outlet connector. So, the storage place offers Battery Tenders for my house and chassis battery banks. This is the direction I plan on going.
I liked to be informed, so my question to you is which specific terminals in this 8 battery 6V battery configuration should I connect the Battery Tender positive and negative cables? I have this exact configuration that you have listed below. If you can be specific on the actual diagram that would be ideal, I did not understand your FAQ response. Also, Can you connect 2 battery tenders to this 8 battery 6V configuration, if yes, again what specific terminals would you connect each Battery Tender
Thank you, Russ
How To Wire 8 6V Batteries To An RV While having 8 6V batteries in an RV isn’t super common it may be the right choice for you so I thought I’d add this diagram to illustrate how 8 6V RV batteries can be wired in series but also balanced using the Cross-Diagonal method.
Where do I connect the battery charger on multiple batteries wired together? The battery charger should always be connected to the same battery terminals the load wires are connected to.
Hi Russell,
You connect the cables of the charger to the same terminals the RV power cables are connected to. So put the positive battery charger cable in the same spot as the positive RV power cable and same with the negative.
Some battery chargers can be “stacked” so you have two connected to the same terminals. You will have to read the guidelines for the battery chargers you are going to be using to make sure it’s ok.
I think a good way to keep your battery bank charged with two battery chargers would be to split the banks into two. So rewire them using the 4 6V battery diagram and connect the chargers to the terminals the “RV power” is supposed to be connected to.
Hi Jenni, Would bus bars work the same as the terminals you mentioned in the section on the 12 volt parallel hook up? Ray.
Yes, bus bars are an excellent way to go.
I just picked up a 3o ft motorhome with 2 12 volt batteries. I have a couple of 12 volt batteries from my boat that I would like to add to my motor home but I should not add it to my existing battery setup because they are different ages. Is it worth setting up a battery switch so I can charge one set and then switch it to the other two when those are complete?
That sounds like a great idea to me, I’ve heard of RVers doing that exact thing.
Here’s a great battery switch (click to view on Amazon) that’s for both RV and marine dual battery bank setups.
Hi. Curious if you can provide a best wiring scenario for 6 x 12v 100 ah renogy agm batteries in parallel.
I am building a custom battery bank in the spare tire area of my class C. I’ll putting 1400w of solar on the roof and a 2000w inverter charger to power both 12v and 120v outlets including the air conditioner with the 600 ah total at 12v. I saw the 4 in your diagram above. They would have that same orientation (3×3) as the 2 x 2 orientation in your 4 battery post. Happy ton send a photo of it completed! Thanks!
For a battery bank of that size, you definitely want to go with the terminal post method with all the connecting cables being the same length.
Sounds like you’re going to have an awesome boonkdocking setup. We’d love it if you’d send some pics of the final result.
I originally found your write-up when I first bought my RV – it only had 2 flooded Lead-Acid batteries from the factory and does have a solar panel for charging. I am going to replace the batteries with 4, and decided to continue with lead acid, because all I want to do is double the over-night battery time – with 2 batteries I get between 6-7 hours, but “need” 10-12 without firing up generator or running my truck to charge. I was planning on the cross-diagonal diagram you provided, but someone with the same RV sent me the diagram as theirs was wired by the factory with 4 batteries. Basically, the batteries are all the same as your diagram, but the charge load from the solar, and the RV Main/Converter and Invertor are separated. That would seem to leave it unbalanced! Your thoughts on this?
I think that could actually work as well. But I’ve always been told to put the load and charging cables on the same terminals since you want the battery that’s being discharged to be charged first.
But since there are two positive and negative terminals that are connected to a long and short wire, putting the RV load wires and solar charge cables in different spots probably won’t unbalance things too much. I think you could go with either way, but I’ve always put the load and solar charge cables on the same termnials.
This seems to only be the case when you use the cross-diagnanol method. Most of the other methods only produce one positive and negative terminal that create a balanced draw so you have to put the RV and solar charging cables on the same terminal.
I’d love to see that diagram if you are willing to email it to me.
Hi Jenni, Completely brand new to RV’ing. Trying to feel out how much battery life I need. Going to be plugged in the great majority of the time. Family of 6 though with kids and wife that will be using a lot of power on long road trips and when boondocking for 2-3 days max. Bought a brand new Super C with 2 deep cycle 12v batteries and Onan generator. The RV dealer is suggesting I get more batteries and specifically, 4 6v batteries. I read your prior posts that this is not advisable; kind of shocked that they would suggest it then, pretty alarming. Anyway, do you think I need to add an additional 12v or do you think the two 12v’s are enough? Deathly afraid of running out of battery life. Thanks for your help.
6 volt batteries are still great to use, and back in the day, they were better than 12 volt batteries. But today they are making 12 volt deep cycle batteries that are just as durable. But some still choose 6 volt anyways which is also fine.
If you were to add more 12 volt batteries you would need to buy all new ones since it’s not advisable to have batteries that are different ages in one battery bank.
I think you should go boondocking a few times to see if the two batteries you already have are enough. You will probably need to run your generator for a few hours every day to recharge them.
I also recommend getting some solar panels to charge the batteries during the day as well. The solar panels combined with the generator should keep your RV powered up for a few days of boondocking.
Check out this post for some great solar panel options for charging RV batteries.
After a few camping trips you should know if you will need more battery power or not.
For running the TV and small electronics you could also get a portable power station ( click here to read more about them ).
They’re better than large battery banks in some ways since they have inverters built in so you can plug AC powered appliances directly into them. They can be charged via solar panels, the generator, and at home.
Welcome to the world of RV’ing!
Great article. I currently have 2 6 volt deep cell batteries. I have 100 watt solar panel. This does not work for us. I just purchased 2, 105 ah lithium batteries. I need to purchase a controller that will work with lithium batteries. I thought it might be good to get a controller that could handle 4 batteries. We dry camp and may need more battery storage. What charge controller should I get. When I switch to the 12 volt batteries, do I connect all the wires that currently are connected to the positive on the 6 volt to the positive of the 12 volt. Then the same with the negative wires? What size controller should get.
If the plan is to stick with a single 100W panel, something like the Renogy Voyager 20A (click to view on Amazon) would work with your new batteries. Then you also have the option to buy an additional panel later on.
Are your new batteries 12V? If so, when you switch you’re going to wire the batteries in parallel instead of series. If this is for an RV, the 6V batteries are most likely wired in series right now for a 12V system.
When you wire in parallel, you combine the positives together separate from the negatives. This adds the amperages together, but keeps the voltage the same as from one panel (which is what you want with 12V batteries in a 12V system).
In a series connection, you connect the positive to the negative to combine the volts but not the amps. This is how it’s wired when you use 6V batteries in a 12V system like an RV.
The charge controller I link to can handle 20A, which means 20A from solar panels. A single 100W 12V panel produces about 30Ah on a good day (5-6Ah per hour), so it would take a full week of sunshine to charge your new batteries (210/30).
Therefore I would add a second panel of the same model and wire it in parallel with an MC4 Y branch (click to view on Amazon) , before adding more batteries.
Looks like I’ll need 6-8 100 watt solar panels to charge my 12 volt batteries. Would a 60A MPPT controller be able to manage this system? Thanks for you help.
I didn’t mention that I have a 40Amp Intelli Power converter. Model PD 9140 A. How does this play into the picture? Do I need to purchase a charge wizard?
I don’t know enough about the PD converter chargers to say for sure, I recommend contacting them and asking if it’s a good converter for lithium batteries and/or the charge wizard is necessary.
They might recommend a different converter charger, but it’s going to be worth it to upgrade if you’ve spent a lot of money on lithium batteries.
Yes it should, if you look at this Renogy 60A MPPT solar charge controller (click to view on Amazon) for example, it can handle up to 800W at 12V.
Do I hook up any battery cables from my coach batteries to my engine batteries
Usually, there aren’t any cables that are connected directly between the coach and engine batteries.
Some RVers will install a charger that is wired from the coach to the engine batteries. If your motorhome has one of these chargers, cables might need to be hooked up to both batteries.
Didn’t see this question asked and maybe because the answer is obvious. I have a 39ft toy hauler with two 12v batteries hooked up in parallel. I have two sets of power cables running to the battery compartment. I assume one is from the 12v converter and the other is from the generator? My question is I assume I hook both sets of cables to the same terminals. Meaning two positives to one battery and two negatives to the other.
Yes, you should connect them to the same terminals.
Regarding the section for wiring 3 batteries in parallel, Graphic #3, there is a comment “The middle will put out fewer amps than the end two,” but this comment is not correct. The 3 batteries in this set up are actually equally balanced. Assuming the short connecting wires between the batteries are all the same length and same gauge, then the total resistance in each of the individual battery circuits is identical. Thus, each battery should deliver exactly the same amperage to the load circuit. For the analysis of this, you can ignore the resistance in the load circuit, but we’ll label it L. If the connecting wires for positive and negative are all the same gauge and length, then assume each connector has identical resistance R. Total resistance in each individual battery circuit is then: Batt1 = L +0R(positive) + 2R(negative) = L + 2R Batt2 = L + 1R(positive) + 1R(negative) = L + 2R Batt3 – L + 2R(positive) + 0R(negative) = L + 2R You can see that the middle Batt2 has exactly the same resistance between it and the load circuit, and should therefore deliver exactly the same amperage as the other two.
The Batt3 line has a typo and should read: Batt3 = L + 2R(positive) + 0R(negative) = L + 2R
It would be good if this article were updated with a disclaimer regarding the recommended wire gauge that one should use, to explain that this recommendation does NOT apply to an RV which includes an inverter to power AC accessories. In this case the wire gauge needs to be significantly larger since the amperage involved will be much higher. For example, for a system which includes a 2000W inverter and 3 batteries in parallel, the wires connecting to the load should be minimum 2/0 (two – ought) gauge and the short connecting wires between the batteries should be a minimum 1/0 gauge. Amperage to drive a 2000W inverter with 90% efficiency could be as high as 172A on the load wires and up to 2/3 of that figure on the short connecting wires (amperage assumes 12.8VDC battery voltage).
Thanks for all the great info Jeff.
I’ve updated the wire size section to recommend 2/0 wire for RV setups with inverters.
Hello. Thank you for the info, I currently have 4, 12v batteries hooked up that mimic your Graphic #5 above. I want to hook another 6 up for a total of 10. would you be able to provide me with an image for that? Thank you again for providing this awesome info.
For a battery bank of that size I recommend using the terminal post method in graphic 1.
Regarding your best way to connect multiple batteries in parallel. it seem to me when you use a common terminal for the positives and similarly for the negatives, that those batteries will discharge through the internal resistances of the other batteries.
Leave a Comment Cancel reply
Adding Second Battery To RV: Ultimate Step By Step Guide
Adding a second battery to an RV is one of my first upgrades to a new camper. It is one of those simple things that many RV owners can do that is inexpensive and adds tremendous value to your camping experience. Even if you are always connected to shore power, your RV battery operates so many appliances and lights that the existing battery may have trouble keeping up with.
In this article, we will discuss the steps you need to take to add a second battery to your RV so that you can also benefit from having an additional power source, including:
- Benefits of adding a second battery
- What you need to add a second battery
- How to wire a second battery
- Connecting the second battery to the RV
Especially if you go boondocking or dry camp, the dual battery system is a must for you and your RV.
Table of Contents
Benefits of adding second battery to rv, step 1: location of a second battery, step 2: battery box size, step 3: attachment screws, step 4: jumper cables, wiring two 12 volt batteries together, wiring two 6 volt batteries together, step 1: connect the negative wire from rv to the negative battery terminal, step 2: connect the positive wire from the rv to the other battery, final thoughts.
Before we dive into the wiring and installation of a dual battery, here is a quick recap of the benefits of adding that second RV battery:
- You have increased battery power. Adding that second battery will theoretically double your power capacity for your DC loads. Your camping fridge, slide-out motor, and lights rely on battery power.
- Inverter ability. Some RVs and travel travelers are equipped with an inverter. This inverter will convert your battery’s DC power to AC power. This will allow you to use things such as receptacles in your RV when not connected to shore power. Adding a second battery will increase how long your inverter power will last.
- The additional battery in case of failure. When you are set up with 12V multiple batteries, you have a backup in case of original battery failure. Whether you have lithium batteries, AGM batteries, or a good old fashion lead acid battery, they fail and can be an issue. When you have that second battery, you have that backup DC power to get your slide in and run the jack motor to get you back on the road.
What You Need To Add A Second Battery
Now let’s get you started and see what you need to gather to get the added battery to your RV.
The first step is to ensure you have a great location to add this dual battery. In a travel trailer, the battery box is located at the front of the camper near the hitch. A couple of pieces of angle iron or steel usually act as a tray for your battery box.
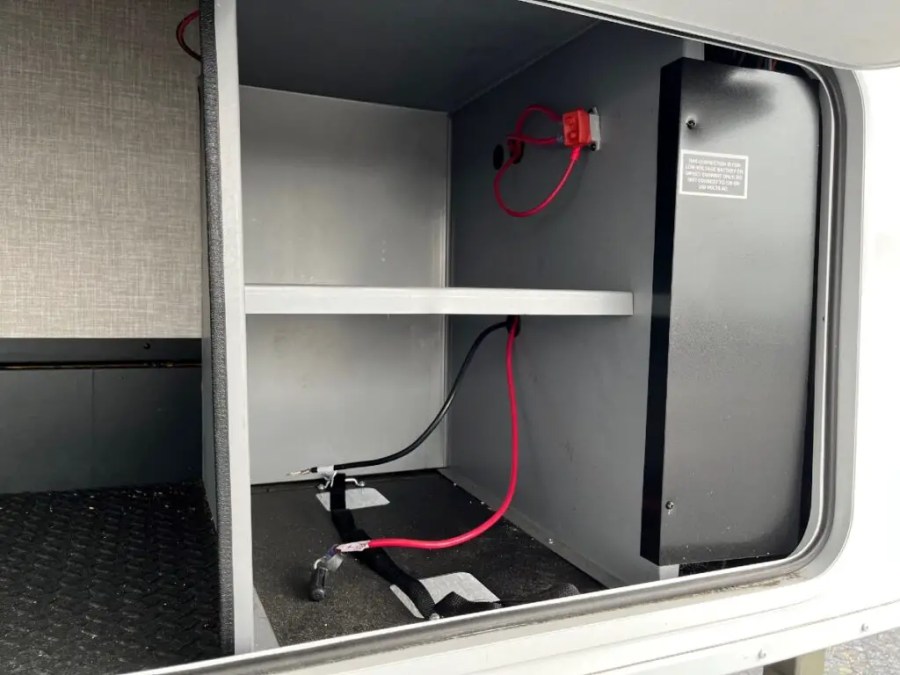
Your battery box is located within an exterior compartment in a motor home, as in the photo above.
Now that you have a location picked, the next decision is whether to add a second single battery box or replace the single box with a dual battery box. Personally, I prefer the dual battery box. The reason is that with a dual battery box, both batteries and wires are tucked away in one box. And once the cover is put on, it gives you a clean look.
When you have two separate boxes, you will have wires going to them, which can look a little less organized.
Next on the list are attachment screws or bolts. These will be needed to secure your single or double box to the trailer.

When using any attachment, it is important to use it with washers. Since the batter box is plastic, and the RV bounces down the road, the small head of a screw will eventually poke through the plastic and come detached from the trailer.
Since you will be wiring two batteries together, you will need a set of positive and negative jumper cables or wires. You want the cables to be around 2 feet long, depending on how close your batteries are to each other. A little slack is good, but you don’t want it too long as it makes it harder to tuck the wires in the box.
And the cables need to be just as thick as your original incoming battery wires. Since you are transferring and combining the power of the batteries, you will always want to stay as thick or thicker as your original so there is no voltage drop or loss of power in the wire.
How To Wire A Second Battery
Now that you made your battery box selection and secured it to your RV, the next step is to place your batteries in the box and wire them together.
Before you start to wire, it is important to know the basics of voltage and how to keep the same 12 volts when connecting the two batteries.
When you wire batteries together, which is true for any battery, including a vehicle battery or even small house batteries, you can increase the voltage or capacity.
In the case of wiring two 12 volt batteries together, you want to make sure that you are not wiring to increase voltage. If you were to wire the two batteries together incorrectly, you would end up with 24 volts going to your RV, causing fuses to be blown and other potential issues.
Important: When wiring two 12-volt batteries to your RV, you must wire them in parallel to keep the same voltage. To wire in parallel, connect the red jumper cable to each battery’s positive terminal. Then take the black jumper cable and connect it to each of the negative terminals of the battery. This is a parallel connection that still keeps the same voltage yet doubles your capacity.
There is an instance where you want to increase the voltage of your battery connection, and that is when you are using two 6v batteries. Although not as common as a 12 volt battery setup, some RVgoer’s have set up their dual battery setup with 6v batteries.
When using 6v batteries for your RV, you want to wire them in series to increase the output voltage to 12 volts. Running batteries in series to get higher voltage is similar to AA house battery in a flashlight. When you slide your AA battery into a flashlight, you are connecting the bottom end of one battery to the top end of the other battery. Each end of a AA battery (which is 1.5 volts) is either positive or negative, just like a deep cycle battery . So by connecting the battery positive to the negative, you are increasing the voltage of the AA battery to what the flashlight needs (3 volts).
This same principle can apply when connecting your RV battery. To wire your 6v batteries in series to get 12 volts, take the red jumper cable and connect one end to the positive of one battery to the negative of the other battery. Then take the black wire, and do the same with the open terminals. Connect one end of the jumper cable to the open negative end and the other to the open positive terminal. This battery is now producing double voltage at 12 volts. However, the capacity of the battery remains the same.
For a lot more information, visit the Ultimate Deep Dive into 6v vs 12v RV batteries . There you will learn more about the advantages and disadvantages of each battery type.
Connecting The Second Battery To RV
Now that you have your box in place and the batteries connected to each other, it’s time to connect the batteries to your RV.
There are a couple of ways to connect your dual battery system that will work just fine. I prefer this method that I am going to share. The reason is that this method will keep multiple batteries acting as one, and the power is transferred to your RV equally from both batteries.
It sounds simple and makes sense. Nothing fancy here; make sure you have a clean and secure connection. The next step is where my preferred option comes into play.
In this method, you now connect the positive RV cable to the other battery’s positive terminal. So that means you will have just one connection to the RV from each battery. The advantage of this is that the power from each battery is transferred equally across both batteries.
Whereas, if you connect the RV wires to just one of the batteries, it would first drain that battery and then go to the second connected battery. Again, this will still work, but I prefer both batteries being equally drained vs one draining first, then the other. This also helps as your converter is trying to keep the batteries charged . It will charge both equally vs one then the other.
Step 3: Connect Your Battery Isolator
You can reconnect from the RV with a battery isolator or disconnect switch .

Since the isolator disconnects either the positive or negative cable, it will still work with your double battery setup.
Whether dry camping or always being connected to shore power , having a dual battery system in your RV is a wise upgrade. Adding a second battery gives you the advantage of increased battery power, more inverter capabilities, and a backup battery to power you up in case one battery fails. We also reviewed how to wire a 12 volt battery in parallel to keep the same voltage. As well as wiring 6 volt golf cart batteries in series to get 12 volts for the RV. Once the batteries are connected, you can connect them to the RV by the preferred method of connecting the negative to one battery and the positive to the other.

Tony is an avid camper and RV traveler. He fell in love with camping on his first RV trip with his wife over 25 years ago. Tony loves sharing lessons learned and tips about RV maintenance and safe traveling.

Adding Dual Batteries To Our Travel Trailer
Our trailer battery recently made the decision that it needed to be changed while we were out camping.
The battery came from our last camper and was roughly 5 years old.
So we went to the neighborhood auto parts shop after grabbing the battery.
Once there, we obtained two cables—one positive and one negative—to join the two batteries as well as two fresh batteries.
In the video below, we temporarily install two batteries while camping with the intention of later building a second battery box for the second battery.
Now that we are back at the home, I am finishing up the second battery installation and second battery box installation.
Due to the space that was available where the batteries were to be mounted, certain changes to the battery boxes were required.
For a thorough setup, see the video below.
NOTE: The batteries were connected by running jumper wires from the second battery to the first battery, then connecting the positive and negative lines to the first battery.
Now there won’t be any issues if just a little load is placed on the batteries; the voltage will discharge at the same pace.
However, a friend and participant in our facebook group Campers Life did suggest that a better approach to connect the batteries would be to attach the positive line from the trailer to one battery and the negative cable to the second battery’s negative post.
This will enable both batteries to be discharged at the same pace under large loads, which is a brilliant suggestion.
I’ll rewire the batteries in that fashion in a future video.
When I finish the improvement, I’ll release a new video.
Adding Second Battery To RV Videos Suggestions From Youtube
Published on September 25, 2022

Meet Bob & Sarah

We're Bob & Sarah, the RVers behind RVing Beginner. We love RV travel, useful gear, and all things nature. Read more…
About Us - Contact Us - Privacy Policy - Terms Of Service - Affiliate Disclosure - Sitemap
Copyright © RVing Beginner 2022

Quick guide on connecting 2 RV Batteries

If you are looking for more power for your RV, connecting 2 RV batteries is a novel solution to your problem. Joining 2 RV batteries together increases the voltage, the capacity, or both to give you more power.
With that said, how do you connect 2 RV batteries safely? This article is going to outline how to connect 2 RV batteries – specifically AGM batteries for RVs.
Two options – in series or parallel?
There are two ways to connect RV batteries – either in series or in parallel.
Connecting 2 RV batteries in series
This method adds the voltage of both batteries together while keeping the same amount of amp hours.
When connecting 2 RV batteries in a series, you use jumper cables to connect the negative terminal of the first battery to the positive terminal of the second one. Using the second set of jumper cables, connect the two open terminals to your appliance.
Caution: Never cross the open positive and negative terminals as this will cause a short circuit and damage the battery.
Connecting 2 RV batteries in parallel
This type of connection increases the capacity rating of your setup, but the voltage won’t change.
When connecting 2 RV batteries in parallel, you will want to use a jumper cable to connect both positive terminals and a second jumper cable to connect both negative terminals of the batteries. This should give you a positive/positive and a negative/negative connection.
Although you can connect your entire load to one of the batteries, it will drain them both equally with no issue. With that said, the best way to connect 2 RV batteries in parallel is to connect the positive at one end of the battery, with the negative being connected to the other side. This helps equalize the charge distribution and keeps both batteries in good condition.
If you are unsure about the best approach to connecting 2 RV batteries, try to think about your usage. Do you need more capacity or more amp hours? Your answer will guide you toward the best setup. Remember to always stay safe when working with batteries and make sure your connections are correct. A diagram of your progress can be a good way to stay on track.
- Deep Cycle Batteries
- Lithium Batteries
- 6 volt and 12 volt
- News & Updates
- RV Articles
- Boats / Marine Articles
- Racing Car Articles
- AGM Battery Articles
- LiFePO4 Market Articles
Recent Posts
- Getting AGM Batteries for Cold Winter Weather
- The Powerhouse on Wheels: Why AGM Batteries are Perfect for RVs
- Sell Me AGM Batteries !
- The Best Batteries for RV Adventurers – Lifeline AGM RV Batteries
- Boat Battery Isolators & Separators and Tips to Install Them
- How to choose the best marine battery for your boat
- How to charge 2 RV batteries

Pete's RV Info Blog
Everything rving, 12-volt dual battery setup.
Pete’s RV-TV YouTube Channel Resident RV Expert Randy Murray displays how to properly connect two 12 volt batteries in parallel for added dry camping power. By connecting the campers positive wire to the positive terminal on one battery and connecting the campers ground wire to the negative terminal on the second battery, Randy illustrates the correct way to achieve equal battery drain and how to ensure top notch battery life.
Rather than a single battery connection where you will be required to replace it with a fresh battery, a dual connection alleviates this procedure and provide more even use of battery life. With the use of jumper wires (one for both positive and negative as Randy explains) that are equal or greater to the gauge of wire found on your camper, connect each line to the corresponding positive and negative battery to complete the connection and enjoy some extended dry camping.
Video Transcript for “12-Volt Dual Battery Setup”
Randy: Hey guys. Randy from Pete’s RV here today, another quick tip segment for you. This segment is going to be for our dry campers out there or the people looking to get a little bit more longevity out of their battery. So hooking up a couple batteries on to your 12 volt supply camper.
What we’re going to do here today is we’re going to hook up 2 batteries in parallel. So we’ll have 2 12 volt batteries to provide power to our camper so we can use it off the grid for a little while longer. First thing you want to do when you’re hooking something up in parallel is figure out which is positive and which is negative on your battery. This is very important for us. And the next thing you want to do is you want to make yourself some jumper wires or you could purchase these at an automotive store, or we can make them for you here at Pete’s RV as well.
So when we’re hooking something up in parallel, we’re pretty much going positive to positive and negative to negative. Back to the jumper wires that I just talked about, is we want to make sure the jumper wires that we use are going to be equal or a greater gauge than the wires that are on the camper. If we use wires that are too small, now our wires become the fuse, rather than the fuse that we’ll have inside the camper to protect this coach. A smaller wire could actually heat up and melt, where a larger wire will not. So we want to make sure that those wires are the appropriate gauge.
So we’re going to go ahead and put these batteries up here on the camper, show you how to hook them up in parallel, give you a little bit more longevity out of those batteries when you’re dry camping.
All right, so here we are on the front of our Bullet Premier that we have here in the Burlington, Vermont location showroom. I’m doing this video today without battery boxes, which we would usually install on here to protect the batteries but a little bit easier to see it while shooting the video so we’re going to leave those out today.
So what I’ve done is I’ve situated my batteries on the A-frame here. This, , unit is set up to take 2 batteries. And I’ve got my ground wire and my positive wire that normally feed the camper on a one battery set up. Now you can always tell your ground wire because it’s going to be hooked to the A-frame or to the chassis of the coach, and that’s how we achieve ground throughout the coach.
So I know this wire’s my ground wire because it’s hooked right here to the A-frame. This black wire here is going to be my positive wire, because it goes to back to one of the resetting breakers on the front of this camper. So I’ve hooked my battery to the positive, and I’m going to take this ground wire and I’m actually going to hook it to the negative on the opposite battery. That way we’re pulling both of these batteries down together. If we hook them both to one, chances are the second battery is going to be pulled down at the same rate as the first battery.
Another important thing when you’re doing a set up like this is to use batteries purchased at the same time. If you use one older battery and one newer battery, you’re only as good as your lower battery, and that’s going to shorten your battery life. So make sure the, batteries are equal and purchased at the same time and they start out fresh.
So I’ve got the negative, the positive hooked to the positive over here on the battery, which is going to be kind of hard to see there, but I can see it here. I’ve got the negative hooked up here. So now what we, we’re going to want to do is hook up another positive wire from the positive of this battery to the positive of this battery. We’re going to go ahead and put our nuts on now. Lock that down there. I’ll put this guy on here. Good idea is snug these up pretty good, and make sure that the terminals are very clean and the battery connections are very clean on your wires as well. That way you’re going to get the best voltage you can have supplied to you.
I’m going to set this one over here to the negative. Turn it around, a little bit easier to hook it up for us. Put that nut on there. Tighten that down. I’ll go back and snug things up later with one of my wrenches. I’m going to hook this negative here. So now we have just successfully hooked these 2 batteries up in parallel, so it’s going to give us 12 volt supply to the coach and going to give us a lot more longevity when we are using this camper in a dry camping situation. Now these batteries will be charged while we’re driving down the road. If you’ve got an appropriate charge line in the truck, that’s the best way to charge these batteries.
But there’s a simple parallel hook up, positive to positive, negative to negative. Make sure you put your positive from the trailer on one battery, your negative from the trailer on the other battery. That way they will decell at the same time, and make sure your batteries are purchased at the same time. We’ve always got discounted pricing here on batteries at Pete’s RV Center so we can take care of you in that regard as well.
So there it is in a nutshell. Parallel wiring two 12 volt batteries. This’ll get you where you need to go on your dry camping. Thanks again for watching Pete’s RV with Randy today, and come see us on our Facebook page. Check us out on YouTube as always. And once again, thanks for thinking of Pete’s RV and happy camping.
Pete’s RV Center is an exceptional dealership group serving the United States and Canada since 1952. With multiple locations, Pete’s RV provides sales, service, parts, accessories, and education to our community of RVers all across North America.
Share this:
Discover more from pete's rv info blog.
Subscribe now to keep reading and get access to the full archive.
Type your email…
Continue reading
How to wire RV batteries | 12V or 6V
This post may contain affiliate links. See our privacy policy for details.
A lot of us want to be off-grid when RVing. Away from the crowds (and covid!), out in nature, enjoying the silence, the open spaces and the solitude. But the biggest hurdle for us modern day RVer’s (other than water) is getting enough power. I mean, we have fridges and laptops and water pumps, phones and lights that all need powering.
Having an efficient battery bank that is large enough for your power needs is the first step.
Regardless of what RV battery or batteries you use, it is of course not advised to let them drain completely. For example, lead-acid batteries can become damaged when they’re drained by half, and Lithium-ion batteries can only be drained by 20% before you see damage.

Plus, although you may use a solar panel or generator to charge your RV batteries daily you’re still going to want to have a good amount of power stored up, so you can use as much electricity as you need day and night while avoiding significant damage to your RV batteries.
The easiest solution to this problem is to power your RV with more batteries. But how simple is it to do this?
Below, I’ll take you through the pros and cons of both a 12v battery set-up and a 6v battery set-up, and how you can correctly wire multiple batteries to both.
This post contains affiliate links. Please see our disclosure for more information.
12v Battery Set-Up: Pros And Cons
When not connected to an electrical hook-up, RVs as well as travel trailers, truck campers, vans, and 5th-wheels require 12-volt power to run.
A 12 volt marine deep cycle battery is the most popular type of battery you’ll find in RVs, and these are readily available in stores no matter where you are. When buying from a dealer they will usually install one or two 12v batteries connected in parallel.
12v batteries also tend to cost less than 6v ones, and it’s very easy to connect two 12v batteries together to increase the amp hours.
Amp hours are the unit of measurement that gives you a rough idea of how much storage your RV battery has.
Most RV/Marine deep cycle batteries can store about 35-70 amp hours, but you can also purchase deep cycle RV batteries with significantly more or less amp hour storage.
If you camp without a hook-up on the weekend, or if you’re a full-time RVer who tends to camp with hookups in RV parks or campgrounds, I would suggest a battery set-up with at least 70 amp hours, regardless if it is with one or two 12v RV batteries.
- It only takes one 12v battery to power an RV. But if you have two 12v batteries this comes in handy if one of the batteries fails.
- 12v deep cycle RV batteries are often more budget-friendly.
- You can easily find them in smaller, regular stores.
- Each 12v battery that is connected in parallel increases amp hours. If connected properly, you can add as many 12v batteries as you like.
- The more amp hours a 12v battery can store, the larger it gets. For example, one 200ah 12v AGM deep cycle RV battery can weigh up to 114 lbs.
- Not as durable as a 6v battery, but a high-quality 12v battery (such as AGM, Gel, or Lithium) that isn’t a marine deep cycle battery can be fairly hardy.
- If you have a smaller storage area in your RV for your battery it may not be able to accommodate a larger 12v high amp hour battery.
6v Battery Set-Up: Pros And Cons
You may be wondering why you would want a 6v battery set-up for your RV. After all, RVs run on 12v power, right? Well, there are ways that I will discuss below that you can wire batteries together, and these are series and parallel.
Wiring a 6v battery parallel is the same as wiring 12v RV batteries, as you are making the batteries larger while keeping the voltage the same. However, when wiring in series you are increasing the voltage, but the amp hour capacity remains the same.
Since 12 volts is needed to power an RV, you therefore need at least two 6v batteries to power it. To add more batteries in the future these will also need to be added in pairs. Most RVers have their two 6v batteries wired in series, and a 6v 225ah AGM deep cycle RV battery weighs around 71 lbs.
When two of these batteries are combined, you get a 12v battery that is still 225ah.
This is perhaps simpler to understand when you consider this in watt-hours, and you can calculate the watt-hours of a battery by multiplying the total voltage by the amp hours. For example, one 12v RV battery with 100ah will have 1,200 watt hours, while two 12v RV batteries with 100ah will have 2,400 watt-hours.
Meanwhile, one 6v RV battery with 225ah will have 1,350 watt-hours. You may have noticed that while the amp hours are significantly more on the 6v battery than the 12v battery, the watt-hours will be fairly similar. This is simply because you are multiplying by 6 and not by 12. Therefore, two 6v batteries with 225ah will equal 2,700 watt-hours.
- Often, 6v batteries are more durable than 12v batteries. For example, 12v marine deep cycle batteries that are not actually deep cycle batteries are not great to use in your RV.
- More manageable than larger 12v batteries.
- Don’t take up as much space as 12v batteries.
- If you have two 6v batteries and one of them fails, you will not be able to run your RV.
- Not as easy to find in regular stores than 12v batteries.
- Not as budget-friendly as 12v batteries.
Correctly Wiring Multiple 12 Volt Batteries To An RV

It’s actually not too difficult to wire more than one 12v RV battery to an RV and you typically don’t need to call a professional in. However, there could be a couple of ways in which it can go wrong.
Your aim is to correctly wire the 12v batteries together in parallel, so there is even balance of power between all the batteries. This not only extends the life of your batteries, but helps them to work better.
Firstly, you will need the proper wire to wire the RV batteries together. The recommended sizes are 6-4 AWG copper wire, with 4 AWG being the most effective as it has the least resistance, making the transfer of power from the batteries more efficient.
Of course, every battery set-up will differ depending on the size of the batteries you’re using and the area where they will be stored, but you can’t go wrong with a generous length of red and black 4 AWG copper wire with the correct type of battery terminal connectors.
The Windy Nation 4 AWG Wire Kit is ideal for most deep cycle RV batteries and has enough wire length for average connections. But if you would like to wire together over 4 RV batteries or there will be quite a bit of distance between the batteries connecting, it’s best to buy more to be safe.
To correctly wire your batteries you will also need to have a crimping tool to hand, like this IWISS Cable Lug Crimping Tool . You can attempt the wiring without it, but it will be difficult to get tight or secure connections without it. This could lead to more resistance, and your battery may not work at all.
Parallel wiring: When connecting batteries through the parallel method you combine positive terminals to the positive ones and the negative terminals to the negative ones. This means that you create a larger battery with the same voltage.
However, you can’t combine batteries with different voltages, and I would warn against combining batteries of different sizes and ages, although it is possible to do so through the parallel method. When wiring 12v batteries you need to use the parallel method, as you want the voltage to stay the same.
This is in contrast to 6v batteries where you want to increase the voltage.
The incorrect way to parallel connect 12v batteries: If your load wires that connect the batteries to your RV have been placed on the same battery, then you’ve incorrectly parallel connected the 12v batteries. This puts an uneven amount of pressure on the first battery, and not enough pressure on the last battery in the line.
If you parallel wire your RV batteries this way, the original batteries will drain much faster than the other ones. The load instead needs to be distributed evenly, so the batteries are charging and discharging simultaneously.
The correct way to parallel connect 12v batteries: Each wire running from each battery needs to measure the same length, otherwise more resistance is added to the one battery and this causes the circuit to be unbalanced. However, a flaw in this method is that not everybody will have the space in their RV to add external terminal posts.
If you would like to create a big solar power bank with more than 8 batteries you need to make sure you use the parallel method correctly to keep your batteries in good condition, but for a couple more RV batteries there are other ways you can wire your batteries for more balanced batteries.
Wiring 2 12v batteries to an RV: This is one of the most popular battery set-ups, and what most RV manufacturers and dealers accommodate for. What makes this method correct is that it involves the load wires from the RV being connected to different batteries. This distributes the load evenly and gives you a more balanced circuit.
Wiring 3 12v batteries to an RV: As soon as you start adding over two batteries with this method, the less efficient it becomes. Still, adding another battery shouldn’t make too much of a difference, so you can add a third 12v RV battery the same way as you would add a second.
The load wires should still be placed on the outer batteries, in order for the middle battery to distribute power evenly. The battery in the middle will be releasing fewer amps than the two batteries on the end, but this difference should be minimal.
For three perfectly balanced RV batteries, then you can turn to the parallel method or the cross-diagonal method I’ll be discussing shortly.
Wiring 4 12v batteries to an RV: When adding 4 batteries to your RV, the wiring gets a bit more complicated. You can still chain the terminals together like the methods above, but this makes things more unbalanced. You start by connecting two pairs of batteries with a short wire.
You then connect the two pairs of batteries with a long wire, combing the two groups of batteries. You then connect your load RV power wires to the terminal in the middle with the short and long wire on it, making sure the negative and positive load wires are connected to two separate batteries.
Once everything is wired correctly, the load wires should connect to the batteries in the middle. Every battery should have a long and short wire connected to it that keeps the batteries balanced and the four batteries even. Adding a few different types of connections gives you the optimum balance, more than a standard chain of connections that has load wires on their ends.
However, if 4 batteries placed next to each other won’t fit in your battery storage space, then you can connect them using the cross-diagonal method. In the cross-diagonal method, each battery has a long and short connecting wire that is still perfectly balanced.
Correctly Wiring Multiple 6v Batteries To An RV
If you would like to power your RV with more durable batteries and want batteries with more total amp hours, then 6v batteries might be the right choice for you. As we have already discussed, there are arguments for and against using 6v batteries over 12v batteries, but ultimately what batteries are best for you will depend on personal preference.
Wiring 6v RV batteries is slightly different to wiring 12v batteries. The voltage will need to be increased to 12 volts, as an RV cannot run on just 6 volts. You can increase the voltage by wiring two 6v batteries together in series by connecting a positive and a negative. This increases the voltage while the amperage remains the same.
For example, if you wire two 12v 100ah deep cycle RV batteries together in parallel you still have 12 volts but 200ah. However, if you wire two 200ah 6v batteries together in series you still have 12 volts and the amp hours stay at 200.
Fortunately, you can combine series and parallel wiring with 6v batteries, meaning you can combine 4 or more batteries and keep the voltage at 12 while increasing the amp hours. However, you should never combine different amp hour 6v batteries. You must always use the same size, type, and – if you can – age.
Wiring 2 6v batteries to an RV: Firstly, connect the 6v batteries in series, so you now have a 12v battery. This can be achieved with a small piece of wire such as the 4 AWG copper wire mentioned earlier. You still attach the load wires to different batteries, and you should never have both load wires connected to one 6v battery.
Wiring 4 6v batteries to an RV: If you’ve wired 2 6v batteries in series to make a 12v battery then it’s simple to wire 2 or more 6v batteries together in series or parallel to get more amp hours. You can do this by combining each pair of 6v batteries, and then wire them together in parallel like you would with 2 12v batteries.
However, you should make sure you connect the load (or the RV power) wires to different pairs of 6v batteries. This doesn’t just balance the batteries out, but helps them to last longer too.
Wiring 6 6v batteries to an RV: With 6v batteries you can create large battery banks, but using over 4 6v batteries will be significantly heavy, even for RV use. But if you need a lot of energy for your RV, you can easily wire 6 6v RV batteries together with the same series/parallel method.
The batteries need to be suitably balanced, just like wiring 3 12v batteries together. For more balance you can use the cross-diagonal method to balance them further, but it won’t make too much of a difference.
Frequently Asked Questions
What awg of wire should i use to connect rv batteries together.
4 AWG is usually the best for connecting RV batteries together but 6 AWG will also provide good results.
When Multiple Batteries Are Wired Together, Where Is The Battery Charger Connected?
The battery charger always needs to be connected to the same battery terminals that the load wires are connected to. This makes sure the batteries charge evenly, meaning that no battery is overcharged while the other batteries on the same circuit are getting charged appropriately.
Do I Need Two Batteries For mMy RV?
It all depends on the voltage of your batteries. If you are using 6v RV batteries then you will need at least two in order to achieve the 12 volts of power needed to power the RV. If you are using 12v batteries then you only require one, but it is recommended to get either a large 100ah 12v deep cycle RV battery, or two smaller 35-50ah 12v deep cycle RV batteries.
Can I Combine Batteries With Different Amp Hours (ah)?
Again, it all depends on what batteries you have and how you plan on wiring them.
If you are wiring 6v batteries in a series then you shouldn’t mix batteries with different amp hours. However, if you are wiring in parallel like you normally would with 12v batteries, then you can use different size batteries as long as the voltage is the same.
However, I cannot stress enough how important it is not to mix batteries of different ages. Anything with a 6-month age difference you shouldn’t wire together.
Should An RV Always Be Plugged In?
If you would like to leave your RV constantly plugged in all the time, you need to first check to make sure your RV has a smart or 3-stage charger in the converter. Older RV models may just have an older type of trickle charger in the converter that can overcharge your batteries, which can be as damaging as your batteries dying completely.
However, if your RV does have an older charger, you can easily replace it with a different, newer one. If you have a smart or 3-stage charger in your RV then always leaving the batteries plugged in should be safe to do.
However, you should always regularly check on your batteries and monitor their water levels to see if the batteries are flooded with lead-acid.
Is It Better To Wire RV Batteries In Series Or Parallel?
Again, this will all depend on what type of batteries you are using.
12v batteries always need to be wired using the parallel method, so the voltage is the same, but the amperage is increased. However, 6v batteries need to be wired in series and in pairs, so they have the same power as a 12v battery.
When two 6v batteries are wired together in series, you can then wire them to another pair of 6v batteries using the parallel method.
What Is The Difference Between Wiring RV Batteries In Series And Wiring RV Batteries In Parallel?
When batteries are wired in series then the voltage is increased. For example, two 12v batteries that are wired in series will turn into a huge 24v battery, which is a bit excessive for use in an RV. This is why you instead wire them in parallel, so the amp hours are increased rather than the voltage.
Since wiring batteries in series increases the voltage, you can connect two 6v batteries. This creates a 12v battery that is now adequate to power an RV.
Do RV Batteries Wired In Parallel Have A Longer Lifespan?
When wired correctly and with the right balance, 12v batteries that are wired in parallel definitely have a longer lifespan. However, if incorrectly wired, then the battery that is directly connected to the RV may drain and wear out sooner than the other batteries.
Wiring in series can take more of a toll on batteries, but 6v batteries are preferred for their durability, and the difference between 2 6v batteries wired in series compared to two high-quality 12v RV deep cycle batteries wired in parallel is extremely minimal.
Final Thoughts
Your RV uses a lot of power to truly make it a home away from home, and your RV needs to be powered by a battery that can meet its demands.
A 12v battery provides an adequate voltage, while you will need two 6v batteries to properly power your RV. However, even when your RV is powered by a 12v battery, it is recommended to wire multiple batteries to the original, in case your original battery fails.
Luckily, wiring multiple batteries is easy using one of three methods; wiring batteries in parallel, wiring batteries in series, or using the cross-diagonal method.
Whatever method you choose, make sure the batteries you’re using are compatible in age, type, and size, and that they can distribute power evenly.
Similar Posts

Difference Between Weight Distribution & Sway Control

10 Ways to Make Your RV Feel Not So Small

RV Computer Desks | Working on the Road

RV Christmas Decorations

14 Travel Trailer Bathroom Remodel Ideas

Doing Laundry in an RV
Leave a reply cancel reply.
Your email address will not be published. Required fields are marked *

Properly Hooking Up RV Battery: Identifying Positive and Negative Wires
When it comes to hooking up an RV battery, one crucial question arises: how do you identify the positive and negative wires ? Is it as simple as black and white? Or is there more to it than meets the eye?
In this article, I will guide you through the process of correctly identifying the positive and negative wires in your RV battery. Understanding the proper wiring setup is essential to ensure the smooth functioning of your RV’s electrical system.
Key Takeaways:
- Correctly identifying the positive and negative wires is crucial when hooking up an RV battery.
- Black is the hot wire and should be connected to the positive terminal of the battery.
- White is the negative or ground wire and should be connected to the negative terminal of the battery.
- Consulting the RV’s wiring diagram or seeking professional assistance is recommended to ensure proper connection.
- Following the correct wiring color coding is essential to ensure the efficiency and safety of your RV’s electrical system.
- 1 Understanding RV Battery Wiring Diagrams
- 2 Differentiating Between Positive and Negative Wires
- 3 Connecting RV Batteries in Parallel
- 4 Grounding the RV Battery
- 5 Troubleshooting Battery Wiring Issues
- 6 Importance of Proper Battery Cable Assembly
- 7 Preventing Battery Terminal Corrosion
- 9 Source Links
Understanding RV Battery Wiring Diagrams
When it comes to properly wiring an RV battery system, it’s essential to have a clear understanding of the wiring diagrams. RV battery wiring diagrams provide a visual representation of how the positive and negative wires should be connected to the battery terminals. These diagrams not only help with the installation process but also ensure that the system is wired correctly according to the manufacturer’s specifications.
RV battery wiring diagrams often include additional components and devices that may be connected to the battery, such as inverters and monitors. By referring to these diagrams, you can ensure that all the wires are connected properly, and the system is set up in the most efficient and effective way.
Whether you’re a beginner or an experienced RVer, understanding and following the RV battery wiring diagram is crucial for a successful installation. It eliminates guesswork and ensures that your RV’s electrical system operates smoothly.
Differentiating Between Positive and Negative Wires
In an RV electrical system , it is essential to understand how to differentiate between the positive and negative wires. The correct identification of these wires is crucial for the proper installation and functioning of the RV battery. In most RV systems, the standard convention is to use specific colors to designate positive and negative wires.
The positive wire, also known as the hot wire, is typically colored black in RV electrical systems. It carries the electrical current from the battery to power various components and devices in the RV. On the other hand, the negative wire, also known as the ground wire, is usually colored white. It serves as the return path for the electrical current and provides the necessary grounding for the system.
It is important to note that the color coding for positive and negative wires in an RV may differ from the wiring in a typical car or other electrical systems. In car wiring, black is often used for the negative wire, while in an RV, it represents the positive wire. Therefore, it is crucial to understand and follow the specific color coding used in RV systems to avoid any confusion or potential wiring errors.
If you are unsure about the wiring color coding of your RV, consult the RV’s wiring diagram or seek assistance from a qualified electrician. The wiring diagram provides a visual representation of the RV’s electrical system, indicating the proper connections for the positive and negative wires. This diagram can be a valuable resource for ensuring the correct installation and wiring of the RV battery.
Understanding the differentiation between positive and negative wires is fundamental in maintaining a safe and efficient RV electrical system . By following the RV battery wiring guide and adhering to the proper color coding, you can ensure the electrical components of your RV function optimally.

Wiring Color Codes
Connecting rv batteries in parallel.
One of the ways to increase the overall power capacity in an RV system is by connecting multiple batteries in parallel. This configuration allows for equal distribution of power across all the batteries, providing a more efficient and reliable power source.
To connect RV batteries in parallel, it is essential to follow the manufacturer’s instructions and refer to the wiring diagram specific to your RV model. Here is a step-by-step guide:
- Start by ensuring that all batteries used for parallel connection have the same voltage and amp-hour rating. Mismatched batteries can lead to unequal charging and discharging, affecting the performance of the entire system.
- Identify the positive and negative terminals of each battery. Typically, the positive terminal is marked with a (+) sign, while the negative terminal is marked with a (-) sign.
- Connect the positive terminal of one battery to the positive terminal of the other battery using a suitable-sized battery cable.
- Connect the negative terminal of one battery to the negative terminal of the other battery, ensuring a secure and tight connection.
- Repeat this process for each additional battery being connected in parallel.
Note: It is crucial to use appropriate-sized battery cables and connectors to handle the combined current of the parallel connected batteries. Consult the wiring diagram or seek professional assistance to ensure the correct gauge of wires is used.
By connecting RV batteries in parallel, you can enhance the power capacity of your electrical system, enabling you to run more appliances and devices while enjoying extended periods off-grid. Remember to always take the necessary precautions and follow the manufacturer’s guidelines to ensure the proper functioning and longevity of your RV battery setup.
Grounding the RV Battery
In order to ensure the safety and efficiency of your RV’s electrical system, proper grounding of the RV battery is essential. By securely connecting the negative or ground wire of the battery to the RV’s frame or chassis, you create a safe pathway for electrical current in the event of a fault or short circuit.
To achieve the best results, it is crucial to use the appropriate gauge of wire for grounding and ensure a solid connection between the wire and the frame. This will facilitate the smooth flow of electricity and help prevent any potential hazards.
In addition to proper grounding, it is important to regularly inspect and clean the battery terminals to prevent corrosion. Corrosion can impede the flow of electricity, leading to poor battery performance and potential malfunctions in the electrical system.
When inspecting the battery terminals, look for any signs of corrosion such as white or greenish deposits. These can be cleaned using a wire brush and a mixture of baking soda and water. Gently scrub the terminals to remove any corrosion, ensuring you also clean the cable connectors.
By maintaining a good electrical connection and preventing corrosion, you can enhance the longevity and functionality of your RV’s battery and electrical system.

Troubleshooting Battery Wiring Issues
If you experience issues with your RV battery wiring, such as clicking sounds or malfunctioning electrical devices, it is important to troubleshoot the problem. Follow these steps to identify and resolve common battery wiring issues:
- Visually inspect battery connections: Start by examining all the battery connections for any loose or corroded wires. A loose connection can disrupt the flow of electricity and cause malfunctions. Tighten any loose connections and clean any corrosion using a wire brush.
- Ensure correct wire connections: Check that all wires are connected to the correct terminals. Incorrectly connected wires can lead to crossed circuits or reverse polarity, causing damage to the electrical system. Refer to the RV’s manual or wiring diagram for guidance.
- Test voltage and continuity: Use a multimeter or volt-ohm meter to test the voltage and continuity in each wire. This will help identify any faulty or disconnected wires. Measure the voltage at various points along the wiring to pinpoint the location of the issue.
- Check fuses and breakers: Inspect the fuses and breakers related to the battery wiring. A blown fuse or tripped breaker can disrupt the electrical flow and cause issues. Replace any blown fuses and reset any tripped breakers.
If you are unable to identify or resolve the wiring issue on your own, it is recommended to seek the assistance of a qualified electrician. They have the expertise and tools to diagnose and fix complex wiring problems in an RV.
“Proper troubleshooting of battery wiring issues is essential to maintain the functionality and safety of your RV’s electrical system.” — John Smith, RV Electrical Expert
Importance of Proper Battery Cable Assembly
When it comes to the safe and efficient operation of your RV’s electrical system, proper battery cable assembly is of utmost importance. Battery cables are specifically designed to connect batteries to the electrical system and ensure seamless power distribution. It is essential to choose the right size, type, and length of battery cables for your RV’s specific requirements to optimize performance and prevent any potential issues.
RV battery cable assemblies are constructed using high-quality, thick wires that can withstand the demanding conditions often encountered in RVs. These cables are built to handle vibrations, high temperatures, corrosion, and moisture, ensuring reliability and durability. By using properly assembled battery cables, you can have peace of mind knowing that your RV’s electrical system is in good hands.
Proper termination and connection of the battery cables are also crucial. The cables should be securely connected to the battery terminals, ensuring a solid electrical connection. Loose or poorly connected cables can lead to voltage drops, which can negatively affect the performance of your RV’s electrical system.
Choosing the correct cable size is essential to meet the power demands of your RV. Undersized cables can result in voltage losses and overheating, while oversized cables can lead to unnecessary weight and cost. It is recommended to consult your RV’s manufacturer or a qualified electrician to determine the appropriate cable size for your specific application.
Additionally, proper cable routing and protection are important to prevent any damage or wear over time. Cables should be routed away from sharp edges, moving parts, and hot surfaces. Using cable protectors or conduits can help shield the cables from external elements and reduce the risk of abrasion.
The Benefits of Proper Battery Cable Assembly:
- Ensures safe and efficient operation of the RV’s electrical system
- Prevents voltage drops and power losses
- Resists vibrations, heat, corrosion, and moisture
- Optimizes power distribution and performance
- Reduces the risk of electrical issues and failures
- Provides a reliable and durable connection
By prioritizing proper battery cable assembly in your RV, you can enjoy a reliable and well-functioning electrical system throughout your adventures. Take the time to choose the right cables, ensure proper termination and connection, and protect them from potential damage. Doing so will help maximize the lifespan of your batteries and enhance your overall RVing experience.
Preventing Battery Terminal Corrosion
Battery terminal corrosion is a common issue in RVs and can significantly impact the performance of your batteries and the overall functioning of your electrical system. To ensure optimal performance and extend the lifespan of your RV battery terminals , regular maintenance is essential.
The first step in preventing battery terminal corrosion is to clean the terminals and cable connectors regularly. Using a wire brush, gently remove any built-up corrosion from the terminals and connectors. This will help maintain a clean and solid connection, ensuring efficient electrical transfer.
To further protect your battery terminals, consider applying a corrosion inhibitor or dielectric grease. These products form a protective barrier that shields the terminals from moisture and corrosive elements. Be sure to apply a thin layer of the inhibitor or grease to both the positive and negative terminals.
Lastly, it is vital to check the tightness and security of the connections between the cables and the battery terminals. Loose connections can lead to voltage drops and diminished battery performance. Regularly inspect the connections and tighten them if necessary to maintain a reliable electrical connection.
By following these preventive measures and incorporating regular inspection and maintenance into your routine, you can significantly reduce the risk of battery terminal corrosion, ensuring optimal performance and longevity for your RV’s electrical system.
How do I properly hook up an RV battery?
To properly hook up an RV battery, identify the positive and negative wires. Connect the black wire, which is the hot wire, to the positive terminal of the battery. Connect the white wire, which is the negative or ground wire, to the negative terminal of the battery. Make sure not to confuse these wire colors with car wiring, where black is the negative wire.
How can RV battery wiring diagrams help me?
RV battery wiring diagrams provide a visual representation of how the positive and negative wires should be connected to the battery terminals. They also show additional components and devices that may be connected to the battery. By referring to these diagrams, you can ensure that all the wires are connected correctly and that the system is wired according to the manufacturer’s specifications.
How can I differentiate between positive and negative wires in an RV electrical system?
In an RV electrical system , the standard convention is to use black as the positive or hot wire and white as the negative or ground wire. This follows the traditional house wiring color coding. However, some RV manufacturers may use different colored wires or color stripes to indicate the function of the wires. To determine which wire is positive and which is negative, refer to the RV’s wiring diagram or contact a qualified electrician.
How do I connect RV batteries in parallel?
When connecting RV batteries in parallel, connect the positive terminal of one battery to the positive terminal of the other battery. Connect the negative terminal of one battery to the negative terminal of the other battery. This allows for equal distribution of power across all the batteries in the system. Always follow the manufacturer’s instructions and wiring diagram when connecting batteries in parallel.
How do I properly ground the RV battery?
To properly ground the RV battery, securely connect the negative or ground wire of the battery to the RV’s frame or chassis. This provides a safe path for electrical current to flow in the event of a fault or short circuit. Use the appropriate gauge of wire for grounding and ensure a solid connection between the wire and the frame. Regularly inspect and clean the battery terminals to prevent corrosion and maintain a good electrical connection.
What should I do if I experience issues with my RV battery wiring?
If you experience issues such as clicking sounds or malfunctioning electrical devices, visually inspect all the battery connections for loose or corroded wires. Make sure all wires are connected to the correct terminals and that there are no crossed or incorrectly connected wires. Use a multimeter or volt-ohm meter to test for proper voltage and continuity. If you’re unsure or unable to resolve the issue, seek the assistance of a qualified electrician.
Why is proper battery cable assembly important?
Proper battery cable assembly is crucial for the safe and efficient operation of an RV’s electrical system. Battery cables are specifically designed for connecting batteries to the electrical system and withstand harsh conditions. Choose the correct cable size and type for your application and ensure proper termination and connection to the battery and electrical system.
How can I prevent battery terminal corrosion?
To prevent battery terminal corrosion, regularly clean the battery terminals and cable connectors with a wire brush. Apply a corrosion inhibitor or dielectric grease to the terminals and ensure a tight and secure connection between the cables and the battery terminals. Monitor the battery fluid levels and keep the batteries properly charged. Regular inspection and maintenance of the battery terminals can help prolong their lifespan and ensure optimal performance of the RV’s electrical system.
Source Links
- https://www.linkedin.com/pulse/battery-cable-assembly-the-ultimate-guide-you-need-know-
- https://www.thorforums.com/forums/f8/battery-cable-help-see-pictures-25525.html
- https://thecampingadvisor.com/how-to-hook-up-rv-battery-cables/
About The Author

Kal Wiggins
Related posts.

Effortless Guide: How to Clean Camping Chairs

Fort Dummer State Park: Explore Vermont

Rooster Rock State Park: Explore Oregon

Bennett Spring State Park: Explore Missouri

False Cape State Park: Explore Virginia

Flandrau State Park: Explore Minnesota
Privacy Policy - Terms and Conditions
- You are here:
- Home »
- Blog »
- » What Gauge Wire to Connect Two 12v Batteries In Parallel

What Gauge Wire to Connect Two 12v Batteries In Parallel
- March 25, 2022 /
- RVing 101 /
- By James V.
Using the correct wiring is vital to any operating system. That includes your RV or travel trailer. Without the right wires connecting anything, you won’t have power and you may have to replace some essential devices. Always be wary of the gauge of the wire before making any connections
The official recommendation may be 4 or 6 gauge wire but for most RVs and travel trailers, 10 gauge is the correct thickness. It is rated for up to 30 amps. Anything thicker than this measurement is done to protect any current drop-off that occurs between the source of power the devices connected to it.
To learn more about this topic, just continue to read our article. It has the information you want to know about so you can make the right connection and not damage your electrical systems. Take a few moments to read up on this important subject.
What Gauge Wire Should be Used With a 12-Volt Battery?
The thickness of the wire depends more on how many amps will be running through them than anything else. The length of the wire may play a role in which wire thickness you use. The following chart shows you number of amps and the wire thickness for those connects up to 4 feet in length:
Also, these figures are for a 12-volt battery system. If you want to hook up 24-volt batteries, then you need to double the figures you see in the above chart.
Can You Wire 2 12-Volt Batteries Together?

Yes, this is possible and it is done all the time. The fact that it can be and is done every day means that it is also a very safe method to use when you need more power. The key to this safety though is to hook up the right gauge wire to the right terminals.
When you connect two 12-volt batteries in parallel, your amperage will increase. That means you need to go to a thicker cable to make the connection safe and not ruin your electrical devices.
When you are making the connection do not go from open positive to open negative as that will cause a short circuit which can harm both you and your batteries.
When you want to make a connection of 2 batteries in a series then your amp rating will remain the same but the number of volts will increase. The connecting wires should go from the negative terminal of the first battery to the positive terminal of the second battery.
The positive terminal of the first battery should connect to the negative terminal of the second battery.
What Gauge Wire To Connect Two 12v Batteries in Parallel

This will be determined by the number of amps flowing through the wires. It will also depend on the length of the wire in parallel. The longer the wire the thicker it has to be. For example, the chart says for wire length up to 4 feet a 30 amp charge requires a 10 gauge wire.
However, when the wire is 10 to 15 feet long, you need an 8 gauge wire; for 15 to 20 feet you will need a 6 gauge wire for the same amount of amps. And on it goes down to up to 30 feet in length which would need a 4 gauge wire to make the connection.
When you make the connection, make sure it is tight, and there are o frays or broken parts in the wire. Watch where you lay the wire as well as you do not want anything to disturb it when it is working.
How do You Wire 12-Volt Batteries in Parallel?

When you wire two 12 volt batteries in parallel, remember that you are not going to increase the voltage. The two or more batteries will always produce 12 volts. As we said earlier, the number of amps will increase and you have to watch the gauge of wire at this time.
10 gauge wire is rated for up to 30 amps. If your parallel system creates more amps than that level, then you have to move up to a thicker gauge wire. When you are making the connection between the two batteries, go positive to positive and negative to negative.
Be careful not to make any connections that will short circuit the system.
12v Parallel Battery Cable

You can find these wires just about anywhere wiring is sold. Your cheapest option may be Amazon. But your local electrical outlets should have enough of a selection at a reasonable price that you do not have to wait for shipping time.
Wiring is not going to be that expensive and should depend on the length you are buying. Some stores may have a minimum amount you can buy but that is okay as it is always good to have some extra wire in storage when you need it.
When you shop at Amazon, many of their wire options already come paired for parallel systems. You just have to select the vendor you want to deal with. However, going to the store and checking it out first hand can save you a lot of hassle and make the purchase simple and easy.
Some Final Words
Making the right connections depends on using the right gauge of wire. The 10 gauge option will work for most RV and travel trailers as long as you are not running more than 30 amps through the system.
Watch the distance though as you may be running longer distances which require thicker wires. You are in control here so make the right choices.
Related Posts
Does CarMax Buy RVs? (CarMax RV Trade-In Guide)
300 Lbs Over Payload: What Happens If I Exceed My Payload?
Thor Vegas Problems (Windshield, Battery, Fridge, Swivel Chair)
Leave a Comment:

How To : How the Hookup or Connect a Battery to Your Camper or RV
This video will show you how to connect the positive and ground wire on the battery of your RV or camping trailer.
There will be a red and a black or white wire for the ground, we'll show you how to hook everything up to get you up running.
Just updated your iPhone? You'll find new features for Podcasts, News, Books, and TV, as well as important security improvements and fresh wallpapers. Find out what's new and changed on your iPhone with the iOS 17.5 update.
Be the First to Comment
Share your thoughts, how to : loosen or unstick frozen rv or camper stairs that will not fold in, how to : keep mosquitoes & other annoying bugs away from your campfire or backyard fire pit, how to : tie the miller's knot (bag or sack knot), how to : make an all-night campfire with just one log, how to : bind poles together with a japanese square lash, how to : make a stone rocket stove, how to : make a comfy diy camping chair for less than 5 dollars, how to : use round lashing to build a flagpole or a-frame, how to : identify the parts of a compass, how to : set up a sleeping bags in a tent, how to : use diagonal lashings to tie poles together, how to : dehydrate food for camping, how to : lash a bamboo tripod, how to : use the common rope seizing knot, how to : pitch a pop-up tent the easy way, how to : set up a tent when camping outdoors, how to : tie two ropes together with different knots, how to : build a comprehensive chuck box for camping, how to : secure a kayak on car or suv using j bar roof rack.
- All Features
How To : Get Your Camper or RV Toilet to Stop Smelling
How to : pack personal gear for a canoe trip, how to : fix or replace a broken clearance light on popup camper and utility trailer, how to : set up popup camper or tent trailer, how to : make a survival light source, how to : make a swedish torch (aka canadian candle), how to : make a compass in your kitchen, news : brooklynites build skull-shaped igloo fortress.
- All Hot Posts
IMAGES
VIDEO
COMMENTS
If your RV or travel trailer needs more power, then you can get a second battery to give it a boost. The key will be to wire the batteries properly so you do not have a short . Wiring correctly is not hard to do. All you have to do is make sure you have enough space in the battery compartment, add a new battery box to hold 2 batteries instead ...
Travel Trailer Battery Hook Up Diagram. Generally, your system may have 2 batteries connected in a parallel system. The parallel method helps bring the power you need to all your devices without draining the batteries too quickly.
This is how you hook up two batteries to your travel trailer so that you can get an extra day or two of power when your not hooked up to power. They charge f...
Even my travel trailer came with two deep cycle 12 volt batteries in plastic battery boxes, wired in parallel, and neatly stored on the front of the trailer. ... It has to be a battery issue because when I hook up a single 12 volt everything works fine. The 6 colts are brand new. Thank you. Reply. Jenni. May 24, 2021 at 1:57 am . Hey Lisa,
This video will show you how to connect the positive and ground wire on the battery of your RV or camping trailer.There will be a red and a black or white wi...
In a travel trailer, the battery box is located at the front of the camper near the hitch. A couple of pieces of angle iron or steel usually act as a tray for your battery box. ... and a backup battery to power you up in case one battery fails. We also reviewed how to wire a 12 volt battery in parallel to keep the same voltage. As well as ...
Our trailer battery recently made the decision that it needed to be changed while we were out camping. ... I am finishing up the second battery installation and second battery box installation. ... For a thorough setup, see the video below. Adding Dual Batteries to our Coleman 202RD Travel Trailer - Diy RV and Home. NOTE: The batteries were ...
Connecting 2 RV batteries in series. This method adds the voltage of both batteries together while keeping the same amount of amp hours. When connecting 2 RV batteries in a series, you use jumper cables to connect the negative terminal of the first battery to the positive terminal of the second one.
Pete's RV-TV YouTube Channel Resident RV Expert Randy Murray displays how to properly connect two 12 volt batteries in parallel for added dry camping power. By connecting the campers positive wire to the positive terminal on one battery and connecting the campers ground wire to the negative terminal on the second battery, Randy illustrates the correct way to achieve equal battery drain and ...
You will need to disconnect the trailer from the vehicle when parked for extended periods, or use a battery isolator, item # PK5231201 to keep your vehicle battery from being discharged if the trailer batteries are being used.
12v Battery Set-Up: Pros And Cons. When not connected to an electrical hook-up, RVs as well as travel trailers, truck campers, vans, and 5th-wheels require 12-volt power to run. A 12 volt marine deep cycle battery is the most popular type of battery you'll find in RVs, and these are readily available in stores no matter where you are.
I'm not sure how to hook them up. There is not enough room for two small 6-volt batteries, as the space is quite small. Can you help me? —Stan S. Hi Stan, Parallel 12-volt batteries are interconnected by routing a battery cable from the positive post of one battery to the other positive post on the other battery.
The following quotes from the OP link also supports my findings of which battery bears the brunt of cycle duty: "The bottom battery provides 35.9 amps of this. The next battery up provides 26.2 amps. The next battery up provides 20.4 amps. The top battery provides 17.8 amps. So the bottom battery provides over twice the current of the top battery."
How do you hook two 12 volt or 2 6 volt batteries up to an RV or motorhome? This video shows you the easiness of the way.
Step 2 - Disconnect the Old Batteries. First disconnect the old battery by unscrewing the negative and positive battery clamps. It should be noted that the positive leads from the trailer are normally black wires and negative leads are white. This is different from other automobiles, where usually red is positive and black is negative.
To properly hook up an RV battery, identify the positive and negative wires. Connect the black wire, which is the hot wire, to the positive terminal of the battery. Connect the white wire, which is the negative or ground wire, to the negative terminal of the battery.
Let's review the four types of battery banks typical in RV house systems: single 12 volt, double 12-volt, double 6-volt, and four series-parallel 6-volt. Yes, they all add up to 12 volts, but in different ways. Single 12-volt battery. For a single 12-volt battery placing a disconnect switch is usually pretty simple.
The official recommendation may be 4 or 6 gauge wire but for most RVs and travel trailers, 10 gauge is the correct thickness. It is rated for up to 30 amps. ... Also, these figures are for a 12-volt battery system. If you want to hook up 24-volt batteries, then you need to double the figures you see in the above chart.
Jayco RV Owners Forum > Trailers, 5th Wheels, and Motorhomes > Jayco Travel Trailers: battery wiring schematic Click Here to Login: Register: Registry FAQ: Community: Calendar: Today's Posts ... Is it as simple as the series hook up in the picture, hot to hot, ground to ground, using 8 or 10 gauge wire? _____ 2012 264BH Q56 Infiniti 02-11-2013 ...
How To: Get Your Camper or RV Toilet to Stop Smelling ; How To: Avoid RV problems by cleaning your hookup cord ; How To: Loosen or Unstick Frozen RV or Camper Stairs That Will Not Fold In ; How To: Keep RV Boat Classic Car Battery Charged During the Winter ; How To: Fix an overcharging battery problem on your RV
Would like to know how to hook up my battery to my trailer connections - I took the batteries off in the fall and forgot to write down the info - I have a 91 17' Bigfoot trailer - I have connected the two 6V batteries (positive to negative)together with the short cable but now I need to hook up the rest - I am left with a red wire, two black wires and a white wire to hook up to the battery.
Their ONLY job is to blow if you hook up the battery backwards. They disconnect all 12 volt power to the camper to protect your electronics. ... is a breaker between the battery and the converter located under a red cover located within 18 inches or so of the battery. On a travel trailer it is located on the frame (looks like the photo) and it ...
Everything worked, but now battery is good, but doesn't charge when plugged in to rv park. Have to keep a trickle charger on all the time for the fridge, lights and all ac stuff. 2006 R. Vision Trsil sport 25ft travel trailer. Checked the fuses and battery. They are good. Cannot find a convertor anywhere. Hoping it is not under the oven and ...